ChevyParts
My Garage
My Account
Cart
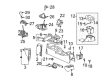
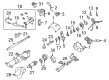
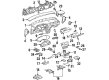
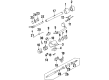
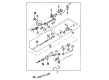
OEM Chevrolet Door Jamb Switch
Door Jamb Interior Dome Light Switch- Select Vehicle by Model
- Select Vehicle by VIN
Select Vehicle by Model
orMake
Model
Year
Select Vehicle by VIN
For the most accurate results, select vehicle by your VIN (Vehicle Identification Number).
30 Door Jamb Switches found


Chevrolet Door Jamb Switch Part Number: 15739935
$7.48 MSRP: $11.14You Save: $3.66 (33%)Ships in 1-2 Business DaysProduct Specifications- Other Name: Switch, Dome Lamp; Door Ajar Switch; Switch, Courtesy Lamp And Door Ajar


Chevrolet Door Jamb Switch Part Number: 22601896
$10.84 MSRP: $16.97You Save: $6.13 (37%)Ships in 1 Business DayProduct Specifications- Other Name: Switch, Dome Lamp; Lamp Switch; Jamb Switch; Switch; Switch, Courtesy Lamp And Door Ajar; Switch, Cargo Lighting
- Replaces: 15686635


Chevrolet Door Jamb Switch Part Number: 22600228
$8.85 MSRP: $13.85You Save: $5.00 (37%)Ships in 1-2 Business DaysProduct Specifications- Other Name: Switch, Dome Lamp; Door Ajar Switch; Jamb Switch; Switch, Door And End Gate Electrical; Switch, Courtesy Lamp And Door Ajar


Chevrolet Door Jamb Switch Part Number: 88891785
$7.11 MSRP: $11.14You Save: $4.03 (37%)Ships in 1-3 Business DaysProduct Specifications- Other Name: Switch, Dome Lamp; Switch
- Replaces: 15959494


Chevrolet Door Jamb Switch Part Number: 15676080
$18.36 MSRP: $28.74You Save: $10.38 (37%)Ships in 1-2 Business DaysProduct Specifications- Other Name: Switch, Courtesy Lamp And Door Ajar; Switch, Dome Lamp

Chevrolet Door Jamb Switch Part Number: 15905665
$8.63 MSRP: $13.50You Save: $4.87 (37%)Ships in 1-3 Business DaysProduct Specifications- Other Name: Switch, Door And End Gate Electrical; Jamb Switch; Switch, Dome Lamp

Chevrolet Door Jamb Switch Part Number: 96235956
$4.74 MSRP: $7.05You Save: $2.31 (33%)Ships in 1-2 Business DaysProduct Specifications- Other Name: Switch, Courtesy Lamp And Door Ajar; Jamb Switch; Switch Actuator; Instrument Light Rheostat; Switch, Door Electric And Vacuum Locks
- Position: Front


Chevrolet Door Jamb Switch Part Number: 15674628
Product Specifications- Other Name: Switch, Courtesy Lamp And Door Ajar; Switch, Dome Lamp


Chevrolet Door Jamb Switch Part Number: 30024014
Product Specifications- Other Name: Switch, Dome Lamp; Door Ajar Switch


Chevrolet Door Jamb Switch Part Number: 15693401
Product Specifications- Other Name: Switch, Courtesy Lamp And Door Ajar; Switch, Dome Lamp


Chevrolet Door Jamb Switch Part Number: 15726710
Product Specifications- Other Name: Switch, Dome Lamp
- Position: Front


Chevrolet Door Jamb Switch Part Number: 15652865
Product Specifications- Other Name: Switch, Dome Lamp; Dome Lamp Switch


Chevrolet Door Jamb Switch Part Number: 14066671
Product Specifications- Other Name: Switch, Courtesy Lamp And Door Ajar; Switch, Instrument Panel Compartment Lamp; Switch, Dome Lamp


Chevrolet Door Jamb Switch Part Number: 15036560
$14.10 MSRP: $20.99You Save: $6.89 (33%)Product Specifications- Other Name: Switch, Courtesy Lamp And Door Ajar; Switch, Dome Lamp


Chevrolet Door Jamb Switch Part Number: 94841859
Product Specifications- Other Name: Switch Assembly, Door Jamb; Switch, Courtesy Lamp And Door Ajar

Chevrolet Door Jamb Switch Part Number: 22646642
Product Specifications- Other Name: Switch, Dome Lamp; Switch, Courtesy Lamp And Door Ajar

Chevrolet Door Jamb Switch Part Number: 94857223
Product Specifications- Other Name: Switch, Front Side Door Jamb; Jamb Switch; Switch, Courtesy Lamp And Door Ajar
- Position: Front

Chevrolet Door Jamb Switch Part Number: 30019582
Product Specifications- Other Name: Switch, Dome Lamp
Chevrolet Door Jamb Switch Part Number: 14014578
Product Specifications- Other Name: Switch Assembly, Door Jamb; Switch, Electrical Switches; Switch, Dome Lamp
- Replaces: 14040845

Chevrolet Door Jamb Switch Part Number: 10045860
Product Specifications- Other Name: Switch, Courtesy Lamp And Door Ajar
| Page 1 of 2 |Next >
1-20 of 30 Results
Chevrolet Door Jamb Switch
Want to cut long-term maintenance and repair costs? Choose OEM Door Jamb Switch. Those parts deliver top durability you can trust. On our site, you'll find a huge catalog of genuine Chevrolet parts. Prices are unbeatable, so you can keep more in your pocket. Every OEM Chevrolet Door Jamb Switch includes a manufacturer's warranty. You can also get an easy return policy that keeps buying risk free. Fast delivery, get your car on the road quickly. It's simple to search, compare, and order. Stop guessing about quality or fit. Order today and save with parts that last.
Chevrolet Door Jamb Switch Parts Questions & Experts Answers
- Q: How to replace the rear door jamb switch on Chevrolet Blazer?A:The first safety step before replacing the rear Door Jamb Switch involves disconnecting the negative Battery Cable. A flat bladed tool should be used to extract the Door Jamb Switch from the rear door hinge-pillar while you disconnect its electrical connector and tape the wires to the body to stop them from entering the rear door hinge-pillar. Begin by attaching the electrical connector and fit the Door Jamb Switch onto the rear door hinge-pillar followed by reconnecting the battery negative cable.
- Q: How to replace the rear door jamb switch on Chevrolet S10?A:The first step to replace the rear Door Jamb Switch involves disconnecting the negative side of the battery as a safety precaution. A flat bladed tool should be used to remove the Door Jamb Switch from the rear door hinge-pillar followed by disconnecting the electrical connector before taping the wires to the body to avoid contamination in the hinge-pillar. After connecting the power source you should place the Door Jamb Switch onto the rear door hinge-pillar before reconnecting the battery negative cable.
- Q: How to service the Door Jamb Switch for a 2 Door on Chevrolet Tracker?A:You can begin door switch service on a 2 Door vehicle by opening front doors to remove their rubber caps then access the door jamb switch retaining screw. First remove the screw fixing the door jamb switch to the door jamb before removing the rear quarter lower trim panel to access the door jamb electrical connector. First disconnect the electrical connector and afterward remove the door jamb switch from the vehicle. Begin the installation process by attaching the door jamb switch electrical connector followed by putting the switch on the jamb then fastening it with the retaining screw. Place back the rear quarter lower trim panel while closing the rubber cap until you shut the front side door.


Related Chevrolet Parts
 Chevrolet Distributor
 Chevrolet MAP Sensor
 Chevrolet Body Control Module
 Chevrolet Headlight Relay
 Chevrolet Ignition Control Module
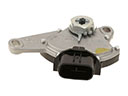 Chevrolet Neutral Safety Switch
 Chevrolet Power Window Switch
 Chevrolet Turn Signal Flasher
 Chevrolet Door Lock Switch
 Chevrolet Igniter
 Chevrolet Washer Pump
 Chevrolet Wiper Pulse Module
Browse Chevrolet Door Jamb Switch by Models
Nova S10 Colorado C10 Tahoe Malibu Camaro Impala Caprice Classic Cobalt Blazer HHR Tracker K10 Astro Cavalier Corvette C20 Aveo Beretta C1500 C2500 C30 C3500 Celebrity Chevette City Express Corsica Express 1500 Express 2500 Express 3500 G10 G20 G30 K1500 K20 K2500 K30 K3500 K5 Blazer Lumina Prizm S10 Blazer Uplander Venture Lumina APV Aveo5 C10 Suburban C1500 Suburban C20 Suburban C2500 Suburban K10 Suburban K1500 Suburban K20 Suburban K2500 Suburban R1500 Suburban R2500 Suburban V1500 Suburban V2500 Suburban