ChevyParts
My Garage
My Account
Cart
OEM Chevrolet Turn Signal Flasher
Turn Signal Indicator Flasher- Select Vehicle by Model
- Select Vehicle by VIN
Select Vehicle by Model
orMake
Model
Year
Select Vehicle by VIN
For the most accurate results, select vehicle by your VIN (Vehicle Identification Number).
28 Turn Signal Flashers found


Chevrolet Fuel Pump Relay, Black Part Number: 19116962
$8.18 MSRP: $15.36You Save: $7.18 (47%)Ships in 1-2 Business DaysProduct Specifications- Other Name: Relay, Air Conditioner Electrical; Multi Purpose Relay; Fog Light Relay; Fan Relay; Horn Relay; Compressor Relay; Relay
- Replaced by: 13500113


Chevrolet Fuel Pump Relay Part Number: 12088594
$14.29 MSRP: $26.68You Save: $12.39 (47%)Product Specifications- Other Name: Relay, Electronic Brake Control; Multi Purpose Relay; Cooling Fan Relay; Fog Light Relay; ABS Relay; A/C Relay, relays for fan, control, power, compressor, motor, lighting & fuel
- Replaces: 12034544, 15210866, 15591178, 22555387, 25609047, 12088596, 22570060


Chevrolet Flasher Part Number: 15231201
$45.11 MSRP: $87.56You Save: $42.45 (49%)Ships in 1 Business DayProduct Specifications- Other Name: Flasher, Hazard Lamp & Turn Signal Lamp; Flasher, Chassis/Body Marker/Hazard; Flasher, Turn Signal Lamp
- Replaces: 12450284, 15101912

Chevrolet Fan Relay Part Number: 12135000
$5.28 MSRP: $9.39You Save: $4.11 (44%)Ships in 1-2 Business DaysProduct Specifications- Other Name: Relay, Electronic Brake Control; Power Relay; Relay
- Replaced by: 19151475

Chevrolet Flasher Part Number: 12450057
$25.02 MSRP: $46.70You Save: $21.68 (47%)Product Specifications- Other Name: Flasher, Hazard Lamp & Turn Signal Lamp; Flasher, Chassis/Body Marker/Hazard; Flasher, Turn Signal Lamp
- Replaces: 09442893, 9442893

Chevrolet Flasher Part Number: 10383320
$64.13 MSRP: $120.44You Save: $56.31 (47%)Ships in 1-2 Business DaysProduct Specifications- Other Name: Flasher, Hazard Lamp & Turn Signal Lamp; Flasher, Chassis/Body Marker/Hazard; Flasher, Turn Signal Lamp
- Replaces: 15764136

Chevrolet Turn Signal Flasher Part Number: 11516051
$44.00 MSRP: $85.40You Save: $41.40 (49%)Ships in 1-2 Business DaysProduct Specifications- Other Name: Flasher, Hazard Lamp & Turn Signal Lamp; Hazard Flasher; Flasher; Flasher, Chassis/Body Marker/Hazard; Flasher, Turn Signal Lamp

Chevrolet Flasher Relay Part Number: 96312545
$18.25 MSRP: $29.47You Save: $11.22 (39%)Ships in 1-2 Business DaysProduct Specifications- Other Name: Relay, Turn Signal & Cornering Lamp; Multi Purpose Relay; Flasher; Relay; Relay,Turn Signal & Cornering Lamp; Flasher, Turn Signal Lamp


Chevrolet Turn Signal Flasher Part Number: 10041074
Product Specifications- Other Name: Flasher, Turn Signal Lamp


Chevrolet Flasher Part Number: 15803671
$71.95 MSRP: $107.09You Save: $35.14 (33%)Product Specifications- Other Name: Relay, Voltage And Glow Plug; Relay,Turn Signal & Cornering Lamp
- Replaces: 22719429

Chevrolet Hazard Flasher Part Number: 94847781
Product Specifications- Other Name: Flasher, Hazard Lamp & Turn Signal Lamp; Flasher, Chassis/Body Marker/Hazard

Chevrolet Hazard Switch Part Number: 9442874
Product Specifications- Other Name: Flasher Assembly-Hazard Lamp & Turn Signal Lamp; Hazard Flasher Switch; Flasher; Flasher, Chassis/Body Marker/Hazard; Flasher, Turn Signal Lamp

Chevrolet Flasher Relay Part Number: 12450070
Product Specifications- Other Name: Flasher, Hazard Lamp & Turn Signal Lamp; Turn Signal Flasher; Hazard Flasher; Flasher, Chassis/Body Marker/Hazard; Flasher, Turn Signal Lamp; Flasher
Chevrolet Turn Signal Flasher Part Number: 94859190
Product Specifications- Other Name: Flasher, Turn Signal Lamp; Multi Purpose Relay; Relay

Chevrolet Turn Signal Flasher Part Number: 94844448
Product Specifications- Other Name: Flasher, Turn Signal Lamp; Hazard Flasher

Chevrolet Flasher Part Number: 12450329
Product Specifications- Other Name: Flasher, Chassis/Body Marker/Hazard; Flasher, Turn Signal Lamp

Chevrolet Hazard Flasher Part Number: 11516136
Product Specifications- Other Name: Flasher Assembly-Hazard Lamp; Multi Purpose Relay; Relay; Flasher, Chassis/Body Marker/Hazard

Chevrolet Relay Part Number: 96312546
Product Specifications- Other Name: Relay, Turn Signal & Cornering Lamp; Multi Purpose Relay; Flasher; Relay,Turn Signal & Cornering Lamp
Chevrolet Flasher Part Number: 12450072
Product Specifications- Other Name: Flasher, Hazard Lamp & Turn Signal Lamp; Flasher, Chassis/Body Marker/Hazard; Flasher, Turn Signal Lamp

Chevrolet Flasher Part Number: 25760222
Product Specifications- Other Name: Flasher, Chassis/Body Marker/Hazard; Flasher, Turn Signal Lamp
- Replaces: 25749121
| Page 1 of 2 |Next >
1-20 of 28 Results
Chevrolet Turn Signal Flasher
Want to cut long-term maintenance and repair costs? Choose OEM Turn Signal Flasher. Those parts deliver top durability you can trust. On our site, you'll find a huge catalog of genuine Chevrolet parts. Prices are unbeatable, so you can keep more in your pocket. Every OEM Chevrolet Turn Signal Flasher includes a manufacturer's warranty. You can also get an easy return policy that keeps buying risk free. Fast delivery, get your car on the road quickly. It's simple to search, compare, and order. Stop guessing about quality or fit. Order today and save with parts that last.
Chevrolet Turn Signal Flasher Parts Questions & Experts Answers
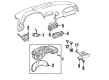
- Q: How to Replace a Turn Signal Flasher on Chevrolet Camaro?A:The first step to replace the flasher is by taking the turn signal flasher clip off its instrument panel tie bar position. Disconnect the turn signal flasher electrical connector and take off the clip from the turn signal flasher. Begin replacement by fixing the clip first to the flasher unit then connecting the electrical connector and securing the clip to the instrument panel support.
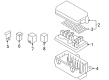
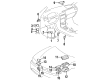
- Q: How to replace the hazard and turn signal flasher on Chevrolet Cavalier?A:Start replacement by disconnecting the electronic connector from the flasher module and then pulling the module through the brake pedal bracket. Detach the flasher module if needed but leave it inside the vehicle. To install the new flasher you need to join the electrical connector to the flasher module first then put the flasher module back onto the brake pedal bracket. Press the flasher module to fasten the rosebud retainer to the brake pedal bracket .
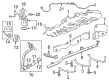
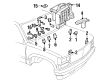
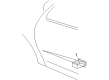
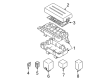
- Q: How to replace the turn signal flasher on Chevrolet Tracker?A:Starting the Turn Signal Flasher replacement requires users to disconnect the negative Battery Cable. The process begins by removing the trim plate above the steering column ip that leads to the Fuel Pump Relay and main relay bracket located at the junction block's left front side. Disconnect the following connectors from the bottom of the junction block : the replacement process requires inline connector c213 , inline connector c205 , and inline connector c204 . To continue disassembly separate junction block connector c4 at the junction block front. Use a socket wrench to remove two nuts which secure the junction block to both the hinge pillar and the bulkhead surface. The junction block removal from its three supporting studs gives access to electrical connectors at the rear. Disconnect the junction block from the connector housing by unlocking the retaining tabs that run across the top. Start by taking out the turn/hazard flasher from the junction block by disengaging its retaining tabs and pulling it directly out. The installation process requires you to place the turn/hazard flasher back into the junction block while fully engaging both retaining tabs. Complete the junction block installation by fitting the connector housing while engaging the retaining tabs at the top. Secure the junction block to the 3 retaining studs through 3 nuts (3,10) maintaining 10 n.m torque (89 lb in). Secure junction block connector c4 and junction block connector c5 to the front side of the junction block before connecting inline connector c213 , inline connector c205 and inline connector c204 at the bottom of the junction block . Replace the bracket including Fuel Pump Relay and main relay on the left front junction block side before reinstalling the ip steering column opening trim plate and reattaching the negative Battery Cable.


Related Chevrolet Parts
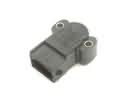 Chevrolet Throttle Position Sensor
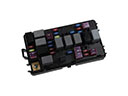 Chevrolet Fuse
 Chevrolet Brake Light Switch
 Chevrolet Crankshaft Position Sensor
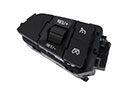 Chevrolet Cruise Control Switch
 Chevrolet Neutral Safety Switch
 Chevrolet Turn Signal Switch
 Chevrolet ABS Relay
 Chevrolet Back Up Light Switch
 Chevrolet Intake Manifold Temperature Sensor
 Chevrolet Seat Heater Pad
 Chevrolet Wiper Switch
Browse Chevrolet Turn Signal Flasher by Models
Nova S10 Tahoe Cruze Malibu Camaro Equinox Impala SS SSR Avalanche Silverado 1500 Silverado 2500 HD Caprice Suburban Traverse Blazer Sonic Tracker El Camino Spark Trailblazer Astro Cavalier Corvette Aveo Beretta C1500 C2500 C3500 Celebrity Chevette Corsica Express 1500 Express 2500 Express 3500 G10 G20 G30 K1500 K2500 K3500 Lumina Metro Monte Carlo Prizm S10 Blazer Silverado 2500 Venture Lumina APV Silverado 3500 Suburban 1500 Trailblazer EXT Avalanche 1500 Avalanche 2500 Aveo5 C1500 Suburban C2500 Suburban Citation II Cruze Limited K1500 Suburban K2500 Suburban Silverado 1500 HD Silverado 1500 LD Silverado 1500 LTD Silverado 3500 HD Spectrum Suburban 2500