ChevyParts
My Garage
My Account
Cart
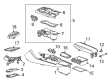
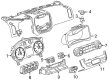
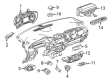
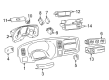
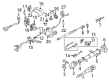
OEM Chevrolet Wiper Switch
Windshield Wiper Switch- Select Vehicle by Model
- Select Vehicle by VIN
Select Vehicle by Model
orMake
Model
Year
Select Vehicle by VIN
For the most accurate results, select vehicle by your VIN (Vehicle Identification Number).
264 Wiper Switches found


Chevrolet Turn Signal Switch Part Number: 20940099
$41.69 MSRP: $85.66You Save: $43.97 (52%)Ships in 1-2 Business DaysProduct Specifications- Other Name: Switch Assembly-Turn Signal & Headlamp Dimmer; Multi Purpose Switch; Combination Switch; Signal Switch; Switch, Turn Signal Lamp; Switch, Headlamp Dimmer
- Replaces: 10362761, 15258881, 15841544, 15915857


Chevrolet Turn Signal Switch Part Number: 26073715
$291.22 MSRP: $546.90You Save: $255.68 (47%)Ships in 1-2 Business DaysProduct Specifications- Other Name: Switch Assembly, Turn Signal & Headlamp Dimmer, Windshield Wiper & Washer Switch; Multi Purpose Combination Switch; Signal Switch; Front Wiper Switch; Switch, Windshield Wiper Control; Switch, Turn Signal Lamp; Switch, Headlamp Dimmer
- Replaces: 26084694, 26067087, 26039594


Chevrolet Level Sensor Part Number: 25864383
$31.51 MSRP: $59.17You Save: $27.66 (47%)Ships in 1-2 Business DaysProduct Specifications- Other Name: Switch Kit, Windshield Washer; Washer Fluid Level Sensor; Level Indicator; Fluid Level Sensor; Indicator; Sensor, Windshield Washer
- Replaces: 15809926, 22110978


Chevrolet Turn Signal Switch Part Number: 20808029
$70.66 MSRP: $119.93You Save: $49.27 (42%)Ships in 1-2 Business DaysProduct Specifications- Other Name: Switch, Turn Signal Lamp; Multi Purpose Switch; Combination Switch; Switch, Headlamp/Fog Lamp/Turn Signal; Switch, Headlamp Dimmer
- Replaces: 01999391, 1999391


Chevrolet Turn Signal Switch Part Number: 15909254
$138.69 MSRP: $201.92You Save: $63.23 (32%)Ships in 1-2 Business DaysProduct Specifications- Other Name: Switch, Headlamp/Fog Lamp/Turn Signal; Multi Purpose Switch; Combination Switch; Switch, Windshield Wiper Control; Switch, Turn Signal Lamp; Switch, Headlamp Dimmer


Chevrolet Turn Signal Switch Part Number: 15906128
$190.12 MSRP: $310.19You Save: $120.07 (39%)Ships in 1-2 Business DaysProduct Specifications- Other Name: Switch, Turn Signal Lamp; Multi Purpose Switch; Multifunction Switch; Combination Switch
- Replaces: 15135023, 15281884, 15190614

Chevrolet Turn Signal Switch Part Number: 1995945
$40.84 MSRP: $82.04You Save: $41.20 (51%)Product Specifications- Other Name: Switch, Turn Signal; Multi Purpose Switch; Signal Switch; Switch, Turn Signal Lamp

Chevrolet Turn Signal Switch Part Number: 26100852
$173.34 MSRP: $323.46You Save: $150.12 (47%)Product Specifications- Other Name: Switch Assembly, Turn Signal & Headlamp Dimmer, Windshield Wiper & Washer Switch.; Combination Switch; Front Wiper, Turn Signal, and Headlamp Dimmer Control.
- Replaces: 26063386

Chevrolet Headlamp Switch Part Number: 19209609
$82.74 MSRP: $149.76You Save: $67.02 (45%)Ships in 1-2 Business DaysProduct Specifications- Other Name: Switch, Headlamp Dimmer; Multi Purpose Switch; Combination Switch; Headlamp Dimmer Switch; Switch; Switch, Headlamp/Fog Lamp/Turn Signal; Switch, Turn Signal Lamp
- Replaces: 22619955, 22655202

Chevrolet Wiper Switch Part Number: 42712430
$25.29 MSRP: $45.16You Save: $19.87 (44%)Ships in 1-3 Business DaysProduct Specifications- Other Name: Switch, Windshield Wiper Control; Windshield Washer Switch

Chevrolet Combination Switch Part Number: 22902926
$37.42 MSRP: $66.81You Save: $29.39 (44%)Ships in 1-3 Business DaysProduct Specifications- Other Name: Switch, Electro-Hydraulic Control; Windshield Washer Switch; Control Switch Assembly
- Replaced by: 84358911

Chevrolet Wiper Switch Part Number: 84972826
$32.72 MSRP: $61.43You Save: $28.71 (47%)Ships in 1-3 Business DaysProduct Specifications- Other Name: Switch, Windshield Wiper Control
- Replaces: 23354917, 84414706

Chevrolet Wiper Switch, Black Part Number: 23354917
$32.72 MSRP: $61.43You Save: $28.71 (47%)Ships in 1-2 Business DaysProduct Specifications- Other Name: Switch Assembly-Windshield Wiper & Windshield Washer *Black; Windshield Washer Switch
- Replaced by: 84972826

Chevrolet Turn Signal Switch Part Number: 26100986
$234.92 MSRP: $367.63You Save: $132.71 (37%)Ships in 1-2 Business DaysProduct Specifications- Other Name: Switch, Headlamp Dimmer; Windshield Washer Switch; Multi Purpose Switch; Combination Switch; Headlamp Dimmer Switch; Signal Switch; Wiper & Washer Control; Turn Signal Lamp Switch.
- Replaces: 26083628, 26054726, 26054728, 26091770, 26083630, 26097022, 26047331, 26091772, 26097020

Chevrolet Turn Signal Switch Part Number: 26102160
$190.41 MSRP: $366.36You Save: $175.95 (49%)Ships in 1-2 Business DaysProduct Specifications- Other Name: Switch Assembly, Turn Signal & Headlamp Dimmer, Wiper & Washer (W/Lever); Multi Purpose Switch; Combination Switch; Headlamp Dimmer; Wiper & Washer Control; Turn Signal Lamp.
- Replaces: 26075066, 26096839

Chevrolet Turn Signal Switch Part Number: 25867278
$159.74 MSRP: $249.98You Save: $90.24 (37%)Ships in 1-2 Business DaysProduct Specifications- Other Name: Switch, Turn Signal Lamp; Multi Purpose Switch; Multifunction Switch; Combination Switch
Chevrolet Turn Signal Switch Part Number: 26073716
$317.60 MSRP: $479.03You Save: $161.43 (34%)Ships in 1-2 Business DaysProduct Specifications- Other Name: Switch Assembly, Turn Signal & Headlamp Dimmer, Windshield Wiper & Washer Switch.; Combination Switch; Front Wiper, Turn Signal, and Headlamp Dimmer Control.
- Replaces: 26067088, 26039595, 26084695

Chevrolet Turn Signal Switch Part Number: 26102158
$197.39 MSRP: $322.05You Save: $124.66 (39%)Ships in 1-2 Business DaysProduct Specifications- Other Name: Switch Assembly, Turn Signal & Headlamp Dimmer, Windshield Wiper & Washer Switch; Multi Purpose Combination Switch; Signal Switch; Front Wiper Switch; Windshield Wiper & Washer Control; Turn Signal Lamp; Headlamp Dimmer
- Replaces: 26096835, 26084052

Chevrolet Switch, Rear Part Number: 15994852
Product Specifications- Other Name: Switch Assembly-Rear Window Wiper Cutout; Windshield Washer Switch; Switch, Rear Window Wiper/Washer
- Position: Rear
Chevrolet Switch, Rear Part Number: 15068307
Product Specifications- Other Name: Switch Assembly-Rear Window Wiper Cutout; Windshield Washer Switch; Switch, Rear Window Wiper/Washer
- Position: Rear
- Replaces: 15036229, 15050967
| Page 1 of 14 |Next >
1-20 of 264 Results
Chevrolet Wiper Switch
Want to cut long-term maintenance and repair costs? Choose OEM Wiper Switch. Those parts deliver top durability you can trust. On our site, you'll find a huge catalog of genuine Chevrolet parts. Prices are unbeatable, so you can keep more in your pocket. Every OEM Chevrolet Wiper Switch includes a manufacturer's warranty. You can also get an easy return policy that keeps buying risk free. Fast delivery, get your car on the road quickly. It's simple to search, compare, and order. Stop guessing about quality or fit. Order today and save with parts that last.
Chevrolet Wiper Switch Parts Questions & Experts Answers
- Q: How to replace the Wiper Switch on Chevrolet HHR?A:Start your wipers/washer switch replacement project by taking off the steering column trim covers. Press down on the wipers/washer switch locking tabs before taking out the wiper/washer switch connector assembly. Install the wipers/washer switch by setting it on top of the steering column and confirming that the locking tabs click in place. Afterward, plug the wipers/washer switch harness into position and place back the steering column trim covers.
- Q: How to replace the Wiper Switch on Chevrolet Equinox?A:Take off the steering column trim covers before you replace the wipers/washer switch. After that, disconnect the wipers/washer switch wire and press down the locking tabs to take out the wiper/washer switch. To install, position the wipers/washer switch onto the steering column, be sure the locking tabs are fully in place, then connect the harness and put the trim covers back on.
- Q: How to replace the rear Wiper Switch on Chevrolet Tracker?A:To swap the rear wiper control unit you must uninstall 3 screws and the IP steering column opening trim plate from the dashboard. Unclip the retaining tabs behind the instrument panel that attaches the rear window wiper/washer switch. Once loose pull the switch forward to detach its electrical connector. Disconnect the electrical connector before taking out the rear window wiper/washer switch from the vehicle. Plug in the switch electrical connector and put the switch unit back into its position in the instrument panel, making sure both retaining tabs snap in place. Set the 3 screws in place and put back the IP steering column opening trim plate.


Related Chevrolet Parts
 Chevrolet Camshaft Position Sensor
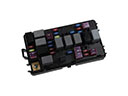 Chevrolet Fuse
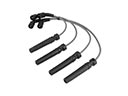 Chevrolet Spark Plug Wires
 Chevrolet Oil Pressure Gauge
 Chevrolet Power Window Switch
 Chevrolet Shift Solenoid
 Chevrolet Air Bag Clockspring
 Chevrolet Antenna Cable
 Chevrolet Back Up Light Switch
 Chevrolet Mirror Switch
 Chevrolet Seat Heater Pad
 Chevrolet Seat Heater Switch
Browse Chevrolet Wiper Switch by Models
Nova S10 Colorado C10 Tahoe Cruze Malibu Camaro Equinox Impala SS SSR Avalanche Silverado 1500 Silverado 2500 HD Caprice Classic Cobalt Suburban Traverse Blazer HHR Sonic Tracker Volt El Camino K10 Spark Trax Trailblazer Astro Cavalier Corvette C20 Aveo Beretta Bolt EUV Bolt EV C1500 C2500 C30 C3500 Celebrity Chevette Corsica Express 1500 Express 2500 Express 3500 G10 G20 G30 K1500 K20 K2500 K30 K3500 K5 Blazer Lumina Metro Monte Carlo P30 Prizm S10 Blazer Silverado 2500 Sprint Uplander Venture Lumina APV Silverado 3500 Suburban 1500 Trailblazer EXT Avalanche 1500 Avalanche 2500 Aveo5 C10 Suburban C1500 Suburban C20 Suburban C2500 Suburban Captiva Sport Citation II Cruze Limited Impala Limited K10 Suburban K1500 Suburban K20 Suburban K2500 Suburban Malibu Limited R10 R10 Suburban R1500 Suburban R20 R20 Suburban R2500 R2500 Suburban R30 R3500 Silverado 1500 Classic Silverado 1500 HD Silverado 1500 HD Classic Silverado 1500 LD Silverado 1500 LTD Silverado 2500 HD Classic Silverado 3500 Classic Silverado 3500 HD Spark EV Spectrum Suburban 2500 Suburban 3500 HD V10 V10 Suburban V1500 Suburban V20 V20 Suburban V2500 Suburban V30 V3500