ChevyParts
My Garage
My Account
Cart
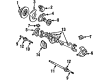
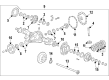
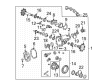
OEM Chevrolet Pinion Bearing
Transmission Pinion Bearing- Select Vehicle by Model
- Select Vehicle by VIN
Select Vehicle by Model
orMake
Model
Year
Select Vehicle by VIN
For the most accurate results, select vehicle by your VIN (Vehicle Identification Number).
69 Pinion Bearings found


Chevrolet Pinion Bearings, Inner Part Number: 457108
$56.11 MSRP: $154.36You Save: $98.25 (64%)Ships in 1-2 Business DaysProduct Specifications- Other Name: Bearing, Differential Drive Pinion Gear Inner; Differential Pinion Bearing; Rear Pinion Bearing; Front Pinion Bearing; Inner Pinion Bearing; Differential Drive Pinion Bearings.
- Position: Inner


Chevrolet Wheel Bearing Part Number: 9436881
$80.31 MSRP: $145.36You Save: $65.05 (45%)Ships in 1-3 Business DaysProduct Specifications- Other Name: Bearing, Differential; Differential Pinion Bearing; Differential Bearing; Axle Bearings; Shaft; Inner; Side; Differential Gear; Front Wheel; Rear Wheel; Nut.


Chevrolet Rear Pinion Bearing Part Number: 92191329
$195.09 MSRP: $346.82You Save: $151.73 (44%)Ships in 1-2 Business DaysProduct Specifications- Other Name: Bearing, Drive Pinion Rear And Intermediate; Differential Pinion Bearing; Bearing, Differential Drive Pinion
- Position: Inner


Chevrolet Pinion Bearings Part Number: 454021
$161.60 MSRP: $292.48You Save: $130.88 (45%)Ships in 1-2 Business DaysProduct Specifications- Other Name: Bearing Assembly, Differential Drive Pinion Gear; Differential Pinion Bearing; Rear Pinion Bearing; Inner Pinion Bearing; Differential Drive Pinion; Rear Wheel Bearing.
Chevrolet BEARING,DIFF DRV P/GR OTR Part Number: 09413427
$55.80 MSRP: $99.63You Save: $43.83 (44%)Product Specifications- Other Name: Rear, Front, Outer Pinion Bearings; Differential Drive, Steering Knuckle King, Pinion Shaft, Front Axle Bearings.
- Replaces: 20997051, 15286376

Chevrolet Rear Pinion Bearing, Front Outer Part Number: 23243842
$16.22 MSRP: $28.96You Save: $12.74 (44%)Ships in 1-3 Business DaysProduct Specifications- Other Name: Bearing Assembly-Front Differential Drive Pinion Gear Outer; Differential Pinion Bearing; Bearing, Differential Pinion
- Position: Front Outer

Chevrolet Pinion Bearings, Outer Part Number: 22943109
$45.75 MSRP: $88.79You Save: $43.04 (49%)Ships in 1-2 Business DaysProduct Specifications- Other Name: Bearing Assembly-Differential Drive Pinion Gear Outer; Differential Pinion Bearing; Axle Bearing; Outer Bearing; Bearing, Pinion Shaft Front
- Position: Outer

Chevrolet Front Pinion Bearing Part Number: 92191330
$183.60 MSRP: $329.31You Save: $145.71 (45%)Ships in 1-3 Business DaysProduct Specifications- Other Name: Bearing Assembly-Differential Drive Pinion Gear Outer; Differential Pinion Bearing; Bearing; Bearing, Differential Drive Pinion Front
- Position: Outer
Chevrolet Front Pinion Bearing, Outer Part Number: 85617857
$29.00 MSRP: $54.46You Save: $25.46 (47%)Ships in 1-2 Business DaysProduct Specifications- Other Name: Bearing Assembly-Front Differential Drive Pinion Gear Outer; Bearing, Differential Drive Pinion Front; Bearing, Differential Pinion
- Position: Front Outer
- Replaces: 23490335, 23471880
Chevrolet Pinion Bearings, Rear Part Number: 84937117
$26.60 MSRP: $47.50You Save: $20.90 (44%)Product Specifications- Other Name: Bearing, Drive Pinion Rear And Intermediate; Bearing, Differential Drive Pinion
- Position: Rear
Chevrolet BEARING ASM,DIFF DRV P/GR Part Number: 00454021
$147.31 MSRP: $264.24You Save: $116.93 (45%)Product Specifications- Other Name: Rear Pinion Bearing; Inner Pinion Bearing; Differential Drive Pinion; Rear Wheel Bearing.
Chevrolet Pinion Bearings Part Number: 84428299
$24.40 MSRP: $45.81You Save: $21.41 (47%)Ships in 1-2 Business DaysProduct Specifications- Other Name: Bearing, Differential Pinion; Differential Pinion Bearing; Front Pinion Bearing
- Position: Front
- Replaced by: 85722137
Chevrolet Front Pinion Bearing Part Number: 23471879
$21.19 MSRP: $39.80You Save: $18.61 (47%)Ships in 1-2 Business DaysProduct Specifications- Other Name: Bearing, Differential Pinion; Bearing, Differential Drive Pinion Front
- Position: Front Inner

Chevrolet Pinion Bearings, Outer Part Number: 84682861
$24.08 MSRP: $45.22You Save: $21.14 (47%)Ships in 1-3 Business DaysProduct Specifications- Other Name: Bearing Assembly-Differential Drive Pinion Gear Outer; Bearing, Pinion Shaft Front
- Position: Outer
- Replaces: 84092759

Chevrolet Rear Pinion Bearing Part Number: 9418356
$72.64 MSRP: $142.22You Save: $69.58 (49%)Ships in 1-2 Business DaysProduct Specifications- Other Name: Bearing, Differential Outer (Timken #M802048-M8020; Front Pinion Bearing
- Position: Outer
- Replaced by: 23243839
Chevrolet Pinion Bearings, Rear Part Number: 84757350
$57.18 MSRP: $110.99You Save: $53.81 (49%)Ships in 1-3 Business DaysProduct Specifications- Other Name: Bearing, Drive Pinion Rear And Intermediate; Differential Pinion Bearing; Differential Bearing
- Position: Rear

Chevrolet Pinion Bearings, Outer Part Number: 84446306
$17.46 MSRP: $32.79You Save: $15.33 (47%)Ships in 1-2 Business DaysProduct Specifications- Other Name: Bearing, Differential Drive Pinion Gear Outer; Differential Pinion Bearing; Axle Bearing; Outer Bearing; Bearing, Differential Pinion; Bearing, Pinion Shaft Front
- Position: Outer


Chevrolet TAPERD RLR Part Number: 09414917
$72.91 MSRP: $125.16You Save: $52.25 (42%)Product Specifications- Other Name: Rear Pinion Bearing; Drive Pinion Rear; Axle Pinion Shaft; Ring And Pinion; Pinion Shaft Front.


Chevrolet Rear Pinion Bearing, Inner Part Number: 15534482
$86.07 MSRP: $254.73You Save: $168.66 (67%)Ships in 1-3 Business DaysProduct Specifications- Other Name: Bearing Assembly, Differential Drive Pinion Gear Inner; Differential Pinion Bearing; Bearing, Drive Pinion Rear And Intermediate; Bearing, Pinion Shaft
- Position: Inner
- Replaces: 9440889, 09440889

Chevrolet BEARING F Part Number: 09422481
$56.34 MSRP: $96.72You Save: $40.38 (42%)Product Specifications- Other Name: Side Bearings; Bearing, Differential Side Gear
| Page 1 of 4 |Next >
1-20 of 69 Results
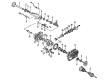
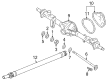
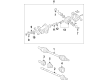
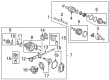
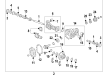
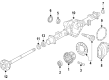
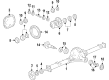
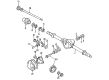
Chevrolet Pinion Bearing
Want to cut long-term maintenance and repair costs? Choose OEM Pinion Bearing. Those parts deliver top durability you can trust. On our site, you'll find a huge catalog of genuine Chevrolet parts. Prices are unbeatable, so you can keep more in your pocket. Every OEM Chevrolet Pinion Bearing includes a manufacturer's warranty. You can also get an easy return policy that keeps buying risk free. Fast delivery, get your car on the road quickly. It's simple to search, compare, and order. Stop guessing about quality or fit. Order today and save with parts that last.
Chevrolet Pinion Bearing Parts Questions & Experts Answers
- Q: How to replace the pinion bearing on an 8.6 Inch Axle on Chevrolet Colorado?A:When replacing the Pinion Bearing of an 8.6 inch axle begin by elevating and supporting the vehicle. Work on the axle by first removing the Differential assembly together with the pinion gear. The dt 49275 - Pinion Bearing remover together with the j 22912-b - bearing remover enable the Pinion Bearing and spacer's removal by placing a brass drift in the axle housing while moving the drift forward and backward to achieve uniform cup extraction. The procedure includes the removal of both outer and inner Pinion Bearing cups through puncturing them with a hammer and brass drift. The installation of the outer bearing cup starts with the j 28677 - needle bearing installer alongside the j 8092 - universal driver handle and concludes with the dt 49032 - Pinion Bearing cup installer for the inner cup. Place the selective pinion spacer with its proper thickness onto the pinion gear. Install the Pinion Bearing with its spacer using the j 22828 - input shaft gear installer while hammering and maintaining adequate lubrication by applying axle lubricant. The axle housing receives the pinion outer bearing before the pinion gear installation and completion with the new pinion seal. The installation process requires placing back the Differential components and lubricating the axle properly ahead of returning the support system and decreasing the vehicle height.
- Q: How to replace the drive pinion bearings on Chevrolet SSR?A:The process of drive Pinion Bearing replacement starts by suspending the vehicle then removing the Differential assembly followed by separating the drive pinion from the axle. The installer tool j45871 must surround the Pinion Bearing before adding the split-plate bearing puller j22912-01 upside down near j45871 to remove the bearing from the pinion. The shim should be removed first before extracting the inner and outer Pinion Bearing cups using a hammer along with a brass drift that ensures equal extraction. The installation of external and internal Pinion Bearing cups requires the rear Pinion Bearing race installer (J8611-01) together with the universal driver handle (J8092) and the rear Pinion Bearing race installer (J8608) also using the j8092 as an installation tool. To select the appropriate shim thickness for the pinion scan the option between the inner Pinion Bearing and the gear shoulder. Install the inner Pinion Bearing with the pinion cone and side bearing installer (J24433) until it reaches the shim stage then insert a new collapsible spacer. The required axle lubricant must be applied to both pinion bearings before installing the pinion into its position within the axle housing with the outer Pinion Bearing and new pinion oil seal through the use of the extension housing oil pump/seal installer (J38694). Apply sealant to the pinion yoke splines before inserting the yoke at its original position using the marks made during removal then seat it with a soft-faced hammer. Place the washer on top of the new pinion nut while you mount the flange and pulley holding tool (J8614-01) to the pinion yoke. Use the j8614-01 while tightening the pinion nut to achieve a just-taken-up end play for the pinion through bearing seating rotation. Test rotating torque using an inch-pound torque wrench to validate the measurement within the described tolerance limits for used or new bearings. Continue manipulating the pinion nut through few small increments until the preferred torque value is obtained before rotating the pinion multiple times for bearing seat validation. The vehicle requires reinstallation of Brake Calipers alongside brake rotors and tire and wheel assemblies along with Differential assembly and lubricant filling before lowering the vehicle.
- Q: How to replace the Pinion Bearing on a 10.5 Inch Axle on Chevrolet Tahoe?A:The procedure for replacing Differential drive pinion gear pinion bearings on 10.5 inch axles starts with vehicle support and raising. Start by removing the Differential assembly followed by disassembly of the pinion yoke together with the oil seal. The next step should be to eliminate the drive pinion housing assembly. A press machine and suitable tool will help users remove the drive pinion gear pinion along with the collapsible spacer. Using the j 22912-b (Bearing Remover) and a hydraulic press you must remove the inner drive Pinion Bearing which requires a brass drift for performing an even work on bearing cups. The same sequence should be used to remove the outer and inner Pinion Bearing cups and the pinion gear pilot bearing. Installation of the drive pinion gear pilot bearing starts by placing it inside the Differential housing then using the j 22761 (Side Bearing Installer) and j 8092 (Universal Driver Handle) tools for insertion. After fitting the j 37624 (Pinion Bearing Installer) with the j 8092 (Universal Driver Handle) install the inner Pinion Bearing cup. Proceed to install the outer Pinion Bearing cup using the j 8608 (Pinion Bearing Cup Installer) also with the j 8092. The installation of the deficient inner Pinion Bearing uses the j 24433 (Pinion Bearing Installer) combined with a hydraulic press and requires the new collapsible spacer installed afterwards. The pinion bearings should receive axle lubricant before the outer Pinion Bearing gets installed into the retainer. After installing the new pinion oil seal through the j 44414 tool you should place the pinion into the bearing retainer and the drive pinion flange/yoke. Insert an original shim of 0.41 mm (0.016 in) size, unless the original shim is not available, to attach the pinion gear bearing retainer onto the axle housing. For used bearings check the pinion rotating torque between 10-20 lb in (1.0-2.3 Nm) and for new bearings check between 15-30 lb in (1.7-3.4 Nm). The device j 8614-01 (Flange Holder and Remover) helps to achieve specified torque values by regular pinion nut tightening whenever measurements fall below established limits. Check the pinion rotation to verify the bearings seated position before checking and adjusting the torque measurement once more. The last step includes reversion of the Differential assembly followed by adjusting the Differential side bearing preload and drive pinion gear pinion depth along with backlash settings then filling the axle with lubricant and removing support to lower the vehicle.


Related Chevrolet Parts
 Chevrolet Wheel Seal
 Chevrolet Differential
 Chevrolet Differential Cover
 Chevrolet Slip Yoke
 Chevrolet Differential Bearing
 Chevrolet Differential Seal
 Chevrolet Driveshaft Yokes
 Chevrolet Pinion Washer
 Chevrolet Universal Joint
Browse Chevrolet Pinion Bearing by Models
S10 Colorado C10 Tahoe Malibu Camaro Impala SS SSR Avalanche Silverado 1500 Silverado 2500 HD Caprice Cobalt Suburban Blazer HHR Tracker El Camino K10 Trailblazer Astro Corvette C20 C1500 C2500 C30 C3500 Chevette Express 1500 Express 2500 Express 3500 G10 G20 G30 K1500 K20 K2500 K30 K3500 K5 Blazer Monte Carlo P30 S10 Blazer Silverado 2500 Silverado 3500 Suburban 1500 Trailblazer EXT Avalanche 1500 Avalanche 2500 C10 Suburban C1500 Suburban C20 Suburban C2500 Suburban K10 Suburban K1500 Suburban K20 Suburban K2500 Suburban R10 R10 Suburban R1500 Suburban R20 R20 Suburban R2500 R2500 Suburban R30 R3500 Silverado 1500 Classic Silverado 1500 HD Silverado 1500 HD Classic Silverado 1500 LD Silverado 2500 HD Classic Silverado 3500 Classic Silverado 3500 HD Suburban 2500 Suburban 3500 HD V10 V10 Suburban V1500 Suburban V20 V20 Suburban V2500 Suburban V30 V3500