ChevyParts
My Garage
My Account
Cart
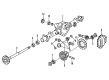
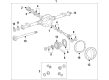
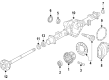
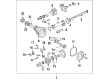
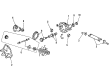
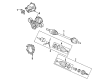
OEM Chevrolet Universal Joint
U-Joint- Select Vehicle by Model
- Select Vehicle by VIN
Select Vehicle by Model
orMake
Model
Year
Select Vehicle by VIN
For the most accurate results, select vehicle by your VIN (Vehicle Identification Number).
29 Universal Joints found


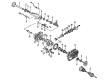
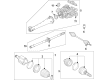
Chevrolet Universal Joints Part Number: 89059111
$163.83 MSRP: $273.43You Save: $109.60 (41%)Ships in 1-2 Business DaysProduct Specifications- Other Name: Joint Kit, Front Axle Propeller Shaft Universal *Outside Snap; Slip Yoke; Joint Kit, Propeller Shaft Universal Joint
- Position: Front
- Replaces: 12472409, 12476231, 12471503, 12522048, 26049843, 88982758, 88964507, 94772179, 12476230


Chevrolet Universal Joints Part Number: 19121436
$130.13 MSRP: $308.44You Save: $178.31 (58%)Ships in 1-2 Business DaysProduct Specifications- Other Name: Joint Kit, Propeller Shaft Universal; U Joint; Joint Kit, Propeller Shaft Universal Joint
- Replaces: 15515792, 19256890, 15898097, 88934794, 88935919


Chevrolet Universal Joints Part Number: 19256729
$196.62 MSRP: $328.19You Save: $131.57 (41%)Ships in 1-2 Business DaysProduct Specifications- Other Name: Joint Kit, Propeller Shaft Universal (1415 Serie*Outside Snap; U Joint; Joint Kit, Propeller Shaft Universal Joint
- Replaced by: 88964413

Chevrolet Universal Joints Part Number: 84555910
$46.37 MSRP: $72.63You Save: $26.26 (37%)Ships in 1-3 Business DaysProduct Specifications- Other Name: Joint Kit, Propeller Shaft Universal Joint; CV Joint; U Joint; U-Joint


Chevrolet Universal Joints Part Number: 84807275
$124.76 MSRP: $212.40You Save: $87.64 (42%)Ships in 1-2 Business DaysProduct Specifications- Other Name: Joint Kit, Propeller Shaft Universal Joint; U-Joint
- Replaces: 23471515, 84712242


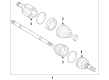
Chevrolet Outer CV Joint, Inner Part Number: 84117593
$86.17 MSRP: $134.99You Save: $48.82 (37%)Ships in 1-3 Business DaysProduct Specifications- Other Name: Inner CV Joint; Joint Kit, Front Wheel Drive Axle; CV Joint
- Position: Inner
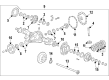
Chevrolet Inner CV Joint, Rear Part Number: 84710415
$77.94 MSRP: $122.09You Save: $44.15 (37%)Ships in 1-3 Business DaysProduct Specifications- Other Name: Joint Kit, Rear Axle Universal Joint; CV Joint
- Position: Rear
- Replaces: 84210654, 84207709

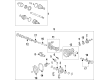
Chevrolet Inner CV Joint Part Number: 84666185
$79.35 MSRP: $124.29You Save: $44.94 (37%)Ships in 1-3 Business DaysProduct Specifications- Other Name: Outer CV Joint; Joint Kit, Front Wheel Drive Axle; CV Joint
- Position: Inner

Chevrolet Inner CV Joint Part Number: 84443364
$77.63 MSRP: $121.61You Save: $43.98 (37%)Ships in 1-3 Business DaysProduct Specifications- Other Name: CV Joint
- Position: Inner
- Replaced by: 84444358

Chevrolet Universal Joints Part Number: 84922956
$148.18 MSRP: $233.17You Save: $84.99 (37%)Ships in 1-3 Business DaysProduct Specifications- Other Name: Joint Kit, Propeller Shaft Universal Joint; CV Joint; U Joint; U-Joint
- Replaces: 84272143
Chevrolet Universal Joints Part Number: 84922957
$161.32 MSRP: $253.81You Save: $92.49 (37%)Ships in 1-3 Business DaysProduct Specifications- Other Name: Joint Kit, Propeller Shaft Universal Joint; CV Joint; U Joint; U-Joint
- Replaces: 84272144

Chevrolet Universal Joints Part Number: 84712242
$124.76 MSRP: $212.40You Save: $87.64 (42%)Ships in 1 Business DayProduct Specifications- Other Name: Joint Kit, Propeller Shaft Universal Joint; CV Joint; U Joint; U-Joint
- Replaced by: 84807275

Chevrolet Universal Joints Part Number: 89040339
Product Specifications- Other Name: Joint Kit, Front Axle Propeller Shaft Universal; U Joint; Joint Kit, Propeller Shaft Universal Joint
- Position: Front

Chevrolet Universal Joints, Front Part Number: 19299817
Product Specifications- Other Name: Joint Kit, Propeller Shaft Front Universal; U Joint; Joint Kit, Propeller Shaft Universal Joint
- Position: Front
- Replaces: 14067678
Chevrolet Outer CV Joint, Rear Part Number: 84207684
Product Specifications- Other Name: Joint Kit, Rear Axle Universal Joint; CV Joint
- Position: Rear

Chevrolet Universal Joints Part Number: 12569884
Product Specifications- Other Name: Joint Kit, Propeller Shaft Universal Joint; U Joint
Chevrolet Universal Joints Part Number: 7849090
Product Specifications- Other Name: Joint Kit, Propeller Shaft Universal; U Joint

Chevrolet Inner CV Joint Part Number: 84666171
Product Specifications- Other Name: CV Joint; Outer CV Joint
- Position: Inner
- Replaces: 84609996
Chevrolet Inner CV Joint, Rear Part Number: 84207673
Product Specifications- Other Name: Joint Kit, Rear Axle Universal Joint; CV Joint
- Position: Rear
Chevrolet Inner CV Joint, Rear Part Number: 84650829
Product Specifications- Other Name: Joint Kit, Rear Axle Universal Joint; CV Joint
- Position: Rear
| Page 1 of 2 |Next >
1-20 of 29 Results
Chevrolet Universal Joint
Want to cut long-term maintenance and repair costs? Choose OEM Universal Joint. Those parts deliver top durability you can trust. On our site, you'll find a huge catalog of genuine Chevrolet parts. Prices are unbeatable, so you can keep more in your pocket. Every OEM Chevrolet Universal Joint includes a manufacturer's warranty. You can also get an easy return policy that keeps buying risk free. Fast delivery, get your car on the road quickly. It's simple to search, compare, and order. Stop guessing about quality or fit. Order today and save with parts that last.
Chevrolet Universal Joint Parts Questions & Experts Answers
- Q: How to replace the universal joint and slip yoke using tools J9522-3 and J9522-5 on Chevrolet Camaro?A:You need tools j9522-3 and j9522-5 to get the Universal Joint and Slip Yoke out. Secure the propeller shaft on level ground using any method except placing the tubing inside a vise which may harm the components. Apply j9522-3 over the exposed horizontal bearing cap then press it out to break the nylon injected ring seals during extraction. Push the j9522-5 tool between the seal and bearing cap when the front side of the cap does not come loose fully. Spin the propeller shaft once more and repeat the procedure on the opposite end bearing cap. When changing front universal joints always remove the two propeller shaft Slip Yoke bearing caps through identical procedures. Once the spider is taken out clean both the yoke and joint cup hole keeping the dust seals safe. Set the propeller shaft with the spent u-joint spider bearing retainer rings and use the bearing caps to suspend the shaft horizontally. Start the bearing cap in half and turn it down for bottom position before using j9522-3 to set trunnion in place. Rotate the opposite bearing cap with the same method to make sure both trunnion pieces are in a straight position. Apply pressure to the bearing caps as you move the spider to verify its easy operation before examining the needle roller bearing for any hindrances. Stop to press when the first bearing retainer groove pops loose and push the retainer ring into position by hitting on the yoke surface if required. Apply this step to both Universal Joint sections.
- Q: How to replace the universal joint with an external snap ring on Chevrolet Colorado?A:Start by placing the propeller shaft on a press table flat on top then keep the hollow tubing from vise clamps since vise pressure can break it. Note the specific positioning of the transmission and rear axle on the propeller shaft before installation. Push pliers onto the snap ring ends then pinch to disassemble; gently tap the cup when the ring remains stuck. Use a 30 mm hex head socket or 27 mm socket to support the lower yoke ear and push out its bearing cup with j 9522-3. After the seal and bearing cup fail to separate together use j 9522-5 tool to reach and push them apart. Turn the prop shaft and press out the opposite bearing cup as you note its position to the tube for future setup. Take out all components from the yoke including the cross to replace both universal joints and bearing cups of the Slip Yoke. Check the groove areas of retaining rings and bearing cup spaces for dirt and defects before cleaning them when needed. To build the yoke assembly insert one bearing cup into the joint part until its flat section meets the yoke hole and the ear points downward. Put the cross inside the yoke with the trunnion moving easily in the bearing cup before pushing the bearing cup tightly against the yoke ear. Place the opposite bearing cup partially in place after lining up its trunnions straight to both parts before pushing the piece in while verifying easy movement. Examine the needle bearings when they cannot slide freely. Press until the bearing retainer seating groove appears before putting in both retainers and completing the pushing process. Use a small dead blow hammer to push on the retainer when fitting becomes hard. Applying a tiny amount of chassis grease to the snap ring makes it easier to put it into position correctly.
- Q: How to replace the universal joint with an external snap ring on Chevrolet Tahoe?A:Use the J 9522-3 Universal Joint Bearing Separator and J 9522-5 Universal Joint Bearing Spacer Remover to change the universal joint with an external snap ring. Set the propeller shaft gently on a press surface using markings that show where the parts need to go during reassembly. Use pliers to pinch and loosen snap rings before tapping the end of the lying mechanism gently when needed. Set the J 9522-3 tool on top of the horizontal bearing cups in the yoke ear and press the tool over the lower socket head (30mm hex). Push the J 9522-5 tool between seal and bearing cup when the full release does not happen. Press out the bearing cup while supporting the lowered cross above it. Turn the propeller shaft to push out the bearing cups with their opposite orientation for future reassembly. Examine both horizontal bearing cup bores for signs of defects after removing the cross and universal joint parts. Check the bearing cup and retaining ring grooves for any dirt or damage. Load a bearing cup into one yoke bore so the trunnion fits easily and push it to the yoke edge. Press the opposite bearing cup into the yoke while checking both trunnions run 100 percent smooth. Check if the needle bearings show misalignment when installation causes resistance. You should press down the tool once you see the bearing cup retainer groove and finish by snapping both holders into position. Using a dead blow hammer to hit firmly will help position the retainer if it is hard to put into place. Chassis grease on the snap ring will make it easier to set the retainer in place.


Related Chevrolet Parts
 Chevrolet Wheel Seal
 Chevrolet Differential
 Chevrolet Differential Cover
 Chevrolet Slip Yoke
 Chevrolet Differential Bearing
 Chevrolet Differential Seal
 Chevrolet Driveshaft Yokes
 Chevrolet Pinion Bearing
 Chevrolet Pinion Washer
Browse Chevrolet Universal Joint by Models
S10 Colorado Tahoe Camaro Equinox Impala SSR Avalanche Silverado 1500 Silverado 2500 HD Caprice Suburban Traverse Blazer Tracker Volt K10 Trailblazer Astro Corvette C1500 C2500 C3500 Express 1500 Express 2500 Express 3500 G10 G20 G30 K1500 K20 K2500 K30 K3500 K5 Blazer S10 Blazer Silverado 2500 Silverado 3500 Suburban 1500 Trailblazer EXT Avalanche 1500 Avalanche 2500 C1500 Suburban C2500 Suburban K10 Suburban K1500 Suburban K20 Suburban K2500 Suburban Silverado 1500 Classic Silverado 1500 HD Silverado 1500 LD Silverado 1500 LTD Silverado 2500 HD Classic Silverado 3500 Classic Silverado 3500 HD Suburban 2500 Suburban 3500 HD V10 V10 Suburban V1500 Suburban V20 V20 Suburban V2500 Suburban V30 V3500