ChevyParts
My Garage
My Account
Cart
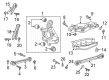
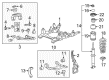
OEM Cadillac Steering Knuckle
Front Steering Knuckle- Select Vehicle by Model
- Select Vehicle by VIN
Select Vehicle by Model
orMake
Model
Year
Select Vehicle by VIN
For the most accurate results, select vehicle by your VIN (Vehicle Identification Number).
164 Steering Knuckles found


Cadillac Knuckle Part Number: 22770325
$385.00 MSRP: $611.28You Save: $226.28 (38%)Ships in 1-2 Business DaysProduct Specifications- Other Name: Knuckle Assembly-Steering; Knuckle, Steering


Cadillac Knuckle, Driver Side Part Number: 84193258
$141.69 MSRP: $241.23You Save: $99.54 (42%)Product Specifications- Other Name: Knuckle Assembly-Steering; Knuckle, Steering
- Position: Driver Side
- Replaces: 23311301, 23504875

Cadillac Knuckle, Passenger Side Part Number: 18060635
$164.43 MSRP: $376.96You Save: $212.53 (57%)Ships in 1-2 Business DaysProduct Specifications- Other Name: Knuckle, Steering
- Position: Passenger Side
- Replaces: 18021762, 18026646

Cadillac Knuckle, Passenger Side Part Number: 84032116
$120.21 MSRP: $189.10You Save: $68.89 (37%)Ships in 1-3 Business DaysProduct Specifications- Other Name: Knuckle Assembly-Steering; Knuckle, Steering
- Position: Passenger Side

Cadillac Knuckle, Passenger Side Part Number: 84712198
$94.94 MSRP: $148.72You Save: $53.78 (37%)Ships in 1-2 Business DaysProduct Specifications- Other Name: Knuckle, Steering
- Position: Passenger Side

Cadillac Knuckle, Driver Side Part Number: 22739649
$92.61 MSRP: $152.53You Save: $59.92 (40%)Product Specifications- Other Name: Knuckle, Steering
- Position: Driver Side

Cadillac Knuckle, Driver Side Part Number: 22861294
$311.73 MSRP: $513.50You Save: $201.77 (40%)Ships in 1-2 Business DaysProduct Specifications- Other Name: Knuckle, Steering
- Position: Driver Side
- Replaced by: 23118360

Cadillac Knuckle, Driver Side Part Number: 84560117
$89.12 MSRP: $139.55You Save: $50.43 (37%)Ships in 1-3 Business DaysProduct Specifications- Other Name: Knuckle, Steering
- Position: Driver Side
- Replaces: 84437330

Cadillac Knuckle, Rear Driver Side Part Number: 84569112
$145.83 MSRP: $229.47You Save: $83.64 (37%)Ships in 1-3 Business DaysProduct Specifications- Other Name: Knuckle, Rear Wheel
- Position: Rear Driver Side

Cadillac Knuckle, Driver Side Part Number: 15775067
$221.65 MSRP: $359.73You Save: $138.08 (39%)Product Specifications- Other Name: Knuckle Assembly-Steering; Knuckle, Steering
- Position: Driver Side

Cadillac Knuckle, Rear Driver Side Part Number: 84196224
$123.81 MSRP: $203.94You Save: $80.13 (40%)Ships in 1-2 Business DaysProduct Specifications- Other Name: Knuckle, Rear Wheel
- Position: Rear Driver Side
- Replaced by: 26503836

Cadillac Knuckle, Rear Part Number: 22770355
$448.28 MSRP: $711.73You Save: $263.45 (38%)Ships in 1-2 Business DaysProduct Specifications- Other Name: Knuckle, Rear Wheel
- Position: Rear
Cadillac Knuckle, Passenger Side Part Number: 84702875
$113.79 MSRP: $179.04You Save: $65.25 (37%)Ships in 1-3 Business DaysProduct Specifications- Other Name: Knuckle, Steering
- Position: Passenger Side

Cadillac Knuckle, Driver Side Part Number: 25998393
$95.35 MSRP: $180.37You Save: $85.02 (48%)Ships in 1-2 Business DaysProduct Specifications- Other Name: Knuckle, Steering
- Position: Driver Side
- Replaces: 18048936

Cadillac Knuckle, Rear Driver Side Part Number: 84520221
$145.67 MSRP: $229.22You Save: $83.55 (37%)Ships in 1-3 Business DaysProduct Specifications- Other Name: Knuckle, Rear Wheel
- Position: Rear Driver Side

Cadillac Knuckle, Driver Side Part Number: 23271315
$104.62 MSRP: $163.85You Save: $59.23 (37%)Ships in 1-3 Business DaysProduct Specifications- Other Name: Knuckle Assembly-Steering; Knuckle, Steering
- Position: Driver Side


Cadillac Knuckle Part Number: 89060307
$209.80 MSRP: $330.09You Save: $120.29 (37%)Ships in 1-3 Business DaysProduct Specifications- Other Name: Knuckle, Steering
- Replaces: 18040503

Cadillac Knuckle, Driver Side Part Number: 18064146
$199.80 MSRP: $329.13You Save: $129.33 (40%)Ships in 1-2 Business DaysProduct Specifications- Other Name: Knuckle, Steering
- Position: Driver Side
- Replaces: 89060203

Cadillac Knuckle, Rear Passenger Side Part Number: 18026760
Product Specifications- Other Name: Knuckle Assembly, Rear Suspension; Knuckle, Rear Wheel
- Position: Rear Passenger Side
- Replaces: 18023712

Cadillac Knuckle, Passenger Side Part Number: 15775070
$240.66 MSRP: $378.68You Save: $138.02 (37%)Product Specifications- Other Name: Knuckle, Steering
- Position: Passenger Side
| Page 1 of 9 |Next >
1-20 of 164 Results
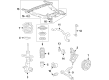
Cadillac Steering Knuckle
Want to cut long-term maintenance and repair costs? Choose OEM Steering Knuckle. Those parts deliver top durability you can trust. On our site, you'll find a huge catalog of genuine Cadillac parts. Prices are unbeatable, so you can keep more in your pocket. Every OEM Cadillac Steering Knuckle includes a manufacturer's warranty. You can also get an easy return policy that keeps buying risk free. Fast delivery, get your car on the road quickly. It's simple to search, compare, and order. Stop guessing about quality or fit. Order today and save with parts that last.
Cadillac Steering Knuckle Parts Questions & Experts Answers
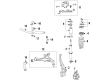
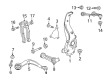
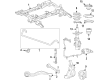
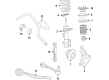
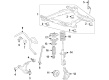
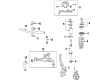
- Q: How to replace the steering knuckle on an AWD on Cadillac CTS?A:To replace the Steering Knuckle on an awd vehicle, ensure that there is no spinning around. Enter the ball stud with hand tools when disassembling or reassembling it. Start by lifting and supporting the vehicle, and then take the tire and wheel. Next exit the wheel bearing hub, them the outer tie rod from the Steering Knuckle. Unfasten the brake hose bracket retaining bolts and then remove the Steering Knuckle in the upper Control Arm and drop it from the Control Arm. For installation; you mount the Steering Knuckle to the lower Control Arm as well as attaching it to the upper Control Arm. Replace the brake hose bracket retaining bolts, then the outer tie rod to the Steering Knuckle. Finally, the wheel bearing/hub, the tire and wheel, and bring the vehicle down.
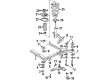
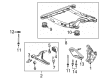
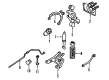
- Q: What tools are required to replace the steering knuckle on a 2500 Series on Cadillac Escalade?A:The replacement of a 2500 series Steering Knuckle requires these specific tools: ball joint remover (J 43631), ball joint separator protector adaptor (J 45851) and Ball Joint separator (J-42188-B). The tool kit for Steering Knuckle replacement includes Ball Joint remover (J 43631), ball joint separator protector adaptor (J 45851), and Ball Joint separator (J-42188-B). First raise and support the vehicle and then take off the wheel together with the tire. First stabilize the lower Control Arm before you extract the Wheel Hub paired with the bearing assembly. Prior to installation disconnect the outer tie rod from the Steering Knuckle while you also disassemble the brake hose bracket retaining bolt. The Ball Joint separator (J-42188-B) enables Ball Joint separation from the Steering Knuckle after you remove the upper Control Arm retaining nut. Use the Ball Joint remover (J 43631) with the Ball Joint separator protector adaptor (J 45851) to remove the lower Ball Joint from the Steering Knuckle following lower Control Arm retaining nut removal. Before fitting new components clean all grease residue and contaminants from the tapered edges and threading surfaces of upper ball joints, lower ball joints and tie rods. Steering knuckles should get replacement when inspection shows elongated or out-of-round or damaged holes found in the mounting surface or taper areas. First install the new Steering Knuckle before attaching the lower Ball Joint and installing the retaining nut which must be tightened to 110 n.m (81 lb ft). Tighten the upper Ball Joint's retaining nut to 50 n.m (37 lb ft). Attach the brake hose and bracket retaining bolt before tightening it to 9 n.m (80 lb in). Next secure the outer tie rod to the Steering Knuckle. After placing the Wheel Hub and bearing assembly install the tire and wheel. Inspect wheel alignment after lowering the vehicle and removing its lower Control Arm support.
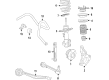
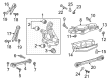
- Q: How to replace the front steering knuckle on Cadillac XLR?A:The start of front Steering Knuckle replacement requires vehicle elevation and support. Disconnect the brake caliper and remove rotor before detaching the stabilizer shaft link from the lower Control Arm along with separating the Wheel Speed Sensor electrical connector. Support the lower Control Arm using a jackstand. Use the ball joint separator (J 42188) to detach the outer tie rod ball stud from the Steering Knuckle using this tool before working on the upper Control Arm ball joint stud and lower ball joint stud. The vehicle should have its Steering Knuckle removed after the separation process completes. Begin installation by connecting the Steering Knuckle to both the upper and lower control arms followed by dismounting the jackstand. Connect the steering linkage outer tie rod ball stud to its position on the Steering Knuckle then install the stabilizer shaft link onto the lower Control Arm before torquing the stabilizer shaft link nut to 72 nm (53 ft. Lbs.). The Wheel Speed Sensor electrical connector needs to be connected first followed by installation of the brake rotor and caliper as well as the tire and wheel assembly before the vehicle can be lowered to check the required front wheel toe alignment.