ChevyParts
My Garage
My Account
Cart
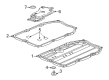
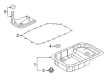
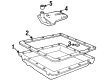
OEM Chevrolet Automatic Transmission Filter
AT Filter- Select Vehicle by Model
- Select Vehicle by VIN
Select Vehicle by Model
orMake
Model
Year
Select Vehicle by VIN
For the most accurate results, select vehicle by your VIN (Vehicle Identification Number).
56 Automatic Transmission Filters found


Chevrolet Filter Part Number: 24268505
$39.51 MSRP: $70.57You Save: $31.06 (45%)Ships in 1-3 Business DaysProduct Specifications- Other Name: Filter Kit, Automatic Transmission Fluid; Transmission Filter; Hydraulic Filter; Filter Kit, Transmission Oil Suction Tube


Chevrolet Pan Gasket Part Number: 24274402
$23.00 MSRP: $41.08You Save: $18.08 (45%)Product Specifications- Other Name: Filter, Oil Pan Pump Suction; Transmission Filter; Valley Pan Gasket; Filter; Filter, Transmission Oil Suction Tube
- Replaced by: 24295812


Chevrolet Filter Part Number: 24208574
$36.38 MSRP: $64.96You Save: $28.58 (44%)Product Specifications- Other Name: Filter Kit, Transmission Oil Suction Tube; Transmission Filter


Chevrolet Filter, Green Line Part Number: 24221762
$40.89 MSRP: $73.03You Save: $32.14 (45%)Ships in 1-3 Business DaysProduct Specifications- Other Name: Filter Kit, Automatic Transmission Fluid; Hydraulic Filter; Transmission Filter Kit.; Filter Kit, Transmission Oil Suction Tube; Filter, Transmission Oil Suction Tube; Filter Kit
- Replaces: 08685185, 24203770, 8685185


Chevrolet Filter Assembly Part Number: 19168277
$35.03 MSRP: $62.57You Save: $27.54 (45%)Ships in 1-3 Business DaysProduct Specifications- Other Name: Filter Kit, Oil Pan Pump Suction; Transmission Filter; Filter


Chevrolet Filter Part Number: 24236799
$36.64 MSRP: $65.42You Save: $28.78 (44%)Ships in 1-3 Business DaysProduct Specifications- Other Name: Filter Kit, Automatic Transmission Fluid; Transmission Filter; Filter Kit, Transmission Oil Suction Tube; Filter Kit, Oil Pan Pump Suction; Filter Kit
- Replaces: 24229186, 24200796


Chevrolet Filter Part Number: 24225323
$41.19 MSRP: $73.58You Save: $32.39 (45%)Ships in 1-2 Business DaysProduct Specifications- Other Name: Filter Kit, Automatic Transmission Fluid; Hydraulic Filter; Transmission Filter Kit.; Filter Kit, Oil Pan Pump Suction; Filter Kit


Chevrolet Filter Part Number: 24240239
$46.58 MSRP: $83.19You Save: $36.61 (45%)Ships in 1-2 Business DaysProduct Specifications- Other Name: Filter, Transmission Oil Suction Tube; Hydraulic Filter; Automatic Transmission Filter Kit.


Chevrolet Filter Part Number: 29537965
$42.59 MSRP: $76.06You Save: $33.47 (44%)Ships in 1-3 Business DaysProduct Specifications- Other Name: Filter, Oil Pan Pump Suction; Transmission Filter; Filter, Transmission Oil Suction Tube
- Replaces: 29537514


Chevrolet Filter Part Number: 24254192
$20.66 MSRP: $36.88You Save: $16.22 (44%)Ships in 1-3 Business DaysProduct Specifications- Other Name: Filter Assembly-Automatic Transmission Fluid; Transmission Filter; Hydraulic Filter; Filter, Transmission Oil Suction Tube


Chevrolet Filter Part Number: 24252158
$37.91 MSRP: $67.69You Save: $29.78 (44%)Ships in 1-3 Business DaysProduct Specifications- Other Name: Filter Kit, Automatic Transmission Fluid; Hydraulic Filter; Transmission Filter Kit.; Filter Kit, Transmission Oil Suction Tube
- Replaces: 24236932

Chevrolet Filter Part Number: 24298004
$53.56 MSRP: $95.64You Save: $42.08 (44%)Product Specifications- Other Name: Filter Kit, Automatic Transmission Fluid; Transmission Filter; Filter Kit, Oil Pan Pump Suction

Chevrolet Filter Part Number: 25198615
$76.98 MSRP: $137.46You Save: $60.48 (44%)Ships in 1-3 Business DaysProduct Specifications- Other Name: Filter, Transmission Oil Suction Tube; Transmission Filter; Hydraulic Filter

Chevrolet Filter Part Number: 8684221
$34.98 MSRP: $62.46You Save: $27.48 (44%)Ships in 1-3 Business DaysProduct Specifications- Other Name: Filter, Automatic Transmission Fluid; Transmission Filter; Filter, Oil Pan Pump Suction

Chevrolet Filter Part Number: 24288521
$22.52 MSRP: $40.23You Save: $17.71 (45%)Ships in 1-3 Business DaysProduct Specifications- Other Name: Filter Assembly-Automatic Transmission Fluid; Transmission Filter; Hydraulic Filter; Filter, Transmission Oil Suction Tube

Chevrolet Filter Part Number: 24047742
$81.94 MSRP: $146.31You Save: $64.37 (44%)Ships in 1-3 Business DaysProduct Specifications- Other Name: Filter-Automatic Transmission Fluid (Suction); Filter, Transmission Oil Suction Tube
- Replaces: 24299335

Chevrolet Filter Part Number: 93741509
$77.63 MSRP: $138.62You Save: $60.99 (44%)Ships in 1-3 Business DaysProduct Specifications- Other Name: Filter, Automatic Transmission Fluid; Transmission Filter; Hydraulic Filter; Filter, Transmission Oil Suction Tube

Chevrolet Filter Part Number: 25199843
$76.04 MSRP: $135.78You Save: $59.74 (44%)Product Specifications- Other Name: Filter, Transmission Oil Suction Tube; Transmission Filter
- Replaces: 25188304

Chevrolet Filter Part Number: 24297793
$17.68 MSRP: $31.57You Save: $13.89 (44%)Ships in 1-3 Business DaysProduct Specifications- Other Name: Filter Assembly-Automatic Transmission Fluid (W/Cover & Seal); Transmission Oil Filter; Hydraulic Filter; Filter, Transmission Oil Suction Tube
- Replaces: 24291509, 24272927

Chevrolet Filter Part Number: 19318309
$45.54 MSRP: $81.32You Save: $35.78 (44%)Product Specifications- Other Name: Filter, Transmission Oil Suction Tube; Transmission Filter; Hydraulic Filter
- Replaces: 19317655
| Page 1 of 3 |Next >
1-20 of 56 Results
Chevrolet Automatic Transmission Filter
Want to cut long-term maintenance and repair costs? Choose OEM Automatic Transmission Filter. Those parts deliver top durability you can trust. On our site, you'll find a huge catalog of genuine Chevrolet parts. Prices are unbeatable, so you can keep more in your pocket. Every OEM Chevrolet Automatic Transmission Filter includes a manufacturer's warranty. You can also get an easy return policy that keeps buying risk free. Fast delivery, get your car on the road quickly. It's simple to search, compare, and order. Stop guessing about quality or fit. Order today and save with parts that last.
Chevrolet Automatic Transmission Filter Parts Questions & Experts Answers
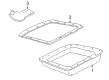
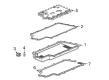
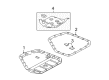
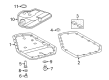
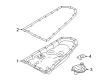
- Q: How to Replace the Automatic Transmission Filter and Fluid on Chevrolet Camaro?A:Before starting the automatic transmission fluid and filter replacement you should raise the vehicle and maintain it in position then place a drain pan underneath the transmission Oil Pan. Disassemble the range selector cable bracket when possible by removing bolts so the technician can set it aside before lowering the pan. The Drain Plug should also be removed from the Oil Pan but only if the transmission allows it. Begin by removing front and side Oil Pan bolts yet keep the back bolts loose at 4 turns before using a rubber mallet to slightly tap the pan for fluid drainage. First remove all remaining bolts before removing the Oil Pan and gasket and then use both hands to twist the filter out while simultaneously removing its attached seal which might require pliers due to its stuck position. You should evaluate the fluid color and filter contents for clutch fragments and metal components after eliminating the gasket seal. Use solvent to clean transmission case and Oil Pan gasket surfaces until all remnants of old gasket material disappear. Place automatic transmission fluid on the new filter seal before putting it into place using a proper socket before installing the new filter. First install the Oil Pan with its new gasket then tighten the bolts starting from one side to the other with even torque at 11 nm (97 inch lbs.). Also reinstall the range selector cable bracket and tighten its bolts to 25 nm (18 ft. Lbs.). Apply gm p/n 12346004 sealant product to the threads of the Oil Pan Drain Plug when equipped and install the plug tightly with 18 nm (13 ft. Lbs.). The technician should lower the vehicle to operate while filling the transmission with dexron iii transmission fluid and should inspect the cold fluid level and verify that the Oil Pan gasket remains leak-free.
- Q: How to Replace the Automatic Transmission Filter and Fluid on Chevrolet Colorado?A:The first step for auto transmission fluid and filter replacement involves raising the vehicle while providing support to it. Pulling at the boot part of the range selector cable should be avoided at all times. Users can disconnect the range selector cable from the transmission range selector lever ball stud by inserting a flat bladed tool between the range selector cable end and the range selector lever . The cable end will separate from the lever when the tool is applied. The transmission range selector cable bracket requires removal of its bolts before setting it away during transmission pan lowering. Set a proper container beneath the transmission Oil Pan then unscrew the bolts at the front and sides before turning the rear bolts four times. The combination of gentle mallet strikes on the Oil Pan along with the transmission fluid will drain into the prepared container. After removing all the bolts from the Oil Pan you can separate the Oil Pan along with its gasket. Ungently rotate the filter while pulling it off before removing the seal to discard it when needed. Examine the fluid while inspecting the filter to evaluate whether it contains signs of bushing wear or clutch material or steel particles. After cleaning transmission case and Oil Pan Gasket surfaces with solvent the surfaces need to dry out completely while removing any residual gasket material. Install the transmission case filter seal by whethering the seal with clean automatic transmission fluid and using a suitable socket to tap it into its proper position. After installing the new filter position the new Oil Pan that comes with its gasket while securing all bolts to 16 nm (12 ft. Lbs.) by adapting a twisting pattern. The separator of used transmission liquid should be removed before the technician positions the transmission range selector cable bracket and bolts it down with 25 nm (18 ft. Lbs.) of torque. The automatic transmission range selector cable needs adjustments before lowering the vehicle for fluid addition using dexron (R) iii transmission fluid at the correct level except during first fill when only cold fluid level should be evaluated. Check for any Oil Pan Gasket leaks as your last step.
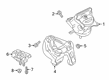
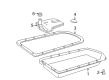
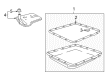
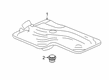
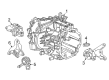
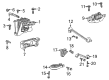
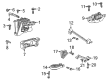
- Q: How to replace the Automatic Transmission Filter and Seal in the 4T65-E Automatic Transaxle on Chevrolet Malibu?A:The first step to replace the automatic transmission fluid filter and seal within the 4t65-e automatic transaxle requires removing both the Oil Pan with its attached gasket. Start by removing the filter (100) and the lip ring seal (101) that is compressed inside the case only when replacement is required. Examine the Oil Pan alongside the filter under inspection for foreign materials especially metal particles clutch facing material rubber particles and engine coolant substances before you determine their origination points to perform necessary corrections. To replace the seal (101) first apply the filter (100) followed by attaching both the gasket (102) and the Oil Pan to the automatic transaxle.


Related Chevrolet Parts
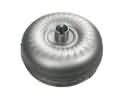 Chevrolet Torque Converter
 Chevrolet Flywheel
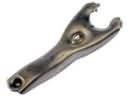 Chevrolet Clutch Fork
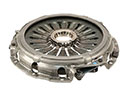 Chevrolet Pressure Plate
 Chevrolet Shift Cable
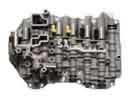 Chevrolet Valve Body
 Chevrolet Automatic Transmission Seal
 Chevrolet Automatic Transmission Shift Levers
 Chevrolet Clutch Disc
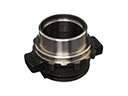 Chevrolet Release Bearing
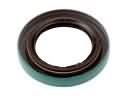 Chevrolet Transfer Case Seal
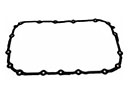 Chevrolet Transmission Gasket
Browse Chevrolet Automatic Transmission Filter by Models
S10 Colorado C10 Tahoe Cruze Malibu Camaro Equinox Impala SS SSR Avalanche Silverado 1500 Silverado 2500 HD Caprice Classic Cobalt Suburban Traverse Blazer HHR Sonic Tracker Volt El Camino K10 Spark Trailblazer Astro Cavalier Corvette C20 Aveo Beretta Bolt EUV Bolt EV C1500 C2500 C30 C3500 Celebrity Chevette City Express Corsica Express 1500 Express 2500 Express 3500 G10 G20 G30 K1500 K20 K2500 K30 K3500 K5 Blazer Lumina Metro Monte Carlo P30 Prizm S10 Blazer Silverado 2500 Sprint Uplander Venture Lumina APV Silverado 3500 Suburban 1500 Trailblazer EXT Avalanche 1500 Avalanche 2500 Aveo5 C10 Suburban C1500 Suburban C20 Suburban C2500 Suburban Citation II Cruze Limited K10 Suburban K1500 Suburban K20 Suburban K2500 Suburban R10 R10 Suburban R1500 Suburban R20 R20 Suburban R2500 R2500 Suburban R30 R3500 Silverado 1500 Classic Silverado 1500 HD Silverado 1500 HD Classic Silverado 1500 LD Silverado 1500 LTD Silverado 2500 HD Classic Silverado 3500 Classic Silverado 3500 HD Spark EV Spectrum Suburban 2500 Suburban 3500 HD V10 V10 Suburban V1500 Suburban V20 V20 Suburban V2500 Suburban V30 V3500