ChevyParts
My Garage
My Account
Cart
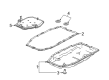
OEM Chevrolet Flywheel
Clutch Flywheel- Select Vehicle by Model
- Select Vehicle by VIN
Select Vehicle by Model
orMake
Model
Year
Select Vehicle by VIN
For the most accurate results, select vehicle by your VIN (Vehicle Identification Number).
156 Flywheels found


Chevrolet Drive Plate Part Number: 12555640
$149.66 MSRP: $360.86You Save: $211.20 (59%)Ships in 1-2 Business DaysProduct Specifications- Other Name: Flywheel, Engine Crankshaft; Plate, Engine Crankshaft


Chevrolet Flywheel Part Number: 12557586
$372.76 MSRP: $536.04You Save: $163.28 (31%)Ships in 1-2 Business DaysProduct Specifications- Other Name: Flywheel, Engine Crankshaft


Chevrolet Flywheel Part Number: 24238864
$553.88 MSRP: $875.06You Save: $321.18 (37%)Ships in 1-3 Business DaysProduct Specifications- Other Name: Flywheel, Engine Crankshaft
- Replaces: 24232434, 12582861


Chevrolet Flywheel Part Number: 24272406
$443.80 MSRP: $698.30You Save: $254.50 (37%)Ships in 1-3 Business DaysProduct Specifications- Other Name: Flywheel, Engine Crankshaft


Chevrolet Flywheel Part Number: 90537283
$116.13 MSRP: $182.74You Save: $66.61 (37%)Ships in 1-3 Business DaysProduct Specifications- Other Name: Flywheel, Engine Crankshaft


Chevrolet Flywheel Part Number: 12561680
$388.59 MSRP: $611.43You Save: $222.84 (37%)Product Specifications- Other Name: Flywheel, Engine Crankshaft


Chevrolet Drive Plate Part Number: 12561217
$378.22 MSRP: $595.10You Save: $216.88 (37%)Ships in 1-3 Business DaysProduct Specifications- Other Name: Flywheel, Engine Crankshaft

Chevrolet Flywheel Part Number: 14100559
$84.00 MSRP: $432.18You Save: $348.18 (81%)Ships in 1-2 Business DaysProduct Specifications- Other Name: Flywheel, Engine Crankshaft

Chevrolet Drive Plate Part Number: 12686891
$48.41 MSRP: $75.83You Save: $27.42 (37%)Ships in 1-3 Business DaysProduct Specifications- Other Name: Plate, Engine Crankshaft
- Replaces: 12655475
Chevrolet Flywheel Part Number: 12645695
$99.19 MSRP: $155.36You Save: $56.17 (37%)Ships in 1-3 Business DaysProduct Specifications- Other Name: Flywheel, Engine Crankshaft

Chevrolet Flywheel Part Number: 12557585
$421.38 MSRP: $605.96You Save: $184.58 (31%)Ships in 1-2 Business DaysProduct Specifications- Other Name: Flywheel, Engine Crankshaft

Chevrolet Drive Plate Part Number: 24575991
$190.11 MSRP: $299.12You Save: $109.01 (37%)Ships in 1-3 Business DaysProduct Specifications- Other Name: Flywheel, Engine Crankshaft

Chevrolet Drive Plate Part Number: 10044373
$140.85 MSRP: $221.62You Save: $80.77 (37%)Ships in 1-3 Business DaysProduct Specifications- Other Name: Flywheel, Engine Crankshaft
Chevrolet Flywheel Part Number: 12679186
$74.08 MSRP: $116.03You Save: $41.95 (37%)Ships in 1-3 Business DaysProduct Specifications- Other Name: Flywheel, Engine Crankshaft
Chevrolet Flywheel Part Number: 55570175
$370.14 MSRP: $582.38You Save: $212.24 (37%)Ships in 1-3 Business DaysProduct Specifications- Other Name: Flywheel, Engine Crankshaft

Chevrolet Drive Plate Part Number: 12663484
$15.83 MSRP: $26.06You Save: $10.23 (40%)Ships in 1-3 Business DaysProduct Specifications- Other Name: Plate, Engine Crankshaft

Chevrolet Drive Plate Part Number: 12686890
$64.24 MSRP: $100.66You Save: $36.42 (37%)Ships in 1-3 Business DaysProduct Specifications- Other Name: Plate, Engine Crankshaft
- Replaces: 12647930, 12664939
Chevrolet Drive Plate Part Number: 12689672
$23.89 MSRP: $37.41You Save: $13.52 (37%)Ships in 1-3 Business DaysProduct Specifications- Other Name: Plate, Engine Crankshaft

Chevrolet Flywheel Part Number: 12582964
$207.40 MSRP: $326.20You Save: $118.80 (37%)Ships in 1-3 Business DaysProduct Specifications- Other Name: Flywheel, Engine Crankshaft
Chevrolet Drive Plate Part Number: 55587259
$19.52 MSRP: $30.57You Save: $11.05 (37%)Product Specifications- Other Name: Plate, Engine Crankshaft
| Page 1 of 8 |Next >
1-20 of 156 Results
Chevrolet Flywheel
Want to cut long-term maintenance and repair costs? Choose OEM Flywheel. Those parts deliver top durability you can trust. On our site, you'll find a huge catalog of genuine Chevrolet parts. Prices are unbeatable, so you can keep more in your pocket. Every OEM Chevrolet Flywheel includes a manufacturer's warranty. You can also get an easy return policy that keeps buying risk free. Fast delivery, get your car on the road quickly. It's simple to search, compare, and order. Stop guessing about quality or fit. Order today and save with parts that last.
Chevrolet Flywheel Parts Questions & Experts Answers
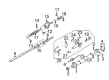
- Q: How to replace the engine flywheel (MA5) on Chevrolet Colorado?A:The first step to replace engine Flywheel (MA5) involves removing the clutch assembly followed by retrieving the Flywheel bolts which are disposable. The next step requires removal of the Flywheel which needs proper cleaning as well as inspection. The installation process requires positioning the new Flywheel onto the Crankshaft according to service precautions that specify the fastener notice. Place the new Flywheel bolts in position before torquing them to 25 nm (18 ft. Lbs.). Install the clutch assembly after you use the j 45059 angle meter to rotate the Flywheel bolts to 50 degrees.
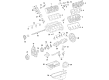
- Q: How to replace the engine flywheel on Chevrolet Malibu?A:A mechanic must take out the transaxle before starting the engine Flywheel replacement task. An assistant should use (J 38122-A) and a breaker bar to install them to the crankshaft balancer to keep the Flywheel from spinning when removing the Flywheel bolts. The edge of an 18 mm socket will require chamfer removal when using it to engage thin-headed Flywheel bolts. The engine balancing process requires discarding the Flywheel bolts after their removal without allowing the Flywheel to face the crankshaft because it remains balanced independently of the engine. Utilize a nylon bristle brush to cleanse thread adhesive from Flywheel bolt holes found on the crankshaft before positioning the Flywheel onto the crankshaft. Place the Flywheel on the crankshaft before tightening all new Flywheel bolts to a moderate torque. An assistant should use (J 38122-A) and a breaker bar attached to the crankshaft balancer to stop the crankshaft rotation during Flywheel bolt tightening. Use (J 45059) tool to tighten Flywheel bolts to 53 nm (39 lb ft) and achieve an additional 25-degree angle. After you detach the (J 38122-A) along with the breaker bar put the transaxle into position.
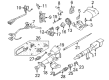
- Q: How to replace the engine flywheel on Chevrolet Tahoe?A:The first step for engine Flywheel replacement requires automatic transmission removal followed by careful note taking of engine Flywheel orientation before the operation. The next step involves taking off the Flywheel bolts following removal of the Flywheel. The spacer removal from the Crankshaft rear requires clockwise rotation of two m11x1.5 mm bolts installed into the threaded holes of the spacer. Start by placing the spacer at the Crankshaft rear when needed before applying the Flywheel and its bolts to the Crankshaft. Also use extended Flywheel bolts with spacer installation. Slight threadlocking liquid such as gm p/n 12345382 (Canadian P/N 10953489) or its equivalent must be applied to all Flywheel bolt threads. Proceed with bolt installation onto the Flywheel by starting with 20 nm (15 ft. Lbs.) torque followed by 50 nm (37 ft. Lbs.) and finishing at 100 nm (74 ft. Lbs.). Reinstallation of the automatic transmission should be the next step after finishing this procedure.


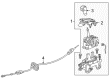
Related Chevrolet Parts
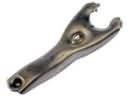 Chevrolet Clutch Fork
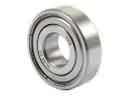 Chevrolet Pilot Bearing
 Chevrolet Shift Cable
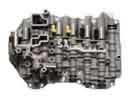 Chevrolet Valve Body
 Chevrolet Automatic Transmission Seal
 Chevrolet Automatic Transmission Shift Levers
 Chevrolet Automatic Transmission Shifter
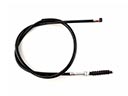 Chevrolet Clutch Cable
 Chevrolet Clutch Disc
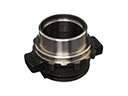 Chevrolet Release Bearing
 Chevrolet Transmission Assembly
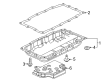
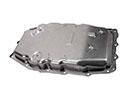 Chevrolet Transmission Pan
Browse Chevrolet Flywheel by Models
Nova S10 Colorado C10 Tahoe Cruze Malibu Camaro Equinox Impala SS SSR Avalanche Silverado 1500 Silverado 2500 HD Caprice Classic Cobalt Suburban Traverse Blazer HHR Sonic Tracker Volt El Camino K10 Spark Trax Trailblazer Astro Cavalier Corvette C20 Aveo Beretta C1500 C2500 C30 C3500 Celebrity Chevette Corsica Express 1500 Express 2500 Express 3500 G10 G20 G30 K1500 K20 K2500 K30 K3500 K5 Blazer Lumina Metro Monte Carlo Prizm S10 Blazer Silverado 2500 Sprint Uplander Venture Lumina APV Silverado 3500 Suburban 1500 Trailblazer EXT Avalanche 1500 Avalanche 2500 Aveo5 C10 Suburban C1500 Suburban C20 Suburban C2500 Suburban Captiva Sport Citation II Cruze Limited Impala Limited K10 Suburban K1500 Suburban K20 Suburban K2500 Suburban R10 R10 Suburban R1500 Suburban R20 R20 Suburban R2500 R2500 Suburban R30 R3500 Silverado 1500 Classic Silverado 1500 HD Silverado 1500 HD Classic Silverado 1500 LD Silverado 1500 LTD Silverado 2500 HD Classic Silverado 3500 Classic Silverado 3500 HD Spectrum Suburban 2500 Suburban 3500 HD V10 V10 Suburban V1500 Suburban V20 V20 Suburban V2500 Suburban V30 V3500