ChevyParts
My Garage
My Account
Cart
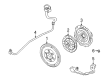
OEM Chevrolet Clutch Master Cylinder
- Select Vehicle by Model
- Select Vehicle by VIN
Select Vehicle by Model
orMake
Model
Year
Select Vehicle by VIN
For the most accurate results, select vehicle by your VIN (Vehicle Identification Number).
66 Clutch Master Cylinders found


Chevrolet Master Cylinder Part Number: 25196007
$60.08 MSRP: $94.12You Save: $34.04 (37%)Ships in 1-3 Business DaysProduct Specifications- Other Name: Cylinder-Clutch Master; Clutch Master Cylinder; Cylinder, Hydraulic Clutch Main Cylinder
- Replaced by: 25208379
- Replaces: 25186238


Chevrolet Master Cylinder Part Number: 12572805
$152.42 MSRP: $239.84You Save: $87.42 (37%)Ships in 1-3 Business DaysProduct Specifications- Other Name: Cylinder Assembly-Clutch Master; Clutch Master Cylinder; Cylinder, Hydraulic Clutch Main Cylinder
- Replaces: 15048469, 12573372


Chevrolet Master Cylinder Part Number: 19331709
$117.55 MSRP: $184.96You Save: $67.41 (37%)Product Specifications- Other Name: Cylinder Assembly, Clutch Master; Clutch Master Cylinder; Cylinder, Hydraulic Clutch Main Cylinder
- Replaced by: 19432063

Chevrolet Master Cylinder Part Number: 12385321
$136.92 MSRP: $215.44You Save: $78.52 (37%)Ships in 1-3 Business DaysProduct Specifications- Other Name: Actuator, Hydraulic Clutch Main Cylinder; Clutch Master Cylinder
- Replaces: 15998928

Chevrolet Master Cylinder Part Number: 25188983
$42.43 MSRP: $66.46You Save: $24.03 (37%)Ships in 1-2 Business DaysProduct Specifications- Other Name: Cylinder Assembly-Clutch Master; Clutch Master Cylinder; Cylinder, Hydraulic Clutch Main Cylinder

Chevrolet Master Cylinder Part Number: 12571919
$133.26 MSRP: $209.69You Save: $76.43 (37%)Ships in 1-3 Business DaysProduct Specifications- Other Name: Cylinder Assembly-Clutch Master; Clutch Master Cylinder; Cylinder; Cylinder, Hydraulic Clutch Main Cylinder
- Replaces: 22632982

Chevrolet Master Cylinder Part Number: 22601783
$81.91 MSRP: $172.91You Save: $91.00 (53%)Ships in 1-2 Business DaysProduct Specifications- Other Name: Cylinder, Hydraulic Clutch Main Cylinder; Clutch Master Cylinder
- Replaces: 22638609

Chevrolet Slave Cylinder Part Number: 15232236
$198.18 MSRP: $311.70You Save: $113.52 (37%)Ships in 1-3 Business DaysProduct Specifications- Other Name: Actuator, Hydraulic Clutch Main Cylinder; Clutch Slave Cylinder


Chevrolet Master Cylinder Part Number: 12574148
$136.69 MSRP: $215.08You Save: $78.39 (37%)Product Specifications- Other Name: Cylinder Assembly-Clutch Master; Clutch Master Cylinder; Cylinder, Hydraulic Clutch Main Cylinder
- Replaces: 15064078, 15027984


Chevrolet Master Cylinder Part Number: 15727261
$192.34 MSRP: $302.50You Save: $110.16 (37%)Product Specifications- Other Name: Cylinder Assembly-Clutch Master; Clutch Master Cylinder; Cylinder, Hydraulic Clutch Main Cylinder
- Replaces: 15740931


Chevrolet Master Cylinder Part Number: 15594142
Product Specifications- Other Name: Cylinder, Hydraulic Clutch Main Cylinder; Clutch Master Cylinder


Chevrolet Master Cylinder Part Number: 15051973
Product Specifications- Other Name: Cylinder, Hydraulic Clutch Main Cylinder; Clutch Master Cylinder
- Replaces: 15153421, 15733571


Chevrolet Master Cylinder Part Number: 12385319
Product Specifications- Other Name: Cylinder Assembly, Clutch Master; Clutch Master Cylinder; Cylinder, Hydraulic Clutch Main Cylinder


Chevrolet Master Cylinder Part Number: 12584955
Product Specifications- Other Name: Cylinder Assembly-Clutch Master; Clutch Master Cylinder; Cylinder, Hydraulic Clutch Main Cylinder
- Replaces: 12574150, 15762468


Chevrolet Master Cylinder Assembly Part Number: 12527718
Product Specifications- Other Name: Cylinder, Hydraulic Clutch Main Cylinder; Clutch Master Cylinder

Chevrolet Master Cylinder Repair Kit Part Number: 94846047
Product Specifications- Other Name: Cylinder Kit, Hydraulic Clutch Main Cylinder
Chevrolet Master Cylinder Repair Kit Part Number: 15579688
Product Specifications- Other Name: Cylinder Kit; Cylinder Kit, Hydraulic Clutch Main Cylinder; Repair Kit, Hydraulic Clutch Main Cylinder

Chevrolet Master Cylinder Repair Kit Part Number: 94859175
Product Specifications- Other Name: Cylinder Kit, Hydraulic Clutch Main Cylinder
Chevrolet Master Cylinder Repair Kit Part Number: 14079421

Chevrolet Master Cylinder Part Number: 96652647
Product Specifications- Other Name: Cylinder, Hydraulic Clutch Main Cylinder; Clutch Master Cylinder
- Replaces: 96652667, 96339733
| Page 1 of 4 |Next >
1-20 of 66 Results
Chevrolet Clutch Master Cylinder
Want to cut long-term maintenance and repair costs? Choose OEM Clutch Master Cylinder. Those parts deliver top durability you can trust. On our site, you'll find a huge catalog of genuine Chevrolet parts. Prices are unbeatable, so you can keep more in your pocket. Every OEM Chevrolet Clutch Master Cylinder includes a manufacturer's warranty. You can also get an easy return policy that keeps buying risk free. Fast delivery, get your car on the road quickly. It's simple to search, compare, and order. Stop guessing about quality or fit. Order today and save with parts that last.
Chevrolet Clutch Master Cylinder Parts Questions & Experts Answers
- Q: How to replace the Clutch Master Cylinder on Chevrolet Camaro?A:In the replacement of the Clutch Master Cylinder, it is necessary to have the following tools, namely the Hydraulic Clutch Line Separator (J36221). Start by removing the driver side instrument panel insulator as well as the drive side knee bolster. Then remove the clutch pedal pin retainer and pull off the clutch master cylinder push rod from the clutch pedal pin. Uncouple the clutch master cylinder nuts, push on nuts then U-bolt and then pull the clutch master cylinder out from the front of the dash. Lift and support the vehicle, depress the white circular release ring of the actuator hose using the Hydraulic Clutch Line Separator (J 36221) and carefully pull the master cylinder hose to separate it. Cover both hose coupling ends with dirt and damage prior to lowering the vehicle. Push the push-in retainer off the clutch master-cylinder reservoir, slide the reservoir out from hood strut bracket, and remove clutch master cylinder (and reservoir) from your vehicle. For installation, put the clutch master cylinder in the hole in the front of the dash, and put the reservoir into the hood strut bracket and hold it with the push-in retainer. Lift the car one more time but do not trust an audible click or visual assurance for the clutch hydraulic hose quick connect fitting connection. Secure the clutch master cylinder hose to the clutch actuator, by pushing the hydraulic quick connect fittings together and then pulling back on them to make sure they are connected. inspect the hydraulic hoses for twists or kinks before lowering the vehicle. Mount with clutch master cylinder u-bolt, push on nuts, and nuts tightening it to 20 Nm (15 ft. lbs). Reattach the clutch master cylinder push rod to the clutch pedal pin and clamp it tight using the clutch pedal pin retainer . Lastly, reinstall the drive side knee bolster and driver side instrument panel insulator, and bleed the clutch hydraulic system.
- Q: How to replace the Clutch Master Cylinder on Chevrolet Colorado?A:Use the j 42371 (J 42371) hydraulic clutch line separator to gently push the white plastic sleeve back on the quick connect and release the hydraulic Clutch Hose from the clutch actuator, making sure the check valves keep most fluid in. First, support and raise the vehicle, and afterwards detach the clutch hydraulic hose retainer located on the inner fender. Position the vehicle on the ground and make a quarter turn clockwise to the Clutch Master Cylinder before you pull it out with the hose from the cowl. To set up, run the clutch hydraulic hose under the brake booster, and slide the Clutch Master Cylinder into the cowl so the reservoir cap is at the 1:30 position. Twist the Clutch Master Cylinder counterclockwise 1/8 turn so it is all the way seated, and check that the cap is straight up at 12:00. Elevate the vehicle one more time, being careful that the clutch hydraulic hose stays away from sharp or hot spots, and then push the quick connect fitting of the hydraulic hose firmly onto the Clutch Slave Cylinder, making sure there is a clear click and that it stays put. Fasten the retainer for the clutch hydraulic hose to the inner fender, lower the vehicle, and put a new retainer onto the Clutch Master Cylinder push rod . Next, put the Clutch Master Cylinder push rod onto the clutch pedal pin to keep it in place, set the clutch release switch and clutch pedal position switch, and bleed the clutch hydraulic system if you feel it is needed.
- Q: How to replace the Clutch Master Cylinder on Chevrolet SSR?A:In order to remove the Clutch Master Cylinder, you have first to disconnect the push rod from the clutch pedal before removing it. With the right tool on hand (Fluid Extractor), extract the fluid from the reservoir and extract the reservoir off the mounting bracket. Next, take out the line clip at the master cylinder and disconnect the line from the master cylinder to the clutch concentric actuator cylinder. Following that, remove the master cylinder mounting nuts and the master cylinder assembly. For installation, place the master cylinder assembly on the bulkhead and fit the mounting nuts with a tightening of 36 nm (27 ft. Lbs.). Refasten the reservoir to the mounting bracket and realign the master cylinder's electrical harness. Join the line from the clutch concentric actuator to master cylinder and install the line clip, the line from the master to the clutch concentric actuator cylinder. Finally, actuate the Pushrod from the brake pedal to the master cylinder, fuel the master cylinder fully (check Fluid and Lubricant Recommendations), and bleed the hydraulic system.


Related Chevrolet Parts
 Chevrolet Transfer Case
 Chevrolet Flywheel
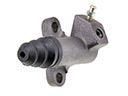 Chevrolet Clutch Slave Cylinder
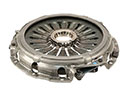 Chevrolet Pressure Plate
 Chevrolet Shift Cable
 Chevrolet Automatic Transmission Input Shaft Seal
 Chevrolet Automatic Transmission Shift Levers
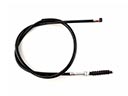 Chevrolet Clutch Cable
 Chevrolet Clutch Disc
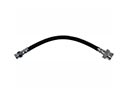 Chevrolet Clutch Hose
 Chevrolet Transmission Assembly
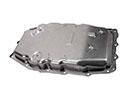 Chevrolet Transmission Pan
Browse Chevrolet Clutch Master Cylinder by Models
Nova S10 Colorado Tahoe Cruze Camaro SS SSR Silverado 1500 Silverado 2500 HD Classic Cobalt Blazer HHR Sonic Spark Astro Cavalier Corvette Aveo Beretta C1500 C2500 C3500 Corsica K1500 K2500 K3500 Lumina Prizm S10 Blazer Silverado 2500 Silverado 3500 Suburban 1500 Avalanche 1500 Avalanche 2500 Aveo5 C1500 Suburban C2500 Suburban Cruze Limited K1500 Suburban K2500 Suburban Silverado 1500 Classic Silverado 1500 HD Silverado 1500 HD Classic Silverado 2500 HD Classic Silverado 3500 Classic Suburban 2500