ChevyParts
My Garage
My Account
Cart
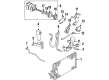
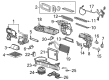
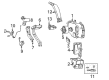
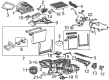
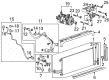
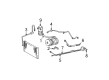
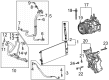
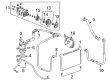
OEM GMC A/C Hose
Air Conditioning Hose- Select Vehicle by Model
- Select Vehicle by VIN
Select Vehicle by Model
orMake
Model
Year
Select Vehicle by VIN
For the most accurate results, select vehicle by your VIN (Vehicle Identification Number).
387 A/C Hoses found


GMC A/C Hose Part Number: 19213696
$81.23 MSRP: $166.92You Save: $85.69 (52%)Product Specifications- Other Name: Hose, Air Conditioner Compressor; A/C Refrigerant Liquid Hose; Hose, A/C Compressor Suction And Discharge
- Replaces: 15981521


GMC A/C Hoses Part Number: 84069778
$115.16 MSRP: $236.66You Save: $121.50 (52%)Ships in 1-2 Business DaysProduct Specifications- Other Name: Hose Assembly-A/C Compressor; A/C Refrigerant Liquid Hose; A/C Hose; Discharge Line; Hose, A/C Compressor


GMC A/C Hoses Part Number: 23212349
$105.32 MSRP: $216.42You Save: $111.10 (52%)Ships in 1-2 Business DaysProduct Specifications- Other Name: Hose, Air Conditioner Refrigerant (Metal And Rubber Sections); A/C Refrigerant Liquid Hose; A/C Hose; Hose & Tube Assembly; Hose, A/C Refrigerant (Metal And Rubber Sections)


GMC Rear Hose Part Number: 19213723
$90.45 MSRP: $168.78You Save: $78.33 (47%)Product Specifications- Other Name: Hose Assembly, Auxiliary A/C Evaporator Inlet Rear; Hose, A/C Compressor And Condenser
- Position: Rear
- Replaces: 15010133


GMC Discharge Hose Part Number: 23357010
$87.86 MSRP: $180.53You Save: $92.67 (52%)Ships in 1-2 Business DaysProduct Specifications- Other Name: Hose Assembly-A/C Condenser; A/C Refrigerant Liquid Hose; A/C Hose; Front A/C Hose; Hose, A/C Compressor And Condenser
- Replaces: 23458163


GMC Discharge Hose Part Number: 23141321
$109.69 MSRP: $225.42You Save: $115.73 (52%)Product Specifications- Other Name: Hose Assembly-A/C Compressor; A/C Refrigerant Liquid Hose; A/C Hose; Suction Hose
- Replaced by: 23186319

GMC Front Hose Part Number: 19169388
$103.16 MSRP: $193.72You Save: $90.56 (47%)Ships in 1-2 Business DaysProduct Specifications- Other Name: Hose Assembly, Auxiliary A/C Evaporator Inlet Front; Hose, A/C Compressor And Condenser
- Position: Front
- Replaces: 15006283
GMC A/C Hoses Part Number: 84553818
$127.24 MSRP: $228.24You Save: $101.00 (45%)Ships in 1-3 Business DaysProduct Specifications- Other Name: Hose Assembly-A/C Compressor; A/C Refrigerant Liquid Hose; A/C Hose; Discharge Line; Hose, A/C Compressor

GMC A/C Hose Part Number: 15571273
$63.78 MSRP: $120.34You Save: $56.56 (47%)Ships in 1-2 Business DaysProduct Specifications- Other Name: Hose, Air Conditioner Compressor; A/C Refrigerant Liquid Hose; Hose, A/C Compressor Suction And Discharge
GMC A/C Hose Part Number: 19213697
$109.46 MSRP: $224.94You Save: $115.48 (52%)Ships in 1-2 Business DaysProduct Specifications- Other Name: Hose, Air Conditioner Compressor; A/C Refrigerant Liquid Hose; Hose, A/C Compressor Suction And Discharge
- Replaces: 15961829

GMC Drain Hose, Lower Part Number: 23200276
$12.93 MSRP: $23.40You Save: $10.47 (45%)Ships in 1-2 Business DaysProduct Specifications- Other Name: Hose-A/C Evaporator & Blower Module Drain Lower; Hose, A/C Evaporator
- Position: Lower


GMC Liquid Line Part Number: 84586759
$48.79 MSRP: $87.10You Save: $38.31 (44%)Ships in 1-2 Business DaysProduct Specifications- Other Name: Tube, Air Conditioner Refrigerant (All Metal); A/C Refrigerant Liquid Hose; A/C Hose; Tube, A/C Refrigerant (All Metal)
- Replaces: 84046040


GMC Liquid Line Part Number: 84586760
$57.78 MSRP: $103.17You Save: $45.39 (44%)Ships in 1-3 Business DaysProduct Specifications- Other Name: Tube, Air Conditioner Refrigerant (All Metal); A/C Refrigerant Liquid Hose; A/C Hose; Tube, A/C Refrigerant (All Metal)
- Replaces: 84075327

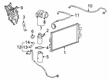
GMC Discharge Hose Part Number: 23400779
$64.80 MSRP: $117.27You Save: $52.47 (45%)Ships in 1-2 Business DaysProduct Specifications- Other Name: Hose, Air Conditioner Refrigerant (Metal And Rubber Sections); A/C Refrigerant Liquid Hose; A/C Hose; Liquid Hose; Hose, A/C Compressor And Condenser
GMC A/C Hoses Part Number: 15187284
$8.41 MSRP: $13.18You Save: $4.77 (37%)Ships in 1-3 Business DaysProduct Specifications- Other Name: Hose Assembly-A/C Condenser; A/C Refrigerant Liquid Hose; A/C Hose
- Replaced by: 11570082


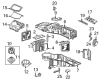
GMC Evaporator Tube Part Number: 22848535
Product Specifications- Other Name: Tube Assembly-A/C Evaporator; A/C Refrigerant Liquid Hose; A/C Hose; Tube, A/C Evaporator
- Replaces: 22802054, 25880177


GMC A/C Hoses Part Number: 19303129
Product Specifications- Other Name: Hose, Air Conditioner Refrigerant (Metal And Rubber Sections); A/C Refrigerant Liquid Hose; A/C Hose; Hose, A/C Compressor And Condenser
- Replaces: 15110886, 15065471


GMC A/C Hoses Part Number: 15043170
Product Specifications- Other Name: Hose, Air Conditioner Compressor And Condenser; A/C Refrigerant Liquid Hose; A/C Hose; Hose, A/C Compressor And Condenser
 Product Specifications
- Other Name: Tube, Air Conditioner Evaporator; A/C Hose; Tube, A/C Evaporator
- Replaces: 15152536

GMC A/C Hose Part Number: 15822910
Product Specifications- Other Name: Hose; A/C Refrigerant Liquid Hose; A/C Hoses
| Page 1 of 20 |Next >
1-20 of 387 Results
GMC A/C Hose
Want to cut long-term maintenance and repair costs? Choose OEM A/C Hose. Those parts deliver top durability you can trust. On our site, you'll find a huge catalog of genuine GMC parts. Prices are unbeatable, so you can keep more in your pocket. Every OEM GMC A/C Hose includes a manufacturer's warranty. You can also get an easy return policy that keeps buying risk free. Fast delivery, get your car on the road quickly. It's simple to search, compare, and order. Stop guessing about quality or fit. Order today and save with parts that last.
GMC A/C Hose Parts Questions & Experts Answers
- Q: How to replace the auxiliary A/C hose on GMC Acadia?A:The first step to replace the auxiliary air conditioning evaporator tube requires refrigerant recovery of the system followed by raising the vehicle. The right rear inner wheelhouse liner needs to be removed if required. The auxiliary evaporator tube nut needs appropriate tools for removal before you can pull the auxiliary a/c evaporator tubes downward from the auxiliary hvac module. Start by removing the auxiliary evaporator tube clip nuts then extract the tubes from their positions. The next step involves removing the txv tube retaining nuts and the auxiliary a/c evaporator tubes from their position on the txv tube as well as condenser tube. At this point the heater/a/c tubes retaining nuts should be removed from their studs and clips which run along the frame in four different sections. Uninstall the auxiliary a/c evaporator tubes from their clamps followed by removing them from the vehicle. The replacement a/c and heater pipes arrive at customers in two separate segments which need splicing before final installation. Connect the auxiliary a/c evaporator tubes to the vehicle framework before securely mounting them on the clamps. Secure the heater/a/c tubes retaining nut to four frame retaining studs and clips by tightening it to 7 n.m (62 lb in). Install the auxiliary a/c evaporator tubes by connecting them to the txv tube and condenser tube then fasten them with retaining nuts that reach 16 n.m (12 lb ft). The hvac module requires the auxiliary a/c evaporator tubes installation together with a retaining nut that needs to be tightened to 16 n.m (12 lb ft). Secure auxiliary evaporator tubes to retaining clips while installing nuts which should be tightened to 4 n.m (35 lb in). Reassemble the right rear inner wheelhouse liner on the vehicle and lower the compartment after you recharge the refrigerant system to permitted levels and test all fittings with the halogen leak detector (J 39400-A).
- Q: How to replace the A/C Hose on GMC Sierra 1500?A:The first step to replace an evaporator tube demands proper recovery of refrigerant. Start the evaporator tube replacement by removing both the upper radiator air baffle and deflector followed by extraction of the air cleaner assembly. The next step involves removing the surge tank hold down nut while simultaneously detaching the bolt then maintaining the cooling system closed. Remove the evaporator tube nut from the evaporator before disconnection of the tube from its attachment to the evaporator. You should disconnect the auxiliary a/c tube by removing the evaporator tube nut when the system is equipped. You should first remove the evaporator tube nut from the condenser then disconnect the evaporator tube from the condenser before extracting the evaporator tube outside the vehicle. The installation process includes discarding old sealing washers while sealing all opened connections. You should connect the evaporator tube to the condenser by using new sealing washers and then install the evaporator tube nut to the condenser and tighten it to 16 nm (12 lb ft). You must install new sealing washers when connecting the evaporator tube to an auxiliary a/c tube before installing the evaporator tube nut properly and tightening it to 16 nm (12 lb ft). Stabilize the evaporator tube to the evaporator by using the evaporator tube nut which should be tightened to 16 nm (12 lb ft). Install the surge tank hold down nut and bolt before putting back the air cleaner assembly followed by installation of the upper radiator air baffle and deflector. The system evacuation process should be followed by recharging and then the j 39400-a halogen leak detector must perform a leak test on all installed components.
- Q: How to Properly Replace the A/C Hose in LY2, LMF, L76, and L92 Models on GMC Yukon?A:To change the discharge hose on vehicles ly2, lmf, l76, and l92 - first rec; the refrigerant. Disconnect the discharge hose from the A/C Compressor after looping out the discharge hose mounting bolt on the A/C Compressor. Now remove the top radiator baffle, then disconnect the discharge hose from the condenser removing the nut and the discharge hose itself. Disconnect electrical connector from a/c recirculation switch, remove discharge hose from vehicle, discard all used sealing washers and cap system openings. To install when attaching new discharge hose to the vehicle attach it to the condenser with new sealing washers. Screw the discharge hose nut to the condenser and tighten it to 16 nm (12 lb ft). Re-install the upper air baffle and also reattach the electrical connector to the a/c recirculation switch. Then attach the discharge hose to the A/C Compressor with new sealing washers and fasten it using the mounting bolt to 16 nm (12 lb ft). Lastly, evacuate and recharge the a/c system and perform a leak test on the fittings with the j 39400-a halogen leak detector.


Related GMC Parts
 GMC Blend Door Actuator
 GMC Blower Motor
 GMC Blower Motor Resistor
 GMC Heater Core
 GMC A/C Expansion Valve
 GMC A/C Service Cap
 GMC A/C Switch
 GMC Air Temperature Sensor
 GMC Ambient Temperature Sensor
 GMC Blower Control Switches
 GMC Evaporator
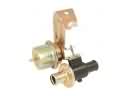 GMC Heater Control Valve
Browse GMC A/C Hose by Models
Acadia Sierra 1500 Yukon Canyon Sierra 2500 HD Terrain Envoy Sonoma Typhoon Syclone C1500 Envoy XL Envoy XUV Jimmy K1500 S15 S15 Jimmy Safari Savana 2500 Savana 3500 Sierra 2500 Sierra 3500 Yukon XL Acadia Limited C2500 C3500 G2500 K2500 K3500 P3500 Savana 1500 Yukon XL 1500 C1500 Suburban C2500 Suburban G1500 G3500 Hummer EV Pickup K1500 Suburban K2500 Suburban P2500 R1500 R1500 Suburban R2500 R2500 Suburban R3500 Sierra 1500 Classic Sierra 1500 HD Sierra 1500 HD Classic Sierra 1500 Limited Sierra 2500 HD Classic Sierra 3500 Classic Sierra 3500 HD V1500 V1500 Suburban V2500 V2500 Suburban V3500 Yukon XL 2500