ChevyParts
My Garage
My Account
Cart
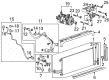
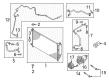
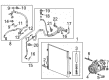
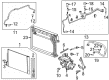
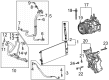
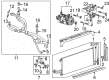
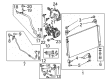
OEM Chevrolet A/C Clutch
Air Conditioning Clutch- Select Vehicle by Model
- Select Vehicle by VIN
Select Vehicle by Model
orMake
Model
Year
Select Vehicle by VIN
For the most accurate results, select vehicle by your VIN (Vehicle Identification Number).
122 A/C Clutches found


Chevrolet Clutch & Pulley Part Number: 92279286
$218.68 MSRP: $392.26You Save: $173.58 (45%)Ships in 1-3 Business DaysProduct Specifications- Other Name: Clutch Kit, A/C; A/C Compressor Clutch; Clutch; Clutch Kit, A/C Compressor Clutch
- Replaces: 92266823, 92259968


Chevrolet Clutch & Pulley Part Number: 22986662
$130.56 MSRP: $245.18You Save: $114.62 (47%)Ships in 1-2 Business DaysProduct Specifications- Other Name: Clutch Kit, Air Conditioner Compressor Clutch; A/C Compressor Clutch; Clutch
- Replaced by: 85656962

Chevrolet Clutch & Pulley Part Number: 19317014
$603.83 MSRP: $1087.98You Save: $484.15 (45%)Ships in 1-3 Business DaysProduct Specifications- Other Name: Clutch Kit, A/C; A/C Compressor Clutch; Clutch Kit, A/C Compressor Clutch

Chevrolet Clutch Plate & Hub Assembly Part Number: 86806081
$139.98 MSRP: $251.09You Save: $111.11 (45%)Ships in 1-3 Business DaysProduct Specifications- Other Name: Clutch Kit, Air Conditioner Compressor Clutch; Clutch; Clutch Kit, A/C Compressor Clutch
- Replaced by: 85008617

Chevrolet Clutch & Pulley Part Number: 19433078
$223.37 MSRP: $400.66You Save: $177.29 (45%)Ships in 1-3 Business DaysProduct Specifications- Other Name: Clutch Kit, A/C; Clutch; Clutch Kit, A/C Compressor Clutch
- Replaced by: 19436021
Chevrolet Clutch Kit Part Number: 86805576
$139.36 MSRP: $249.98You Save: $110.62 (45%)Ships in 1-3 Business DaysProduct Specifications- Other Name: Clutch Kit, Air Conditioner Compressor Clutch; Clutch Kit, A/C Compressor Clutch
- Replaces: 84427786
Chevrolet Clutch Part Number: 20918600
$115.48 MSRP: $209.04You Save: $93.56 (45%)Ships in 1-2 Business DaysProduct Specifications- Other Name: Clutch Kit, A/C; A/C Compressor Clutch; Clutch Kit, A/C Compressor Clutch
Chevrolet Clutch & Pulley Part Number: 92266822
$166.66 MSRP: $312.98You Save: $146.32 (47%)Ships in 1-2 Business DaysProduct Specifications- Other Name: Clutch Kit, A/C; A/C Compressor Clutch; Clutch
- Replaced by: 92279285
Chevrolet Clutch & Pulley Part Number: 84815640
$461.38 MSRP: $831.32You Save: $369.94 (45%)Ships in 1-3 Business DaysProduct Specifications- Other Name: Clutch Kit, Air Conditioner Compressor Clutch; A/C Compressor Clutch; Clutch; Clutch Kit, A/C Compressor Clutch
- Replaced by: 86801140
Chevrolet Clutch Part Number: 86808035
$123.07 MSRP: $220.76You Save: $97.69 (45%)Ships in 1-3 Business DaysProduct Specifications- Other Name: Clutch Kit, Air Conditioner Compressor Clutch; Clutch Kit, A/C Compressor Clutch
- Replaces: 85534587

Chevrolet Clutch & Pulley Part Number: 95016505
$185.82 MSRP: $348.95You Save: $163.13 (47%)Ships in 1-2 Business DaysProduct Specifications- Other Name: Clutch Kit, Air Conditioner Compressor Clutch; A/C Compressor Clutch; Clutch; Clutch Kit, A/C Compressor Clutch
Chevrolet Clutch & Pulley Part Number: 86811105
$153.85 MSRP: $275.96You Save: $122.11 (45%)Ships in 1-3 Business DaysProduct Specifications- Other Name: Clutch Kit, Air Conditioner Compressor Clutch; Clutch; Clutch Kit, A/C Compressor Clutch
- Replaces: 92276909

Chevrolet Clutch & Pulley Part Number: 23505629
$117.50 MSRP: $220.67You Save: $103.17 (47%)Ships in 1-2 Business DaysProduct Specifications- Other Name: Clutch Kit, Air Conditioner Compressor Clutch; A/C Compressor Clutch; Clutch Kit, A/C Compressor Clutch

Chevrolet Clutch & Pulley Part Number: 86811096
$140.76 MSRP: $252.47You Save: $111.71 (45%)Ships in 1-3 Business DaysProduct Specifications- Other Name: Clutch Kit, Air Conditioner Compressor Clutch; Clutch; Clutch Kit, A/C Compressor Clutch
- Replaced by: 85665223
Chevrolet Clutch Part Number: 42783862
$121.01 MSRP: $217.06You Save: $96.05 (45%)Ships in 1-3 Business DaysProduct Specifications- Other Name: Clutch Kit, Air Conditioner Compressor Clutch; Clutch Kit, A/C Compressor Clutch
- Replaces: 94517793
Chevrolet Clutch & Pulley Part Number: 92458717
$267.86 MSRP: $484.82You Save: $216.96 (45%)Ships in 1-2 Business DaysProduct Specifications- Other Name: Clutch Kit, Air Conditioner Compressor Clutch; A/C Compressor Clutch; Clutch; Clutch Kit, A/C Compressor Clutch

Chevrolet Clutch & Pulley Part Number: 86789828
$125.05 MSRP: $224.30You Save: $99.25 (45%)Ships in 1-3 Business DaysProduct Specifications- Other Name: Clutch Kit, Air Conditioner Compressor Clutch; Clutch Plate & Hub Assembly; Clutch
- Replaced by: 85652433


Chevrolet Clutch & Pulley Part Number: 20894158
$161.58 MSRP: $303.45You Save: $141.87 (47%)Ships in 1-2 Business DaysProduct Specifications- Other Name: Clutch Kit, Air Conditioner Compressor Clutch; A/C Compressor Clutch; Clutch
- Replaced by: 86811077

Chevrolet Clutch & Pulley Part Number: 86789844
$125.05 MSRP: $224.30You Save: $99.25 (45%)Product Specifications- Other Name: Clutch Kit, Air Conditioner Compressor Clutch; Clutch; Clutch Kit, A/C Compressor Clutch
- Replaced by: 85652433
Chevrolet Clutch Part Number: 86798579
$134.15 MSRP: $240.62You Save: $106.47 (45%)Product Specifications- Other Name: Clutch Kit, Air Conditioner Compressor Clutch; Clutch Kit, A/C Compressor Clutch
- Replaced by: 85656965
| Page 1 of 7 |Next >
1-20 of 122 Results
Chevrolet A/C Clutch
Want to cut long-term maintenance and repair costs? Choose OEM A/C Clutch. Those parts deliver top durability you can trust. On our site, you'll find a huge catalog of genuine Chevrolet parts. Prices are unbeatable, so you can keep more in your pocket. Every OEM Chevrolet A/C Clutch includes a manufacturer's warranty. You can also get an easy return policy that keeps buying risk free. Fast delivery, get your car on the road quickly. It's simple to search, compare, and order. Stop guessing about quality or fit. Order today and save with parts that last.
Chevrolet A/C Clutch Parts Questions & Experts Answers
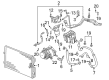
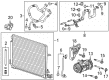
- Q: How to replace the A/C Clutch assembly on Chevrolet Equinox?A:Vehicle technicians must begin the compressor clutch assembly replacement process by taking out the compressor unit. Use Universal Spanner Wrench (J 37872) to grip the compressor clutch before you remove the bolt connecting it to the compressor. The Clutch Remover tool (GE-47849) should be installed onto the compressor clutch before removing it from the compressor unit. Proceed to detach the compressor clutch shims off the shaft before you remove the snap ring from the pulley. Use the Center Puller (GE-47850) combined with Three Jaw Puller (J 25031-A) to disconnect the compressor pulley from the compressor. Start by removing both the clutch field coil connector bracket screw and clutch field coil screws before pulling out the clutch field coil from the compressor. Clean all surfaces of the clutch field coil and pulley mounting area prior to putting the clutch field coil back on the compressor. Use a torque wrench to fasten the clutch field coil screws at 4.9 Nm (43 lb in) and the clutch field coil connector bracket screw at 4.3 Nm (38 lb in). To install the compressor pulley you need to use the Armature Replacer (GE-47851) which should have the snap ring with rounded edge facing up. After installing the snap ring to the compressor pulley you must position the compressor clutch shims onto the compressor shaft. Install the compressor clutch on the compressor shaft before using the Armature Replacer (GE-47851) to fasten the compressor clutch to the compressor. Use a feeler gauge to check the clearance between the compressor clutch and pulley while ensuring it stays within the range of 0.3 mm to 0.6 mm (0.012 in to 0.024 in). Fitting new clutch bolts should be followed by tightening the compressor clutch with a Universal Spanner Wrench (J 37872) to 21 Nm (16 lb ft) torque capacity. Check that the compressor pulley easily rotates free of obstruction before reinstalling the compressor into the vehicle.
- Q: How to replace the A/C Clutch assembly on Chevrolet Impala?A:One needs to obtain several tools before replacing the compressor clutch assembly: a compressor clutch holding tool (J 37872) together with snap ring pliers (J 6083). J 37872 compressor clutch holding tool and j 6083 snap ring pliers are required. Start by taking out the compressor and three adjustable dowels from the compressor clutch holding tool (J 37872), then install three 5/16 x 1 inch bolts. Discard the compressor clutch plate bolt and position the j 37872 compressor clutch holding tool to secure the compressor clutch plate during removal procedures. The compressor pulley snap ring can be removed using snap ring pliers (J 6083) before removing the pulley itself. The technician should use snap ring pliers (J 6083) to remove both the compressor clutch coil snap ring and coil itself. Through the installation process first use an m6x1.0 tap to clean clutch plate bolt threads before applying compressed air to clear remaining debris. Use snap ring pliers (J 6083) to install the compressor clutch coil followed by installation of the compressor clutch coil snap ring using the same tool. To begin installation use the snap ring pliers (J 6083) for attaching the compressor pulley and its snap ring. Place a 0.4 mm (0.016 in) air gap shim inside the clutch drive plate using small amounts of oil before putting on the compressor clutch plate. Normal compressor pulley rotation should not trigger drive plate contacts with the pulley. Utilize the measurement tools to check pulley-drive plate air gap distances and readjust the shims to yield between 0.3 to 0.6 mm (0.012 to 0.024 in) air gap distance. Tighten the new drive plate bolt to 12 n.m (106 lb in) after first making sure the bolt shows colored adhesive on at least 5 threads. Perform this operation while using the compressor clutch holding tool (J 37872) to stop the clutch plate from rotation. After compressor reinstallation complete a leak test on all fittings by using the leak test tool (J 39400-A).
- Q: How to replace the A/C Clutch assembly on Chevrolet Malibu?A:In order to replace the compressor-clutch assembly, remove the driver belt from the A/C Compressor; raise and support the vehicle. Next, remove the lower air deflector remembering to remove the three adjusting dowels from j 37872 universal spanner wrench (J 37872) and replace them with three 5/16x1 inch bolts. In this step, discard the compressor clutch plate bolt and use the j 37872 for holding the compressor clutch plate to avoid turning it while removing. Then, apply the j 6083 snap ring pliers (J 6083) to ensure that the compressor pulley snap ring and the compressor clutch coil snap ring are removed and then the removal of compressor pulley and compressor clutch coil. For installation, work to clear the clutch plate bolt threads using an m6x 1.0 tap and use compressed air to blow out the debris. Install compressor clutch coil and compressor clutch coil snap ring, as well as compressor pulley and then compressor pulley snap ring, using the j 6083. Add a very small amount of oil on the 0.4mm (0.016 in) air gap shim and carefully insert it between the clutch drive plate and the compressor clutch plate right before you install the compressor clutch plate so that it does not annoyingly stick on the pulley. Take measurement of air gap present in-between the pulley and the drive plate including that you adjust the shims to give one of the air gap 0.3-0.6mm (0.012-0.024in) air gap and ensure hand the new drive plate bolt has colored adhesive on atleast five thread to get instal on it for a distance of 12n.m (106ftb in) using the j 37872 to hold the compressor clutch plate. Lastly install lower air deflector, lower the vehicle, and run Drive Belt to A/C Compressor, and use the j 39400-a halogen leak detector (J 39400-A) to do a leak test on fittings.


Related Chevrolet Parts
 Chevrolet Blower Motor Resistor
 Chevrolet Blend Door Actuator
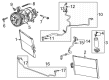
 Chevrolet A/C Compressor
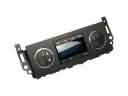 Chevrolet HVAC Control Module
 Chevrolet A/C Compressor Cut-Out Switches
 Chevrolet A/C Hose
 Chevrolet A/C Orifice Tube
 Chevrolet A/C Service Cap
 Chevrolet A/C Switch
 Chevrolet A/C System Valve Core
 Chevrolet Blower Control Switches
 Chevrolet Evaporator
Browse Chevrolet A/C Clutch by Models
Nova S10 C10 Tahoe Malibu Camaro Equinox Impala SS Avalanche Silverado 1500 Silverado 2500 HD Caprice Classic Cobalt Suburban Traverse Blazer HHR Sonic Tracker El Camino K10 Trax Trailblazer Astro Cavalier Corvette C20 Aveo Beretta C1500 C2500 C30 C3500 Celebrity Chevette City Express Corsica Express 1500 Express 2500 Express 3500 G10 G20 G30 K1500 K20 K2500 K30 K3500 K5 Blazer Lumina Metro Monte Carlo P30 Prizm S10 Blazer Silverado 2500 Sprint Venture Lumina APV Silverado 3500 Suburban 1500 Avalanche 1500 Avalanche 2500 Aveo5 C10 Suburban C1500 Suburban C20 Suburban C2500 Suburban Captiva Sport Citation II Impala Limited K10 Suburban K1500 Suburban K20 Suburban K2500 Suburban P20 R10 R10 Suburban R1500 Suburban R20 R20 Suburban R2500 R2500 Suburban R30 R3500 Silverado 1500 Classic Silverado 1500 HD Silverado 1500 HD Classic Silverado 1500 LD Silverado 1500 LTD Silverado 2500 HD Classic Silverado 3500 Classic Silverado 3500 HD Spectrum Suburban 2500 Suburban 3500 HD V10 V10 Suburban V1500 Suburban V20 V20 Suburban V2500 Suburban V30 V3500