ChevyParts
My Garage
My Account
Cart
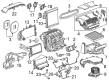
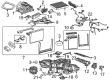
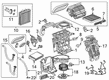
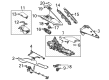
OEM Chevrolet A/C Switch
Air Conditioning Switch- Select Vehicle by Model
- Select Vehicle by VIN
Select Vehicle by Model
orMake
Model
Year
Select Vehicle by VIN
For the most accurate results, select vehicle by your VIN (Vehicle Identification Number).
652 A/C Switches found


Chevrolet Heater Control Part Number: 84426646
$152.97 MSRP: $314.36You Save: $161.39 (52%)Ships in 1-2 Business DaysProduct Specifications- Other Name: Control Assembly-Heater & A/C User Interface; Climate Control Module; Blower Control Switch; Dash Control Unit; Control, Heater And A/C Control
- Replaces: 23414952, 84105597, 84178406


Chevrolet Heater Control, Black; Red Part Number: 23486616
$164.15 MSRP: $306.30You Save: $142.15 (47%)Product Specifications- Other Name: Control Assembly-Heater & A/C (W/Avf) *Black W/Red; Climate Control Module; Blower Control Switch; Dash Control Unit; Control, A/C Instrument Panel
- Replaces: 23176289, 84557922

Chevrolet Controller Part Number: 84566161
$101.99 MSRP: $184.60You Save: $82.61 (45%)Ships in 1-2 Business DaysProduct Specifications- Other Name: Control Assembly-Heater & A/C Remote; Climate Control Module; Control, Heater And A/C Control

Chevrolet Control Switch Part Number: 85531735
$117.65 MSRP: $348.28You Save: $230.63 (67%)Ships in 1-3 Business DaysProduct Specifications- Other Name: Control Assembly-Heater & A/C User Interface; Dash Control Unit; Control, Heater And A/C Control

Chevrolet Controller Part Number: 84692737
$57.11 MSRP: $94.07You Save: $36.96 (40%)Ships in 1-2 Business DaysProduct Specifications- Other Name: Control Assembly-Heater & A/C Remote; Climate Control Module; Module; Control, Heater And A/C Control
- Replaced by: 84692738

Chevrolet Heater Control, Red Part Number: 84769064
$271.54 MSRP: $487.05You Save: $215.51 (45%)Ships in 1-3 Business DaysProduct Specifications- Other Name: Control Assembly-Heater & A/C User Interface *Rosso Red; Climate Control Module; Blower Control Switch; Control, Heater And A/C Control
- Replaced by: 85767887
- Replaces: 84452190, 84563756, 86819887

Chevrolet Heater Control Part Number: 84612975
$143.42 MSRP: $294.75You Save: $151.33 (52%)Ships in 1-2 Business DaysProduct Specifications- Other Name: Control Assembly-Heater & A/C User Interface; Climate Control Module; Blower Control Switch; Dash Control Unit; Control, Heater And A/C Control
Chevrolet Heater Control Part Number: 84612976
$157.45 MSRP: $295.67You Save: $138.22 (47%)Ships in 1-2 Business DaysProduct Specifications- Other Name: Control Assembly-Heater & A/C User Interface; Climate Control Module; Blower Control Switch; Dash Control Unit; Control, Heater And A/C Control

Chevrolet Temperature Switch Part Number: 23145856
$59.83 MSRP: $177.08You Save: $117.25 (67%)Ships in 1-2 Business DaysProduct Specifications- Other Name: Control, Heater And Air Conditioner Control; Climate Control Module; Blower Control Switch; Dash Control Unit; Control, Heater And A/C Control
- Replaced by: 23344087
Chevrolet Control Switch Part Number: 85599547
$201.94 MSRP: $362.22You Save: $160.28 (45%)Ships in 1-3 Business DaysProduct Specifications- Other Name: Control Assembly-Heater & A/C User Interface; Dash Control Unit; Control, Heater And A/C Control
Chevrolet Control Switch Part Number: 84873343
$197.43 MSRP: $354.14You Save: $156.71 (45%)Ships in 1-3 Business DaysProduct Specifications- Other Name: Control Assembly-Heater & A/C User Interface; Dash Control Unit; Control, Heater And A/C Control
- Replaces: 84769756
Chevrolet Heater Control, Silver Part Number: 84769061
$258.42 MSRP: $470.71You Save: $212.29 (46%)Ships in 1-2 Business DaysProduct Specifications- Other Name: Control Assembly-Heater & A/C User Interface; Climate Control Module; Blower Control Switch; HVAC Module; Control, Heater And A/C Control
- Replaces: 84452199, 84563761

Chevrolet Dash Control Unit Part Number: 84972232
$247.88 MSRP: $444.62You Save: $196.74 (45%)Ships in 1-3 Business DaysProduct Specifications- Other Name: Control Assembly-Heater & A/C User Interface; Control, Heater And A/C Control

Chevrolet Heater Control Part Number: 23473962
$138.68 MSRP: $260.44You Save: $121.76 (47%)Ships in 1-2 Business DaysProduct Specifications- Other Name: Control Assembly-Heater & A/C Remote; Climate Control Module; Blower Control Switch; Dash Control Unit; Control, Heater And A/C Control
Chevrolet Controller Part Number: 84305955
$79.19 MSRP: $148.71You Save: $69.52 (47%)Ships in 1-2 Business DaysProduct Specifications- Other Name: Control Assembly-Heater & A/C Remote; Control, Heater And A/C Control
- Replaces: 84221979
Chevrolet Heater Control Part Number: 84422501
$166.49 MSRP: $301.34You Save: $134.85 (45%)Ships in 1-2 Business DaysProduct Specifications- Other Name: Control Assembly-Heater & A/C User Interfacebfo; Climate Control Module; Blower Control Switch; Dash Control Unit; Control, Heater And A/C Control
- Replaces: 84175393
Chevrolet Control Switch Part Number: 84918277
$248.23 MSRP: $445.26You Save: $197.03 (45%)Ships in 1-3 Business DaysProduct Specifications- Other Name: Control Assembly-Heater & A/C User Interface; Dash Control Unit; Control, Heater And A/C Control
Chevrolet Heater Control, Silver Part Number: 84769063
$246.16 MSRP: $441.54You Save: $195.38 (45%)Ships in 1-3 Business DaysProduct Specifications- Other Name: Control Assembly-Heater & A/C User Interface; Climate Control Module; Blower Control Switch; HVAC Module; Control, Heater And A/C Control
- Replaces: 84452189, 84563755
Chevrolet Control Module Part Number: 84518385
$84.72 MSRP: $153.35You Save: $68.63 (45%)Ships in 1-2 Business DaysProduct Specifications- Other Name: Control Assembly-Heater & A/C Remote; Control, Heater And A/C Control
- Replaces: 84422066
Chevrolet Dash Control Unit Part Number: 86544232
$176.08 MSRP: $315.84You Save: $139.76 (45%)Ships in 1-2 Business DaysProduct Specifications- Other Name: Control Assembly-Heater & A/C User Interface; Control, Heater And A/C Control
| Page 1 of 33 |Next >
1-20 of 652 Results
Chevrolet A/C Switch
Want to cut long-term maintenance and repair costs? Choose OEM A/C Switch. Those parts deliver top durability you can trust. On our site, you'll find a huge catalog of genuine Chevrolet parts. Prices are unbeatable, so you can keep more in your pocket. Every OEM Chevrolet A/C Switch includes a manufacturer's warranty. You can also get an easy return policy that keeps buying risk free. Fast delivery, get your car on the road quickly. It's simple to search, compare, and order. Stop guessing about quality or fit. Order today and save with parts that last.
Chevrolet A/C Switch Parts Questions & Experts Answers
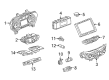
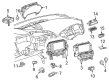
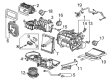
- Q: How to change the A/C Switch in the heater and air conditioning control system on Chevrolet Colorado?A:First, you have to remove the accessory trim plate, and replace the heater air conditioning controls. Next, remove the screws (7,2) from the HVAC control assembly and gently remove the assembly from the instrument panel. Move away the mode cable and temperature cable from the HVAC control assembly, mechanical connectors. After disconnecting, take out the HVAC control assembly. For installation, plug and position the HVAC control assembly, without any bend to the mode and temperature cables. Connect the mode cable and the temperature cable to the HVAC control assembly, and then replace the assembly into the instrument panel. Replace the HVAC control assembly screws and tighten them no more than 1.9 Nm (18 lb in) and, finally, restore the accessory trim plate.
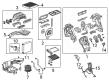
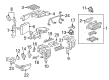
- Q: How to replace the A/C Switch control assembly on Chevrolet Malibu?A:Begin HVAC control assembly replacement by removing IP accessory trim plate screws followed by HVAC control assembly screws before drawing the assembly away from the IP. The vacuum hose harness connector together with the temperature actuator , the blower motor switch electrical connector , and the rear defroster control electrical connector require disconnection from the HVAC control assembly. Before installation connect the HVAC control assembly to its components by attaching the vacuum hose harness connector and temperature actuator and blower motor switch electrical connector and rear defroster control electrical connector . Secure the IP control assembly by utilizing control assembly retaining screws that need tightening to 2 N.m (18 lb in). Reinstall the accessory trim plate as the conclusion of the repair process.
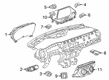
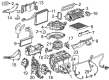
- Q: How to replace the A/C Switch control assembly on Chevrolet Tahoe?A:First remove the instrument cluster trim plate bezel and then the IP storage tray as preparation for control assembly heat and A/C replacement. Start by removing the inflatable restraint module switch from the instrument panel and complete installation by taking out the control assembly through the instrument panel carrier by releasing retaining tabs. Disconnect all electrical wires that connect to the control assembly. Installation begins with connecting the electrical connectors to the control assembly followed by control assembly installation. Begin installation by placing the inflatable restraint module switch in the instrument panel then add the IP storage tray after that add the instrument cluster trim plate bezel.


Related Chevrolet Parts
 Chevrolet Blower Motor
 Chevrolet Heater Control Valve
 Chevrolet Heater Core
 Chevrolet A/C Compressor
 Chevrolet A/C Accumulator
 Chevrolet A/C Condenser
 Chevrolet A/C Hose
 Chevrolet A/C Idler Pulley
 Chevrolet A/C Orifice Tube
 Chevrolet A/C Service Cap
 Chevrolet Blower Control Switches
 Chevrolet HVAC Pressure Switch
Browse Chevrolet A/C Switch by Models
Nova S10 Colorado C10 Tahoe Cruze Malibu Camaro Equinox Impala SS SSR Avalanche Silverado 1500 Silverado 2500 HD Caprice Classic Cobalt Suburban Traverse Blazer HHR Sonic Tracker Volt El Camino K10 Spark Trax Trailblazer Astro Cavalier Corvette C20 Aveo Beretta Bolt EUV Bolt EV C1500 C2500 C30 C3500 Celebrity Chevette City Express Corsica Express 1500 Express 2500 Express 3500 G10 G20 G30 K1500 K20 K2500 K30 K3500 K5 Blazer Lumina Metro Monte Carlo P30 Prizm S10 Blazer Silverado 2500 Sprint Uplander Venture Lumina APV Silverado 3500 Suburban 1500 Trailblazer EXT Avalanche 1500 Avalanche 2500 Aveo5 C10 Suburban C1500 Suburban C20 Suburban C2500 Suburban Captiva Sport Citation II Cruze Limited Impala Limited K10 Suburban K1500 Suburban K20 Suburban K2500 Suburban Malibu Limited R10 R10 Suburban R1500 Suburban R20 R20 Suburban R2500 R2500 Suburban R30 R3500 Silverado 1500 Classic Silverado 1500 HD Silverado 1500 HD Classic Silverado 1500 LD Silverado 1500 LTD Silverado 2500 HD Classic Silverado 3500 Classic Silverado 3500 HD Spark EV Spectrum Suburban 2500 Suburban 3500 HD V10 V10 Suburban V1500 Suburban V20 V20 Suburban V2500 Suburban V30 V3500