ChevyParts
My Garage
My Account
Cart
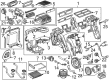
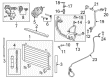
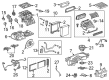
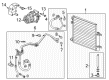
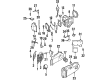
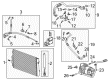
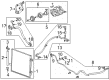
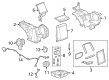
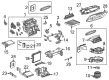
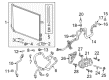
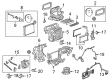
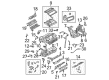
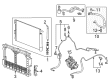
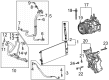
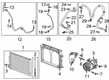
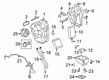
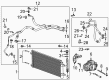
OEM Chevrolet A/C Orifice Tube
A/C Hose- Select Vehicle by Model
- Select Vehicle by VIN
Select Vehicle by Model
orMake
Model
Year
Select Vehicle by VIN
For the most accurate results, select vehicle by your VIN (Vehicle Identification Number).
47 A/C Orifice Tubes found


Chevrolet Dehydrator Part Number: 13277638
$34.95 MSRP: $65.65You Save: $30.70 (47%)Ships in 1-2 Business DaysProduct Specifications- Other Name: Receiver & Dehydrato, Air Conditioner Refrigerant; Drier Desiccant Element; A/C Receiver Drier; A/C Accumulator; Drier; Receiver & Dehydrato, A/C Refrigerant


Chevrolet Dehydrator Part Number: 92191928
$150.62 MSRP: $272.63You Save: $122.01 (45%)Ships in 1-2 Business DaysProduct Specifications- Other Name: Receiver & Dehydrato, Air Conditioner Refrigerant; Drier Desiccant Element; A/C Receiver Drier; A/C Accumulator; Drier; Receiver & Dehydrato, A/C Refrigerant


Chevrolet Dehydrator Part Number: 95374678
$34.52 MSRP: $61.64You Save: $27.12 (44%)Ships in 1-3 Business DaysProduct Specifications- Other Name: Receiver & Dehydrato, Air Conditioner Refrigerant; Drier Desiccant Element; A/C Receiver Drier; A/C Accumulator; Drier; Receiver & Dehydrato, A/C Refrigerant
- Replaces: 95018147


Chevrolet Dehydrator Part Number: 95326122
$13.17 MSRP: $23.84You Save: $10.67 (45%)Ships in 1-3 Business DaysProduct Specifications- Other Name: Receiver & Dehydrato, Air Conditioner Refrigerant; Drier Desiccant Element; A/C Receiver Drier; A/C Accumulator; Drier; Receiver & Dehydrato, A/C Refrigerant
- Replaces: 95193850


Chevrolet Screen Part Number: 52477004
$9.69 MSRP: $17.30You Save: $7.61 (44%)Ships in 1-3 Business DaysProduct Specifications- Other Name: Orifice, Air Conditioner Evaporator; A/C Orifice Tube; Filter; Orifice; Inlet; Orifice, A/C Expansion Refrigerant; Orifice, A/C Evaporator
- Replaces: 15139727, 15097129

Chevrolet Dehydrator Part Number: 42465914
$35.45 MSRP: $66.58You Save: $31.13 (47%)Ships in 1-3 Business DaysProduct Specifications- Other Name: Receiver & Dehydrato, Air Conditioner Refrigerant; Drier Desiccant Element; A/C Receiver Drier; A/C Accumulator; Drier; Receiver & Dehydrato, A/C Refrigerant

Chevrolet Dehydrator Part Number: 25964059
$39.13 MSRP: $73.48You Save: $34.35 (47%)Ships in 1-2 Business DaysProduct Specifications- Other Name: Receiver & Dehydrator, A/C; Drier Desiccant Element; A/C Receiver Drier; A/C Accumulator; Drier; Receiver & Dehydrato, A/C Refrigerant

Chevrolet Expansion Valve Screen Part Number: 89022560
$4.57 MSRP: $8.58You Save: $4.01 (47%)Ships in 1-2 Business DaysProduct Specifications- Other Name: Screen, Air Conditioner Expansion Valve; Hose Assembly Screen; Screen, A/C Expansion Valve

Chevrolet Drier Dessicant Bag Part Number: 42589939
$32.38 MSRP: $57.82You Save: $25.44 (44%)Ships in 1-3 Business DaysProduct Specifications- Other Name: Receiver & Dehydrato, Air Conditioner Refrigerant; Drier Desiccant Element; A/C Receiver Drier; A/C Accumulator; Dehydrator; Receiver & Dehydrato, A/C Refrigerant

Chevrolet Drier Dessicant Bag Part Number: 84951727
$37.61 MSRP: $77.30You Save: $39.69 (52%)Ships in 1 Business DayProduct Specifications- Other Name: Receiver & Dehydrato, Air Conditioner Refrigerant; Dehydrator; Plug; Drier; Receiver & Dehydrato, A/C Refrigerant; Desiccant Kit, A/C Refrigerant; Plug, A/C Refrigerant
- Replaced by: 86551901

Chevrolet Dehydrator Part Number: 84364890
$68.62 MSRP: $122.54You Save: $53.92 (44%)Ships in 1-3 Business DaysProduct Specifications- Other Name: Receiver & Dehydrato, Air Conditioner Refrigerant; Drier Desiccant Element; A/C Receiver Drier; A/C Accumulator; Drier; Receiver & Dehydrato, A/C Refrigerant

Chevrolet Dehydrator Part Number: 10327446
$21.67 MSRP: $40.70You Save: $19.03 (47%)Ships in 1-2 Business DaysProduct Specifications- Other Name: Receiver & Dehydrator, A/C Refrigerant Drier; Desiccant Element; Accumulator; Drier; Receiver & Dehydrato, A/C Refrigerant

Chevrolet Dehydrator Part Number: 84467414
$74.84 MSRP: $133.64You Save: $58.80 (44%)Ships in 1-3 Business DaysProduct Specifications- Other Name: Receiver & Dehydrato, Air Conditioner Refrigerant; Drier Desiccant Element; A/C Receiver Drier; A/C Accumulator; Drier; Receiver & Dehydrato, A/C Refrigerant
- Replaces: 23330028

Chevrolet Dehydrator Part Number: 84497063
$122.16 MSRP: $251.05You Save: $128.89 (52%)Product Specifications- Other Name: Receiver & Dehydrato, Air Conditioner Refrigerant; Drier Desiccant Element; A/C Receiver Drier; A/C Accumulator; Drier; Receiver & Dehydrato, A/C Refrigerant

Chevrolet Drier Dessicant Bag Part Number: 84377853
$105.00 MSRP: $215.75You Save: $110.75 (52%)Ships in 1-2 Business DaysProduct Specifications- Other Name: Receiver & Dehydrato, Air Conditioner Refrigerant; Drier Desiccant Element; A/C Receiver Drier; A/C Accumulator; Dehydrator; Drier; Receiver & Dehydrato, A/C Refrigerant
- Replaced by: 42858352

Chevrolet Dehydrator Part Number: 84473270
$77.97 MSRP: $160.24You Save: $82.27 (52%)Product Specifications- Other Name: Receiver & Dehydrato, Air Conditioner Refrigerant; Drier Desiccant Element; A/C Receiver Drier; A/C Accumulator; Drier; Receiver & Dehydrato, A/C Refrigerant
- Replaced by: 86515463

Chevrolet Dehydrator Part Number: 13465910
$91.19 MSRP: $171.26You Save: $80.07 (47%)Ships in 1-2 Business DaysProduct Specifications- Other Name: Receiver & Dehydrato, Air Conditioner Refrigerant; Drier Desiccant Element; A/C Receiver Drier; A/C Accumulator; Drier; Receiver & Dehydrato, A/C Refrigerant

Chevrolet Dehydrator Part Number: 84789220
$15.93 MSRP: $28.44You Save: $12.51 (44%)Product Specifications- Other Name: Receiver & Dehydrato, Air Conditioner Refrigerant; Drier Desiccant Element; A/C Receiver Drier; A/C Accumulator; Drier; Receiver & Dehydrato, A/C Refrigerant
Chevrolet EXPANSION Part Number: 03033879
$6.71 MSRP: $11.51You Save: $4.80 (42%)Product Specifications- Other Name: A/C Line Screen; Tube; Strainer; Inlet Orifice; A/C Expansion Refrigerant; Gasket, A/C Evaporator
- Replaces: 52453930

Chevrolet Drier Dessicant Bag Part Number: 84951726
$15.41 MSRP: $27.52You Save: $12.11 (44%)Ships in 1-3 Business DaysProduct Specifications- Other Name: Receiver & Dehydrato, Air Conditioner Refrigerant; Dehydrator; Receiver & Dehydrato, A/C Refrigerant
- Replaced by: 86551900
- Replaces: 23248772
| Page 1 of 3 |Next >
1-20 of 47 Results
Chevrolet A/C Orifice Tube
Want to cut long-term maintenance and repair costs? Choose OEM A/C Orifice Tube. Those parts deliver top durability you can trust. On our site, you'll find a huge catalog of genuine Chevrolet parts. Prices are unbeatable, so you can keep more in your pocket. Every OEM Chevrolet A/C Orifice Tube includes a manufacturer's warranty. You can also get an easy return policy that keeps buying risk free. Fast delivery, get your car on the road quickly. It's simple to search, compare, and order. Stop guessing about quality or fit. Order today and save with parts that last.
Chevrolet A/C Orifice Tube Parts Questions & Experts Answers
- Q: How to Properly Service and Replace the A/C Orifice Tube on Chevrolet Impala?A:Proceed with expansion (A/C orifice) tube replacement after you remove the air cleaner and duct assembly along with the cross vehicle brace. After recovering the refrigerant you should remove both the vacuum Brake Booster and the condenser tube from the vehicle. Needle-nose pliers should be used to grasp the A/C Orifice Tube so you can both turn and push it until it separates from its housing before removal. Check the expansion tube for plastic frame damage and replace it if required while inspecting for a plugged inlet filter or a coated inlet filter which should also be replaced when necessary. When the tube can be reused you should clean the inlet filter using low pressure shop air before discarding the o-ring seals. Insert the new o-ring seals into their positions by applying mineral base 525 viscosity refrigerant oil followed by a careful insertion of the A/C Orifice Tube into the condenser tube while avoiding contact with the inlet filter. Install the condenser tube followed by the vacuum Brake Booster and carry out system evacuation before recharging. Once leak inspection of the a/c system is complete the technician should reinstall the cross vehicle brace followed by the air cleaner and duct assembly.
- Q: How to replace the A/C Orifice Tube on Chevrolet Malibu?A:The necessary replacement tools for the expansion (A/C Orifice Tube) consist of the Halogen Leak Detector (J 39400-A) together with the A/C Orifice Tube Remover (J 26549-E). The first step requires recovery of refrigerant and vehicle lift. The first step involves removing the bolt that connects the evaporator hose assembly to the condenser before detaching the assembly while using tape to seal the condenser line opening against contaminant entry. The process requires discarding the seal washer before extracting the A/C orifice tube with A/C Orifice Tube Remover (J 26549-E). The presence of restrictions or plugging requires residue removal and heat application from a heat gun at 7 mm distance (1/4 in) from the inlet pipe dimples followed by plier use to extract the A/C orifice tube through push-pull movements for loosening. Clean the inside of the evaporator inlet line for removing any source of contamination. The expansion A/C orifice tube needs to be inspected for damage and a replacement should be conducted in case of issues. A new O-ring must be installed after applying mineral base 525 viscosity refrigerant oil to the surface lightly. The A/C orifice tube needs to be inserted into the evaporator line so start from the short filter screen outlet side before cleaning all line fitting sealing surfaces using a lint-free cloth. After installing a new seal washer to the condenser tube you can connect the evaporator hose assembly to the condenser as you tighten the bolt to 25 N.m (18 lb ft). Evacuate and charge the A/C system following a leak test on all fittings done with the Halogen Detector (J 39400-A).
- Q: How to replace the A/C Orifice Tube on a long wheel base on Chevrolet Trailblazer?A:The refrigerant recovery procedure must start before you replace the expansion (orifice) tube of a long wheel base vehicle. Take away both the accumulator and Coolant Reservoir from the vehicle. First loosen the Evaporator tube nut installed on the Evaporator while removing the Evaporator tube from its position on the Evaporator. Before continuing remove the nut of the Evaporator tube block then disconnect the Evaporator tube at its block fitting . The expansion tube requires removal with the orifice tube remover (J 26549-E). Dispose of the original o-ring seal. Insert the smaller end of the expansion tube to the Evaporator tube before using the orifice tube remover (J 26549-E) for installation. First place the new o-ring seal and then put together the Evaporator tube with block fitting before tightening the nut to 28 n.m (21 lb ft) on the Evaporator tube block. Pair the Evaporator tube along with its nut to the Evaporator and apply 28 n.m (21 lb ft) of torque to both components. The last step includes reattaching the Coolant Reservoir with the accumulator and recharging the refrigerant system followed by inspecting for leaks with the halogen leak detector (J 39400-A).


Related Chevrolet Parts
 Chevrolet Cabin Air Filter
 Chevrolet Heater Control Valve
 Chevrolet Heater Core
 Chevrolet Ambient Temperature Sensor
 Chevrolet A/C Accumulator
 Chevrolet A/C Clutch
 Chevrolet A/C Idler Pulley
 Chevrolet A/C Switch
 Chevrolet Air Temperature Sensor
 Chevrolet Blower Control Switches
 Chevrolet Evaporator
 Chevrolet HVAC Pressure Switch
Browse Chevrolet A/C Orifice Tube by Models
S10 Colorado Tahoe Cruze Malibu Camaro Equinox Impala Avalanche Silverado 1500 Silverado 2500 HD Caprice Classic Cobalt Suburban Traverse Blazer HHR Sonic Tracker Volt Spark Trax Trailblazer Cavalier Corvette Beretta Bolt EUV Bolt EV Celebrity Corsica Express 1500 Express 2500 Express 3500 Lumina Metro Monte Carlo P30 Silverado 2500 Uplander Venture Lumina APV Silverado 3500 Suburban 1500 Trailblazer EXT Avalanche 1500 Avalanche 2500 C1500 Suburban C2500 Suburban Cruze Limited K1500 Suburban K2500 Suburban Malibu Limited Silverado 1500 Classic Silverado 1500 HD Silverado 1500 HD Classic Silverado 1500 LD Silverado 1500 LTD Silverado 2500 HD Classic Silverado 3500 Classic Silverado 3500 HD Spark EV Suburban 2500 Suburban 3500 HD