ChevyParts
My Garage
My Account
Cart
OEM Chevrolet Evaporator
A/C Evaporator Core- Select Vehicle by Model
- Select Vehicle by VIN
Select Vehicle by Model
orMake
Model
Year
Select Vehicle by VIN
For the most accurate results, select vehicle by your VIN (Vehicle Identification Number).
158 Evaporators found


Chevrolet Evaporator Core Part Number: 84037084
$156.51 MSRP: $283.28You Save: $126.77 (45%)Ships in 1-2 Business DaysProduct Specifications- Other Name: Evaporator Kit-A/C; A/C Evaporator Core Repair Kit; A/C Evaporator; Evaporator Kit, A/C Evaporator

Chevrolet Evaporator Core Part Number: 94508200
$151.50 MSRP: $271.74You Save: $120.24 (45%)Ships in 1-3 Business DaysProduct Specifications- Other Name: Evaporator Assembly-A/C; A/C Evaporator Core Repair Kit; A/C Evaporator Core; A/C Evaporator; Evaporator, A/C Evaporator; Evaporator
- Replaces: 95083714, 95423623

Chevrolet Expansion Valve Part Number: 84432302
$54.36 MSRP: $111.72You Save: $57.36 (52%)Ships in 1-2 Business DaysProduct Specifications- Other Name: Valve Kit, Air Conditioner Expansion Refrigerant; A/C Evaporator; Valve Kit, A/C Expansion Refrigerant; Evaporator, A/C Evaporator

Chevrolet Evaporator Core Part Number: 84689023
$35.37 MSRP: $72.68You Save: $37.31 (52%)Product Specifications- Other Name: Evaporator, Air Conditioner Evaporator; A/C Evaporator Core Repair Kit; A/C Evaporator; Evaporator, A/C Evaporator

Chevrolet Evaporator Core Part Number: 85580272
$88.52 MSRP: $181.90You Save: $93.38 (52%)Product Specifications- Other Name: Evaporator Kit-A/C
- Replaces: 85133360, 85133359

Chevrolet Evaporator Core Part Number: 92273275
$214.37 MSRP: $384.52You Save: $170.15 (45%)Ships in 1-3 Business DaysProduct Specifications- Other Name: Evaporator Assembly-A/C; A/C Evaporator Core Repair Kit; A/C Evaporator Core; A/C Evaporator; Evaporator, A/C Evaporator; Evaporator

Chevrolet Heater Core Part Number: 84206592
$89.49 MSRP: $183.91You Save: $94.42 (52%)Ships in 1-2 Business DaysProduct Specifications- Other Name: Core Kit-Heater; Evaporator Core
- Replaced by: 84760093

Chevrolet Evaporator Core Part Number: 95920150
$161.83 MSRP: $290.28You Save: $128.45 (45%)Product Specifications- Other Name: Evaporator Kit-A/C; A/C Evaporator Core Repair Kit; A/C Evaporator; Evaporator Kit, A/C Evaporator

Chevrolet Evaporator Core Part Number: 84910811
$96.23 MSRP: $171.84You Save: $75.61 (44%)Ships in 1-3 Business DaysProduct Specifications- Other Name: Evaporator Kit-A/C; A/C Evaporator Core Repair Kit; A/C Evaporator; Evaporator Kit, A/C Evaporator
- Replaced by: 85105315

Chevrolet Evaporator Core Part Number: 89019127
$272.13 MSRP: $492.54You Save: $220.41 (45%)Ships in 1-2 Business DaysProduct Specifications- Other Name: Evaporator, Air Conditioner Evaporator; A/C Evaporator Core Repair Kit; A/C Evaporator Core; A/C Evaporator; Evaporator, A/C Evaporator; Evaporator
- Replaces: 89018288

Chevrolet Evaporator Core Part Number: 13435995
$108.25 MSRP: $222.44You Save: $114.19 (52%)Ships in 1-2 Business DaysProduct Specifications- Other Name: Evaporator Kit-A/C; A/C Evaporator Core Repair Kit; A/C Evaporator; Evaporator Kit, A/C Evaporator; Evaporator, A/C Evaporator
- Replaces: 39095843

Chevrolet Evaporator Core Part Number: 95072673
$194.75 MSRP: $349.32You Save: $154.57 (45%)Product Specifications- Other Name: Evaporator Kit-A/C; A/C Evaporator Core Repair Kit; A/C Evaporator; Evaporator Kit, A/C Evaporator

Chevrolet Evaporator Core Part Number: 84104354
$141.34 MSRP: $290.45You Save: $149.11 (52%)Ships in 1-2 Business DaysProduct Specifications- Other Name: Evaporator Assembly-A/C; A/C Evaporator Core Repair Kit; A/C Evaporator
- Replaced by: 84340800

Chevrolet Evaporator Core Part Number: 42834283
$106.77 MSRP: $190.67You Save: $83.90 (44%)Ships in 1-2 Business DaysProduct Specifications- Other Name: Evaporator Kit-A/C; Evaporator Kit, A/C Evaporator
Chevrolet Evaporator Core Part Number: 85105315
$96.23 MSRP: $171.84You Save: $75.61 (44%)Ships in 1-3 Business DaysProduct Specifications- Other Name: Evaporator Kit-A/C; A/C Evaporator Core Repair Kit; A/C Evaporator; Evaporator Kit, A/C Evaporator
- Replaces: 84910811

Chevrolet Evaporator Core Part Number: 13363519
$193.59 MSRP: $397.83You Save: $204.24 (52%)Ships in 1-2 Business DaysProduct Specifications- Other Name: Evaporator Kit-A/C; A/C Evaporator Core Repair Kit; A/C Evaporator Core; A/C Evaporator; Evaporator Kit, A/C Evaporator; Evaporator
- Replaces: 13339087

Chevrolet Evaporator Core Part Number: 42833360
$103.32 MSRP: $184.50You Save: $81.18 (44%)Ships in 1-2 Business DaysProduct Specifications- Other Name: Evaporator Kit-A/C; Evaporator Kit, A/C Evaporator

Chevrolet Evaporator Core Part Number: 23197714
$365.20 MSRP: $750.48You Save: $385.28 (52%)Ships in 1-2 Business DaysProduct Specifications- Other Name: Evaporator Assembly-A/C; A/C Evaporator Core Repair Kit; A/C Evaporator Core; A/C Evaporator; Evaporator, A/C Evaporator; Evaporator
- Replaces: 89019018, 52494775

Chevrolet Evaporator Core Part Number: 42583662
$103.62 MSRP: $185.04You Save: $81.42 (44%)Ships in 1-3 Business DaysProduct Specifications- Other Name: Evaporator Kit-A/C; A/C Evaporator Core Repair Kit; A/C Evaporator; Evaporator Kit, A/C Evaporator
- Replaces: 42423943

Chevrolet Evaporator Core Part Number: 42666241
$153.87 MSRP: $288.96You Save: $135.09 (47%)Product Specifications- Other Name: Evaporator Kit-A/C; A/C Evaporator Core Repair Kit; A/C Evaporator; Evaporator Kit, A/C Evaporator
- Replaces: 95369826
| Page 1 of 8 |Next >
1-20 of 158 Results
Chevrolet Evaporator
Want to cut long-term maintenance and repair costs? Choose OEM Evaporator. Those parts deliver top durability you can trust. On our site, you'll find a huge catalog of genuine Chevrolet parts. Prices are unbeatable, so you can keep more in your pocket. Every OEM Chevrolet Evaporator includes a manufacturer's warranty. You can also get an easy return policy that keeps buying risk free. Fast delivery, get your car on the road quickly. It's simple to search, compare, and order. Stop guessing about quality or fit. Order today and save with parts that last.
Chevrolet Evaporator Parts Questions & Experts Answers
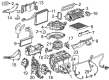
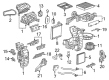
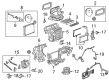
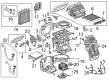
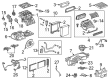
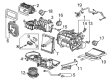
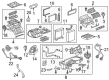
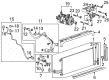
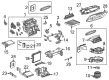
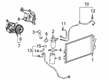
- Q: How to replace the air conditioning evaporator core on Chevrolet Colorado?A:The HVAC module assembly must be removed as the first step to replace the air conditioning evaporator core. Split the HVAC module assembly halves by unscrewing its pieces followed by removing the evaporator temperature sensor control module screw before relocating the sensor module. The HVAC module assembly should be disassembled (1, 4) to enable the removal of the evaporator temperature sensor that connects to the evaporator. To complete the procedure remove the evaporator core from its position in the HVAC module assembly. New evaporator core installations require refrigerant oil according to the specified system capacity information provided in the refrigerant system specifications. The HVAC module assembly halves need their seal installed before inserting the evaporator core into the assembly and attaching the evaporator temperature sensor to the core. Install two screws to unite the HVAC module assembly parts (1, 4) while applying torque of 1.9 Nm (17 lb in) for tightening. Finish the evaporator temperature sensor control module screw installation process by both securing it and tightening it to 1.9 Nm (17 lb in). Reinstall the HVAC module assembly afterwards.
- Q: How to Replace an Evaporator Core in an HVAC Module Assembly on Chevrolet Malibu?A:The first step to replace the air conditioning evaporator core involves removing the HVAC module assembly while being mindful that some screws hide beneath foam insulation. You must remove all screws that hold together the HVAC module assembly before you can separate its two halves after which you need to detach both main parts of the HVAC module assembly. I should now remove the evaporator core from the HVAC module assembly as well as extract the seal that maintains the two halves of the HVAC module assembly. Before installing the new evaporator core you need to add refrigerant oil according to requirement. Insert the seal between the HVAC module assembly halves before placing the evaporator core inside the assembly while being sure the seal remains correctly positioned between the two case sections. The HVAC module assembly parts need to be assembled before screw installation to join the halves while tightening screws to 1.9 N.m (17 lb in). The last step requires HVAC module assembly installation.
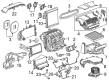
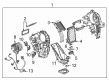
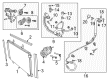
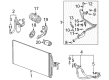
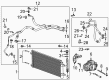
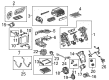
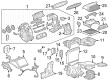
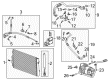
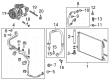
- Q: How to replace the evaporator core in the auxiliary HVAC module on Chevrolet Tahoe?A:The initial step for Evaporator core replacement of the auxiliary hvac module requires refrigerant removal from the a/c system and subsequent drainage of engine coolant. The auxiliary hvac module under the vehicle requires disconnecting of heater lines (2,3) and air conditioning lines (2,3). The auxiliary hvac module needs its vehicle securing nuts removed before safety stands can be taken off the vehicle and the platform should be lowered. Afterwards start by removing both the real time damping (RTD) module with its electrical connectors and the right rear quarter trim panel. Then remove the fastener that attaches the upper auxiliary air duct while sliding the duct into place near the headliner. Take out the rear auxiliary hvac module by removing its fasteners and position it on a work surface. Start by removing the air temperature actuator and Heater Core cover as well as Heater Core and lower module cover from the module before removing the Evaporator core from the lower module cover. Put the Evaporator core inside the lower module cover and reassemble everything by inserting the lower module cover, Heater Core, Heater Core cover and air temperature actuator onto the module. Install the auxiliary hvac module assembly back into the vehicle while fastening it using two bolts which should be inside the vehicle body. To finish the installation process, connect the upper auxiliary air duct to the air distributor duct through fastener attachment. After that, reinstall the rtd module and right rear quarter trim panel together with electrical connector reattachment. Reposition the vehicle at its height before installing auxiliary hvac module nuts while twisting them to achieve 9 n.m (80 lb in). Broaden and join (2,3) air conditioning lines with nut to the auxiliary hvac module while using a torque of 16 n.m before linking heater lines to the module. Lower the vehicle and follow the system with correct fluid and then complete a refrigerant recharging process.


Related Chevrolet Parts
 Chevrolet Blower Motor
 Chevrolet Blower Motor Resistor
 Chevrolet Cabin Air Filter
 Chevrolet Blend Door Actuator
 Chevrolet Heater Core
 Chevrolet Ambient Temperature Sensor
 Chevrolet A/C Condenser
 Chevrolet A/C Orifice Tube
 Chevrolet A/C Service Cap
 Chevrolet Air Temperature Sensor
 Chevrolet Blower Control Switches
 Chevrolet HVAC Pressure Switch
Browse Chevrolet Evaporator by Models
Nova S10 Colorado C10 Tahoe Cruze Malibu Camaro Equinox Impala SS SSR Avalanche Silverado 1500 Silverado 2500 HD Caprice Classic Cobalt Suburban Traverse Blazer HHR Sonic Tracker Volt El Camino K10 Spark Trax Trailblazer Astro Cavalier Corvette C20 Aveo Beretta Bolt EUV Bolt EV C1500 C2500 C30 C3500 Celebrity City Express Corsica Express 1500 Express 2500 Express 3500 G10 G20 G30 K1500 K20 K2500 K30 K3500 K5 Blazer Lumina Metro Monte Carlo P30 Prizm S10 Blazer Silverado 2500 Uplander Venture Lumina APV Silverado 3500 Suburban 1500 Trailblazer EXT Avalanche 1500 Avalanche 2500 Aveo5 C10 Suburban C1500 Suburban C20 Suburban C2500 Suburban Captiva Sport Citation II Cruze Limited Impala Limited K10 Suburban K1500 Suburban K20 Suburban K2500 Suburban Malibu Limited P20 R10 R10 Suburban R1500 Suburban R20 R20 Suburban R2500 R2500 Suburban R30 R3500 Silverado 1500 Classic Silverado 1500 HD Silverado 1500 HD Classic Silverado 1500 LD Silverado 1500 LTD Silverado 2500 HD Classic Silverado 3500 Classic Silverado 3500 HD Spark EV Spectrum Suburban 2500 Suburban 3500 HD V10 V10 Suburban V1500 Suburban V20 V20 Suburban V2500 Suburban V30 V3500