ChevyParts
My Garage
My Account
Cart
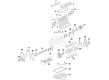
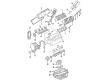
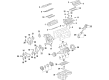
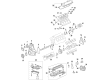
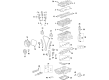
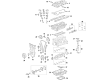
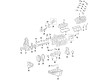
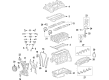
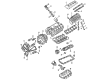
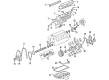
OEM Chevrolet Camshaft
Cam- Select Vehicle by Model
- Select Vehicle by VIN
Select Vehicle by Model
orMake
Model
Year
Select Vehicle by VIN
For the most accurate results, select vehicle by your VIN (Vehicle Identification Number).
236 Camshafts found


Chevrolet Camshaft Part Number: 12623064
$131.17 MSRP: $179.55You Save: $48.38 (27%)Product Specifications- Other Name: Camshaft, Engine
- Replaces: 12605220


Chevrolet Camshaft Part Number: 12596567
$231.04 MSRP: $324.27You Save: $93.23 (29%)Ships in 1-2 Business DaysProduct Specifications- Other Name: Camshaft, Engine


Chevrolet Camshaft Part Number: 12625988
$258.67 MSRP: $406.90You Save: $148.23 (37%)Product Specifications- Other Name: Camshaft, Engine
- Replaced by: 19431714


Chevrolet Camshaft Part Number: 12623063
$160.21 MSRP: $275.13You Save: $114.92 (42%)Product Specifications- Other Name: Camshaft, Engine
- Replaces: 12603844


Chevrolet Camshaft Part Number: 12586532
$115.94 MSRP: $182.40You Save: $66.46 (37%)Product Specifications- Other Name: Camshaft, Engine


Chevrolet Camshaft Part Number: 12638651
$111.33 MSRP: $174.39You Save: $63.06 (37%)Ships in 1-3 Business DaysProduct Specifications- Other Name: Camshaft Assembly-Intake; Camshaft, Engine

Chevrolet Camshaft Part Number: 12724360
$143.15 MSRP: $225.20You Save: $82.05 (37%)Ships in 1-3 Business DaysProduct Specifications- Other Name: Camshaft, Engine

Chevrolet Camshaft Part Number: 55581181
$111.35 MSRP: $174.38You Save: $63.03 (37%)Ships in 1-3 Business DaysProduct Specifications- Other Name: Camshaft Assembly-Intake; Camshaft, Engine

Chevrolet Camshaft Part Number: 12638405
$95.45 MSRP: $149.51You Save: $54.06 (37%)Ships in 1-3 Business DaysProduct Specifications- Other Name: Camshaft, Engine
- Replaces: 12632277
Chevrolet Camshaft Part Number: 12724358
$155.01 MSRP: $243.83You Save: $88.82 (37%)Ships in 1-3 Business DaysProduct Specifications- Other Name: Camshaft Assembly-Intake; Camshaft, Engine

Chevrolet Camshaft Part Number: 12642245
$161.98 MSRP: $254.86You Save: $92.88 (37%)Ships in 1-3 Business DaysProduct Specifications- Other Name: Camshaft, Engine
Chevrolet Camshaft Part Number: 12663596
$132.82 MSRP: $208.93You Save: $76.11 (37%)Ships in 1-3 Business DaysProduct Specifications- Other Name: Camshaft Assembly-Intake; Camshaft, Engine
Chevrolet Camshaft Part Number: 12633773
$345.16 MSRP: $610.73You Save: $265.57 (44%)Ships in 1-2 Business DaysProduct Specifications- Other Name: Camshaft, Engine
- Replaced by: 19432226
Chevrolet Camshaft Part Number: 12665270
$84.81 MSRP: $132.85You Save: $48.04 (37%)Ships in 1-3 Business DaysProduct Specifications- Other Name: Camshaft, Engine


Chevrolet Camshaft Part Number: 12675773
$64.37 MSRP: $155.19You Save: $90.82 (59%)Ships in 1-3 Business DaysProduct Specifications- Other Name: Camshaft Assembly-Intake; Camshaft, Engine
- Replaces: 12677323, 12672933, 12665277

Chevrolet Exhaust Camshaft Part Number: 10199078
Product Specifications- Other Name: Camshaft; Camshaft, Engine

Chevrolet Intake Camshaft Part Number: 10199082
Product Specifications- Other Name: Camshaft; Camshaft, Engine
Chevrolet Exhaust Camshaft Part Number: 10199084
Product Specifications- Other Name: Camshaft; Camshaft, Engine
Chevrolet Intake Camshaft Part Number: 10215909
Product Specifications- Other Name: Camshaft; Camshaft, Engine

Chevrolet Camshaft Part Number: 12631811
Product Specifications- Other Name: Camshaft, Engine
| Page 1 of 12 |Next >
1-20 of 236 Results
Chevrolet Camshaft
Want to cut long-term maintenance and repair costs? Choose OEM Camshaft. Those parts deliver top durability you can trust. On our site, you'll find a huge catalog of genuine Chevrolet parts. Prices are unbeatable, so you can keep more in your pocket. Every OEM Chevrolet Camshaft includes a manufacturer's warranty. You can also get an easy return policy that keeps buying risk free. Fast delivery, get your car on the road quickly. It's simple to search, compare, and order. Stop guessing about quality or fit. Order today and save with parts that last.
Chevrolet Camshaft Parts Questions & Experts Answers
- Q: How to replace the camshaft on Chevrolet Colorado?A:The first step is to take off both the Camshaft cover and Camshaft position (CMP) sensor before the Camshaft replacement process. Rotate the Crankshaft clockwise until the #1 Piston is at top dead center (TDC) on the compression stroke. Secure j 44221 Camshaft holding tool behind the camshafts before you remove the intake and exhaust Camshaft sprocket bolts while keeping up proper tension with j 44222 Camshaft sprocket holding tool. Move the sprocket and Timing Chain from the camshafts onto the j 44222 tool. The j 44221 can be removed along with all Camshaft caps after you loosen the bolts in alternation until all valve spring pressure is gone. Cylinder heads require a removal of all camshafts. For installation, coat the Camshaft journals, thrust face, and lobes with clean engine oil, then install the j 44221 with the Camshaft flats up and the #1 Piston at tdc. The user should replace the intake and exhaust camshafts in their original configuration while checking that the marked slots on the Camshaft caps match their correct placement. Install the Camshaft caps together with bolts and follow even torque specifications to 12 n.m (106 lb in). Use a 25 mm (1 in) wrench on each hex of the camshafts to assist in aligning the sprockets before you carefully transfer the sprockets with Timing Chain from j 44222 to Camshaft positions. Install the new intake Camshaft sprocket bolt onto the Camshaft first then apply torque using the j 45059 angle meter which must reach 100 degrees past the initial 20 n.m (15 lb ft) torque value and then tighten the exhaust Camshaft actuator bolt to 25 n.m (18 lb ft) with an additional 135 degrees using this same tool. To finish the repair you must first discard j 44221 before placing the cmp sensor and then reinstall the Camshaft cover.
- Q: How to replace the intake camshaft and lash adjuster on Chevrolet Malibu?A:The first task in intake camshaft and valve lifter replacement requires removal of the intake camshaft position actuator. One turn of bolt removal at a time from the bearing caps will reduce the camshaft spring tension before you mark the caps for future reinstallation. Unfasten the bearing caps and their bolts before extracting the intake camshaft. Reinstallation of the roller followers and hydraulic adjusters requires proper organization. The next step involves removing camshaft roller followers together with hydraulic element lash adjusters from the mechanism. Insert the hydraulic element lash adjusters into their relevant Cylinder Head bores and lubricate them together with the valve tips using gm pn 12345501 (Canadian PN 992704) or equivalent product. The original placement of roller followers on the camshaft needs to be maintained during repairs; complete replacement of any camshaft mandates the exchange of related roller followers as well. Lubricate the camshaft roller followers that face the valve tips by using gm pn 12345501 (Canadian PN 992704) or equivalent product. Install the intake camshaft and follow it with gm pn 12345501 (Canadian PN 992704) or equivalent oil lubrication. Begin by installing the camshaft bearing caps while hand-tightening the cap bolts before properly torquing bearing caps to 10 n.m (89 lb in) total. Place the final component of intake camshaft position actuator.
- Q: How to replace the camshaft on Chevrolet Tahoe?A:The procedure for Camshaft replacement starts with radiator support removal then proceeding to extract valve lifters. The procedure entails taking out the Timing Chain as well as the Camshaft position actuator and solenoid valve. Remove the Camshaft retainer bolts (204) first together with retainer (203) with caution for the Camshaft bearings while all journals share the same diameter. You can install a bolt onto the Camshaft to serve as a rotational tool while removing the Camshaft from the engine block with utmost care. Perform an evaluation on both the Camshaft and its bearings following correct cleaning procedures. The replacement process for a Camshaft requires replacement of the valve lifters as well. A clean oil dipstick should be used to lubricate the Camshaft journals and bearings before slowly inserting the Camshaft into the engine block through use of the bolt hand holder. Initiate the bolt removal procedure from the Camshaft front section while ensuring the retaining element contains the necessary sealing gasket facing the engine block surface and remains free of foreign particles. Reinstall the Camshaft retainer (203) followed by its bolts (204) while torquing the first design hex head bolts to 25 nm (18 lb ft) in combination with the second design torx(R) head bolts to 15 nm (11 lb ft). Finish the process by reinstalling the Timing Chain and Camshaft position actuator and solenoid valve and the valve lifters and then mount the radiator support.


Related Chevrolet Parts
 Chevrolet Oil Pan
 Chevrolet Crankshaft Pulley
 Chevrolet Crankshaft Gear
 Chevrolet Crankshaft Seal
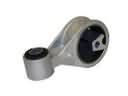 Chevrolet Engine Torque Strut Mount
 Chevrolet Lash Adjuster
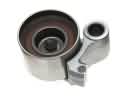 Chevrolet Timing Belt Idler Pulley
 Chevrolet Timing Chain Guide
 Chevrolet Timing Chain Tensioner
 Chevrolet Valve Cover Gasket
 Chevrolet Valve Stem Oil Seal
 Chevrolet Variable Timing Sprocket
Browse Chevrolet Camshaft by Models
Nova S10 Colorado C10 Tahoe Cruze Malibu Camaro Equinox Impala SS SSR Avalanche Silverado 1500 Silverado 2500 HD Caprice Cobalt Suburban Traverse Blazer HHR Sonic Tracker Volt El Camino K10 Spark Trax Trailblazer Astro Cavalier Corvette C20 Aveo Beretta C1500 C2500 C30 C3500 Celebrity Chevette City Express Corsica Express 1500 Express 2500 Express 3500 G10 G20 G30 K1500 K20 K2500 K30 K3500 K5 Blazer Lumina Metro Monte Carlo Prizm S10 Blazer Silverado 2500 Uplander Venture Lumina APV Silverado 3500 Suburban 1500 Trailblazer EXT Avalanche 2500 Aveo5 C10 Suburban C1500 Suburban C20 Suburban C2500 Suburban Captiva Sport Citation II Cruze Limited Impala Limited K10 Suburban K1500 Suburban K20 Suburban K2500 Suburban R10 R10 Suburban R1500 Suburban R20 R20 Suburban R2500 R2500 Suburban R30 R3500 Silverado 1500 Classic Silverado 1500 HD Silverado 2500 HD Classic Silverado 3500 Classic Silverado 3500 HD Suburban 2500 Suburban 3500 HD V10 V10 Suburban V1500 Suburban V20 V20 Suburban V2500 Suburban V30 V3500