ChevyParts
My Garage
My Account
Cart
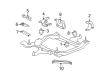
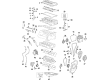
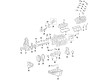
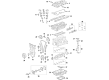
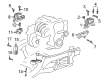
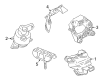
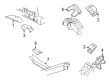
OEM GMC Engine Mount
Engine Motor Mount- Select Vehicle by Model
- Select Vehicle by VIN
Select Vehicle by Model
orMake
Model
Year
Select Vehicle by VIN
For the most accurate results, select vehicle by your VIN (Vehicle Identification Number).
248 Engine Mounts found


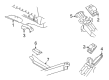
GMC Strut Mount Part Number: 25840458
$47.98 MSRP: $81.69You Save: $33.71 (42%)Ships in 1-3 Business DaysProduct Specifications- Other Name: Strut, Engine Mount Dampening; Engine Mount Torque Strut; Engine Mount Bracket; Motor Mount; Strut Bracket; Strut


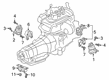
GMC Front Mount Part Number: 25857746
$87.67 MSRP: $150.56You Save: $62.89 (42%)Product Specifications- Other Name: Mount-Engine Front; Engine Mount Bracket; Motor Mount; Mount; Mount, Engine Mount Dampening
- Position: Front
- Replaces: 25811443


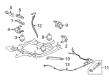
GMC Motor Mount Part Number: 15854940
$160.70 MSRP: $276.00You Save: $115.30 (42%)Ships in 1-2 Business DaysProduct Specifications- Other Name: Mount Assembly-Engine; Engine Mount Bracket; Front Mount; Mount, Engine Mount Dampening; Mount, Engine Mounting


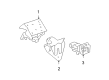
GMC Rear Mount Part Number: 25840450
$117.61 MSRP: $201.99You Save: $84.38 (42%)Product Specifications- Other Name: Mount, Engine Mount Dampening; Engine Mount Bracket; Motor Mount; Mount
- Position: Rear


GMC Motor Mount, Passenger Side Part Number: 84175580
$121.90 MSRP: $209.35You Save: $87.45 (42%)Product Specifications- Other Name: Mount Assembly-Engine; Engine Mount Bracket; Front Mount; Mount, Engine Mount Dampening; Mount, Engine Mounting
- Position: Passenger Side
- Replaced by: 85579395

GMC Motor Mount, Passenger Side Part Number: 85623475
$80.75 MSRP: $137.46You Save: $56.71 (42%)Product Specifications- Other Name: Mount Assembly-Engine; Front Mount; Mount, Engine Mount Dampening; Mount, Engine Mounting
- Position: Passenger Side
- Replaces: 84550211, 84631640, 84631642, 85534479, 84550209

GMC Motor Mount, Driver Side Part Number: 84175579
$181.63 MSRP: $309.23You Save: $127.60 (42%)Ships in 1-2 Business DaysProduct Specifications- Other Name: Mount Assembly-Engine; Engine Mount Bracket; Front Mount; Mount, Engine Mount Dampening; Mount, Engine Mounting
- Position: Driver Side
- Replaced by: 85579394

GMC Motor Mount, Passenger Side Part Number: 23195922
$124.59 MSRP: $212.11You Save: $87.52 (42%)Product Specifications- Other Name: Mount Assembly-Engine; Engine Mount Bracket; Mount; Mount, Engine Mount Dampening; Mount, Engine Mounting
- Position: Passenger Side


GMC Motor Mount, Passenger Side Part Number: 86812789
$63.08 MSRP: $98.79You Save: $35.71 (37%)Product Specifications- Other Name: Mount, Engine Mounting; Side Mount
- Position: Passenger Side

GMC Motor Mount Part Number: 84884385
$90.83 MSRP: $142.28You Save: $51.45 (37%)Ships in 1-3 Business DaysProduct Specifications- Other Name: Mount, Engine Mounting; Engine Mount Bracket
- Replaces: 84377289

GMC Motor Mount, Driver Side Part Number: 85151355
$59.14 MSRP: $92.61You Save: $33.47 (37%)Ships in 1-3 Business DaysProduct Specifications- Other Name: Mount Assembly-Engine; Front Mount
- Position: Driver Side
- Replaced by: 85623479


GMC Mount Bracket, Driver Side Part Number: 23195925
$61.35 MSRP: $96.10You Save: $34.75 (37%)Product Specifications- Other Name: Bracket-Engine Mount Engine Side; Engine Mount Bracket; Motor Mount; Bracket, Engine Mounting
- Position: Driver Side


GMC Motor Mount, Passenger Side Part Number: 15828082
$112.50 MSRP: $177.02You Save: $64.52 (37%)Product Specifications- Other Name: Mount Assembly-Engine; Engine Mount Bracket; Front Mount; Mount, Engine Mount Dampening; Mount, Engine Mounting
- Position: Passenger Side
- Replaces: 15107376

GMC Mount Bracket, Passenger Side Part Number: 15969190
Product Specifications- Other Name: Bracket; Engine Mount Bracket; Motor Mount; Bracket, Engine Mounting
- Position: Passenger Side

GMC Mount Bracket, Passenger Side Part Number: 15969186
Product Specifications- Other Name: Bracket, Engine Mounting; Engine Mount Bracket; Motor Mount
- Position: Passenger Side

GMC Mount Bracket, Driver Side Part Number: 15969185
Product Specifications- Other Name: Bracket, Engine Mounting; Engine Mount Bracket; Motor Mount
- Position: Driver Side

GMC Mount Bracket, Driver Side Part Number: 15969191
Product Specifications- Other Name: Bracket, Engine Mounting; Engine Mount Bracket; Motor Mount
- Position: Driver Side

GMC Mount Bracket, Passenger Side Part Number: 84193765
$42.54 MSRP: $66.64You Save: $24.10 (37%)Product Specifications- Other Name: Bracket-Engine Mount Heat Shield; Engine Mount Bracket; Motor Mount
- Position: Passenger Side

GMC Rear Mount Bracket Part Number: 15115371
Product Specifications- Other Name: Bracket, Engine Mounting; Engine Mount Torque Strut; Engine Mount Bracket; Engine Torque Mount; Motor Mount
- Position: Rear

GMC Mount Bracket, Driver Side Part Number: 15107375
Product Specifications- Other Name: Bracket, Engine Mounting; Engine Mount Bracket; Motor Mount
- Position: Driver Side
| Page 1 of 13 |Next >
1-20 of 248 Results
GMC Engine Mount
Want to cut long-term maintenance and repair costs? Choose OEM Engine Mount. Those parts deliver top durability you can trust. On our site, you'll find a huge catalog of genuine GMC parts. Prices are unbeatable, so you can keep more in your pocket. Every OEM GMC Engine Mount includes a manufacturer's warranty. You can also get an easy return policy that keeps buying risk free. Fast delivery, get your car on the road quickly. It's simple to search, compare, and order. Stop guessing about quality or fit. Order today and save with parts that last.
GMC Engine Mount Parts Questions & Experts Answers
- Q: How to replace the right engine mount on GMC Canyon?A:Replacing the right engine mount starts with raising and supporting the vehicle before removing the wheel and tire assembly and engine shield when present. First support the engine with both a jack stand and wood block before removing the through bolt from the mount-to-frame bracket on the replacement side while loosening the left side through bolt. Usage of the jack stand to raise the engine allows tilting before removing the engine mount bolts for complete engine mount removal when necessary. Begin engine mount bolt installation by first putting in bolt position to enhance mounting efficiency. The process requires setting engine mount bolts at 50 Nm (37 ft. lbs.) then lowering the engine to install the engine mount-to-frame bracket through bolt which needs tightening at 85 Nm (63 ft. lbs.). Last, take off the jack stand while reinstalling any equipped engine shield then reinstall the wheel and tire followed by lowering the vehicle.
- Q: How to replace the right side engine mount on GMC Sierra 1500?A:The first step to replace the right side Engine Mount begins with removing the Engine Mount to Engine Mount Bracket bolts. The first step requires vehicle support by a suitable lift method while removing all oil pan skid plate bolts and the plate itself. The adjustable jack needs placement on the square tab at the engine block rear to lift the engine body after Starter removal. Secondly you must unbolt the Engine Mount and then remove both the mount and its bolts. Remove both Engine Mount Bracket bolts from their positions and the respective bracket components before proceeding to remove the bolts on the Engine Mount Bracket with its bracket. The first step for installation begins with putting the Engine Mount Bracket into position by thoroughly cleaning all bolt threads with denatured alcohol or equivalent and then applying threadlocker gm p/n 12345382 (Canadian P/N 10953489) to the bolts. After cleaning and thread-locking the bolts, proceed with installation by securing the bracket. Fit and tighten Engine Mount Bracket bolts to 75 n.m (55 lb ft), after which position and install the Engine Mount side bracket with its attached bolts then tighten these bracket bolts to 50 n.m (37 lb ft). To complete the installation position the Engine Mount first before tightening its bolts to 50 n.m (37 lb ft) and finally remove the engine and reinstall the Starter. As the final steps install the oil pan skid plate and its bolts at 20 n.m (15 lb ft), drop the vehicle before installing the Engine Mount to Engine Mount Bracket bolts which must be tightened at 65 n.m (48 lb ft).
- Q: How to replace the left engine mount on a 2WD on GMC Yukon?A:The first step to replace the left Engine Mount of a 2wd vehicle involves removing the air cleaner outlet duct. The first step is to lower the vehicle before you access the Engine Mount to frame bolts . Lift the vehicle to reach halfway in the air. During the left wheelhouse liner removal proceed with caution because the engine must not rest on crankshaft balancer or Oil Pan. Position a screw type adjustable jack underneath the tab that extends from the engine block. The wheelhouse opening provides access for removing Engine Mount to engine bolts while an adjustable jack helps elevate the engine marginally for removing the Engine Mount. Position the Engine Mount to the engine before locking the Engine Mount to engine bolts through the wheelhouse opening and tightening them to 50 nm (37 lb ft). After adjusting the engine height you should remove the adjustable jack when the Engine Mount rests completely against the frame. Place the left wheelhouse liner before lowering the vehicle while you install the Engine Mount frame bolts using 65 nm as the tightening torque with the center bolt first and both side bolts afterward. Lower down the vehicle before placing back the air cleaner outlet duct.


Related GMC Parts
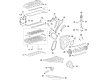
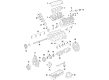
 GMC Timing Chain
 GMC Timing Belt
 GMC Camshaft Seal
 GMC Crankshaft
 GMC Crankshaft Pulley
 GMC Cylinder Head
 GMC Oil Drain Plug Gasket
 GMC Oil Pan Baffle
 GMC Piston
 GMC Piston Ring
 GMC Timing Belt Tensioner
 GMC Valve Cover Grommet
Browse GMC Engine Mount by Models
Acadia Sierra 1500 Yukon Canyon Sierra 2500 HD Terrain Envoy Sonoma Typhoon Syclone Caballero C1500 Envoy XL Envoy XUV Jimmy K1500 S15 S15 Jimmy Safari Savana 2500 Savana 3500 Sierra 2500 Sierra 3500 Yukon XL Acadia Limited C2500 C3500 G2500 K2500 K3500 P3500 Savana 1500 Yukon XL 1500 C1500 Suburban C2500 Suburban G1500 G3500 K1500 Suburban K2500 Suburban P2500 R1500 R1500 Suburban R2500 R2500 Suburban R3500 Sierra 1500 Classic Sierra 1500 HD Sierra 1500 HD Classic Sierra 2500 HD Classic Sierra 3500 Classic Sierra 3500 HD V1500 V1500 Suburban V2500 V2500 Suburban V3500 Yukon XL 2500