ChevyParts
My Garage
My Account
Cart
OEM Chevrolet Fuel Pressure Regulator
Fuel Tank Pressure Regulator- Select Vehicle by Model
- Select Vehicle by VIN
Select Vehicle by Model
orMake
Model
Year
Select Vehicle by VIN
For the most accurate results, select vehicle by your VIN (Vehicle Identification Number).
44 Fuel Pressure Regulators found


Chevrolet Fuel Pressure Regulator Part Number: 97728979
$368.14 MSRP: $579.25You Save: $211.11 (37%)Product Specifications- Other Name: Regulator Kit, Fuel Pressure; Regulator Kit, Fuel Injection

Chevrolet Fuel Pressure Regulator Part Number: 94136505
$12.16 MSRP: $106.50You Save: $94.34 (89%)Ships in 1-2 Business DaysProduct Specifications- Other Name: Regulator Assembly, Fuel Pressure; Regulator, Fuel Injection

Chevrolet Fuel Tank Part Number: 84016245
$497.26 MSRP: $815.18You Save: $317.92 (39%)Ships in 1-2 Business DaysProduct Specifications- Other Name: Regulator Assembly-CNG High Pressure; Regulator; Regulator, Natural Gasoline Pressure Regulator
- Replaces: 23273194

Chevrolet Fuel Pressure Regulator Part Number: 12574339
$108.20 MSRP: $192.35You Save: $84.15 (44%)Ships in 1-2 Business DaysProduct Specifications- Other Name: Regulator Kit, Fuel Pressure; Regulator Kit, Fuel Injection


Chevrolet Fuel Pressure Regulator Part Number: 17112281
Product Specifications- Other Name: Regulator Kit, Fuel Pressure; Pressure Regulator; Regulator Kit, Fuel Injection
- Replaces: 17110874


Chevrolet Fuel Pressure Regulator Part Number: 17091947
Product Specifications- Other Name: Regulator Assembly, Fuel Pressure; Regulator Kit, Fuel Injection; Regulator, Fuel Injection
- Replaces: 17091221
Chevrolet Fuel Pressure Regulator Part Number: 17113079
Product Specifications- Other Name: Regulator Kit, Fuel Pressure (W/Throttle Body Injector Fuel Meter Cover); Regulator Kit, Throttle Body/Carburetor
Chevrolet Fuel Pressure Regulator Part Number: 17110868
Product Specifications- Other Name: Regulator Kit, Fuel Pressure

Chevrolet Fuel Pressure Regulator Part Number: 24500228
Product Specifications- Other Name: Regulator, Fuel Injection
- Replaces: 89054351

Chevrolet Fuel Pressure Regulator Part Number: 91176658
Product Specifications- Other Name: Regulator, Fuel Pressure; Regulator, Fuel Injection
Chevrolet Fuel Pressure Regulator Part Number: 17112757
Product Specifications- Other Name: Regulator, Fuel Injection

Chevrolet Fuel Pressure Regulator Part Number: 24506988
$92.11 MSRP: $164.46You Save: $72.35 (44%)Product Specifications- Other Name: Regulator, Fuel Injection
- Replaces: 24503229

Chevrolet Fuel Pressure Regulator Part Number: 52373074
Product Specifications- Other Name: Regulator; Regulator, Natural Gasoline Pressure Regulator
Chevrolet Fuel Pressure Regulator Part Number: 55564170
Product Specifications- Other Name: Regulator, Fuel Injection; Pressure Sensor
Chevrolet Fuel Pressure Regulator Part Number: 12574287
Product Specifications- Other Name: Regulator Kit-Fuel Pressure; Regulator Kit, Fuel Injection
Chevrolet Fuel Pressure Regulator Part Number: 94845591
Product Specifications- Other Name: Regulator, Fuel Injection
Chevrolet Fuel Pressure Regulator Part Number: 17112907
Product Specifications- Other Name: Regulator Kit, Throttle Body/Carburetor

Chevrolet Fuel Pressure Regulator Part Number: 17107491
Product Specifications- Other Name: Regulator Assembly, Fuel Pressure; Regulator Kit, Fuel Injection

Chevrolet Fuel Pressure Regulator Part Number: 17112399
Product Specifications- Other Name: Regulator Kit, Throttle Body/Carburetor; Cover

Chevrolet Fuel Pressure Regulator Part Number: 17091410
Product Specifications- Other Name: Regulator, Fuel Pressure; Regulator, Fuel Injection
- Replaces: 17112482, 17107485, 17107010
| Page 1 of 3 |Next >
1-20 of 44 Results
Chevrolet Fuel Pressure Regulator
Choose OEM Fuel Pressure Regulator, you're making the optimal decision for superior quality and perfect performance. You can feel confident because each component goes through stringent quality checks. Every part is carefully built to comply with Chevrolet's factory specifications. You'll enjoy a smooth, worry-free installation that fits just right. At ChevyPartsGiant.com, you'll find it easy to get top-quality OEM Chevrolet Fuel Pressure Regulator. You can shop at highly competitive prices and protect your budget. All our genuine Chevrolet parts include a dependable manufacturer's warranty. You'll also appreciate our straightforward return policy and swift delivery services for extra convenience.
Chevrolet Fuel Pressure Regulator Parts and Q&A
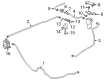
- Q: How to replace the fuel pressure regulator on Chevrolet Colorado?A:The first step to replace the Fuel Pressure Regulator requires bleeding fuel system pressure from the system. Disconnect both the fuel return hose/pipe from the Fuel Rail and remove the atmospheric vent hose from the Fuel Pressure Regulator . Wash the Fuel Pressure Regulator along with its surrounding territory and afterward detach the Fuel Pressure Regulator screws (4, 5). Cut the Fuel Pressure Regulator and its o-ring seal off the Fuel Rail before disposal of the o-ring seal. You need to extract the Fuel Rail return pipe together with its o-ring seal from the Fuel Pressure Regulator but throw away this o-ring seal. Technology mandates testing the filter screen of the Fuel Pressure Regulator for foreign particles which require replacing if necessary. Installation requires fitting the new Fuel Pressure Regulator filter followed by application of minimal gm p/n 9981704 mineral oil to o-ring seals (2, 7). You should install o-ring seals (2, 7) to the Fuel Pressure Regulator first then to the Fuel Rail return pipe. Press the Fuel Rail return pipe together with its o-ring into the Fuel Pressure Regulator before pressing the Fuel Pressure Regulator joint with its o-ring into the Fuel Rail. Firmly torque the Fuel Pressure Regulator screws (4, 5) to 8 n.m (71 lb in). Connect one end of atmospheric vent hose to Fuel Pressure Regulator while the other end of fuel return hose/pipe attaches to Fuel Rail. Turn on the ignition for 2 seconds then wait 10 seconds before a final ignition turn on to verify fuel system leaks.
- Q: How to Address Issues with the Fuel Pressure Regulator on Chevrolet S10?A:A technician should start Fuel Pressure Regulator repairs and servicing by uninstalling the upper intake manifold assembly. The first step is to remove the Fuel Pressure Regulator retainer clip. After that, pull and twist the Fuel Pressure Regulator while using a shop towel to absorb fuel that leaks out from the housing. One needs to remove both the regulator seal lower o-ring and the regulator assembly filter plus the regulator seal upper o-ring and regulator seal back up ring from the Fuel Pressure Regulator setup. Protect the Fuel Pressure Regulator housing from contamination by using a cover and discard the applied o-rings. It is vital to replace the Fuel Pressure Regulator only after inspecting and potentially changing the filter screen for any evidence of contamination. Place clean engine oil on the o-rings before inserting the regulator seal back up ring followed by the regulator seal upper o-ring and regulator assembly filter and finally the regulator seal lower o-ring. Install the Fuel Pressure Regulator by placing its vacuum tube facing down inside the regulator retainer clip and then add the Fuel Pressure Regulator retainer clip followed by the upper manifold assembly. Connect the negative Battery Cable while tightening the fuel filler cap. End the check by turning the ignition on twice during a 2-second period followed by a 10-second off interval before turning on again to verify fuel leak presence.


Related Chevrolet Parts
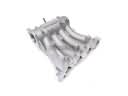 Chevrolet Intake Manifold
 Chevrolet Throttle Body
 Chevrolet Mass Air Flow Sensor
 Chevrolet Air Filter Box
 Chevrolet Air Hose
 Chevrolet Fuel Pump Seal
 Chevrolet Fuel Pump Strainer
 Chevrolet Fuel Pump Wiring Harness
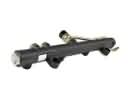 Chevrolet Fuel Rail
 Chevrolet Idle Control Valve
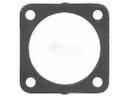 Chevrolet Throttle Body Gasket
 Chevrolet Vapor Pressure Sensor
Browse Chevrolet Fuel Pressure Regulator by Models
Nova S10 Colorado Tahoe Cruze Malibu Camaro Impala SSR Silverado 1500 Silverado 2500 HD Caprice Classic Blazer Tracker El Camino Trailblazer Astro Cavalier Corvette Beretta C1500 C2500 C3500 Corsica Express 1500 Express 2500 Express 3500 G10 G20 G30 K1500 K2500 K3500 Lumina Monte Carlo Prizm Silverado 2500 Venture Lumina APV Silverado 3500 Suburban 1500 Trailblazer EXT Avalanche 1500 Avalanche 2500 C1500 Suburban C2500 Suburban K1500 Suburban K2500 Suburban R1500 Suburban R2500 Suburban R3500 Silverado 1500 Classic Silverado 1500 HD Silverado 3500 HD Spectrum Suburban 2500 V1500 Suburban V2500 Suburban V3500