ChevyParts
My Garage
My Account
Cart
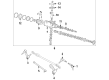
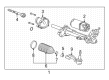
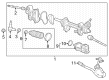
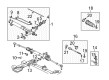
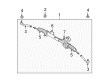
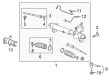
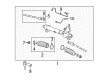
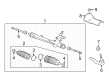
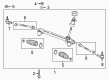
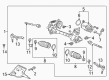
OEM Chevrolet Tie Rod End
Steering Rod End- Select Vehicle by Model
- Select Vehicle by VIN
Select Vehicle by Model
orMake
Model
Year
Select Vehicle by VIN
For the most accurate results, select vehicle by your VIN (Vehicle Identification Number).
98 Tie Rod Ends found


Chevrolet Outer Tie Rod Part Number: 89047756
$129.03 MSRP: $204.88You Save: $75.85 (38%)Ships in 1-2 Business DaysProduct Specifications- Other Name: Rod Kit, Steering Linkage Outer Tie; Steering Tie Rod End; Outer Tie Rod End; Tie Rod End; Rod Kit, Steering Tie Rod Outer
- Position: Outer
- Replaced by: 19418692


Chevrolet Outer Tie Rod, Passenger Side Part Number: 26100287
$103.81 MSRP: $253.32You Save: $149.51 (60%)Ships in 1-2 Business DaysProduct Specifications- Other Name: Rod Kit, Steering Linkage Outer Tie; Steering Tie Rod End; Outer Tie Rod End; Tie Rod End; Rod Kit, Steering Tie Rod Outer
- Position: Outer Passenger Side


Chevrolet Outer Tie Rod, Passenger Side Part Number: 23214216
$44.05 MSRP: $75.63You Save: $31.58 (42%)Ships in 1-2 Business DaysProduct Specifications- Other Name: Rod Assembly-Steering Linkage Outer Tie; Steering Tie Rod End; Outer Tie Rod End; Tie Rod End
- Position: Passenger Side
- Replaced by: 87853957


Chevrolet Outer Tie Rod Part Number: 92198275
$26.35 MSRP: $43.40You Save: $17.05 (40%)Ships in 1-2 Business DaysProduct Specifications- Other Name: Steering Tie Rod End; Outer Tie Rod End; Tie Rod End
- Position: Outer


Chevrolet Outer Tie Rod Part Number: 19352244
$97.05 MSRP: $165.23You Save: $68.18 (42%)Ships in 1-2 Business DaysProduct Specifications- Other Name: Rod Assembly, Steering Linkage Outer Tie; Steering Tie Rod End; Outer Tie Rod End; Tie Rod End
- Position: Outer
- Replaced by: 85819772


Chevrolet Outer Tie Rod, Driver Side Part Number: 26100286
$159.55 MSRP: $253.32You Save: $93.77 (38%)Ships in 1-2 Business DaysProduct Specifications- Other Name: Rod Kit, Steering Linkage Outer Tie; Steering Tie Rod End; Outer Tie Rod End; Tie Rod End; Rod Kit, Steering Tie Rod Outer
- Position: Outer Driver Side


Chevrolet Outer Tie Rod, Passenger Side Part Number: 42769694
$54.72 MSRP: $97.72You Save: $43.00 (44%)Ships in 1-2 Business DaysProduct Specifications- Other Name: Rod Assembly-Steering Linkage Outer Tie; Rod, Steering Tie Rod Outer
- Position: Passenger Side
- Replaces: 42745902

Chevrolet Outer Tie Rod, Driver Side Part Number: 42769693
$54.72 MSRP: $97.72You Save: $43.00 (44%)Ships in 1-2 Business DaysProduct Specifications- Other Name: Rod Assembly-Steering Linkage Outer Tie; Rod, Steering Tie Rod Outer
- Position: Driver Side
- Replaces: 42745901

Chevrolet Outer Tie Rod, Passenger Side Part Number: 22961958
$90.12 MSRP: $154.77You Save: $64.65 (42%)Ships in 1-2 Business DaysProduct Specifications- Other Name: Rod Assembly-Steering Linkage Outer Tie
- Position: Passenger Side
- Replaced by: 87827847

Chevrolet Inner Tie Rod Part Number: 87860044
$48.12 MSRP: $75.37You Save: $27.25 (37%)Ships in 1-2 Business DaysProduct Specifications- Other Name: Rod Assembly-Steering Linkage Outer Tie; Outer Tie Rod; Rod, Steering Tie Rod Outer

Chevrolet Outer Tie Rod Part Number: 19418696
$51.95 MSRP: $126.79You Save: $74.84 (60%)Product Specifications- Other Name: Rod Kit, Steering Linkage Outer Tie; Rod Kit, Steering Tie Rod Outer
- Position: Outer
- Replaces: 26056811, 89047697

Chevrolet Outer Tie Rod Part Number: 93740722
$39.79 MSRP: $97.10You Save: $57.31 (60%)Ships in 1-2 Business DaysProduct Specifications- Other Name: End Assembly, Steering Linkage Tie Rod; Steering Tie Rod End; Outer Tie Rod End; Tie Rod End; End, Steering Tie Rod Outer

Chevrolet Outer Tie Rod Part Number: 19208276
$68.78 MSRP: $118.11You Save: $49.33 (42%)Ships in 1-3 Business DaysProduct Specifications- Other Name: Rod Kit, Steering Linkage Outer Tie; Steering Tie Rod End; Outer Tie Rod End; Tie Rod End; Rod Kit, Steering Tie Rod Outer
- Position: Outer

Chevrolet Outer Tie Rod Part Number: 19149840
$67.28 MSRP: $106.81You Save: $39.53 (38%)Ships in 1-2 Business DaysProduct Specifications- Other Name: Rod Kit, Steering Linkage Outer Tie; Steering Tie Rod End; Outer Tie Rod End; Tie Rod End; Rod Kit, Steering Tie Rod Outer
- Position: Outer
Chevrolet Outer Tie Rod Part Number: 93740723
$58.95 MSRP: $97.10You Save: $38.15 (40%)Ships in 1-2 Business DaysProduct Specifications- Other Name: End Assembly, Steering Linkage Tie Rod; Steering Tie Rod End; Outer Tie Rod End; Tie Rod End; End, Steering Tie Rod Outer

Chevrolet Outer Tie Rod, Passenger Side Part Number: 42820978
$123.15 MSRP: $193.79You Save: $70.64 (37%)Ships in 1-2 Business DaysProduct Specifications- Other Name: Rod Assembly-Steering Linkage Outer Tie; Rod, Steering Tie Rod Outer
- Position: Passenger Side

Chevrolet Outer Tie Rod Part Number: 95371538
$32.32 MSRP: $53.23You Save: $20.91 (40%)Ships in 1-2 Business DaysProduct Specifications- Other Name: Rod Assembly-Steering Linkage Outer Tie; Steering Tie Rod End; Outer Tie Rod End; Tie Rod End; Rod, Steering Tie Rod Outer
- Position: Outer
Chevrolet Outer Tie Rod, Driver Side Part Number: 42820979
$121.32 MSRP: $190.90You Save: $69.58 (37%)Ships in 1-2 Business DaysProduct Specifications- Other Name: Rod Assembly-Steering Linkage Outer Tie; Rod, Steering Tie Rod Outer
- Position: Driver Side

Chevrolet Outer Tie Rod Part Number: 95371539
$32.32 MSRP: $53.23You Save: $20.91 (40%)Ships in 1-2 Business DaysProduct Specifications- Other Name: Rod Assembly-Steering Linkage Outer Tie; Steering Tie Rod End; Outer Tie Rod End; Tie Rod End; Rod, Steering Tie Rod Outer
- Position: Outer

Chevrolet Outer Tie Rod, Passenger Side Part Number: 23449523
$76.86 MSRP: $132.02You Save: $55.16 (42%)Ships in 1-2 Business DaysProduct Specifications- Other Name: Rod Assembly-Steering Linkage Outer Tie; Steering Tie Rod End; Outer Tie Rod End; Tie Rod End; Rod, Steering Tie Rod Outer
- Position: Passenger Side
| Page 1 of 5 |Next >
1-20 of 98 Results
Chevrolet Tie Rod End
Want to cut long-term maintenance and repair costs? Choose OEM Tie Rod End. Those parts deliver top durability you can trust. On our site, you'll find a huge catalog of genuine Chevrolet parts. Prices are unbeatable, so you can keep more in your pocket. Every OEM Chevrolet Tie Rod End includes a manufacturer's warranty. You can also get an easy return policy that keeps buying risk free. Fast delivery, get your car on the road quickly. It's simple to search, compare, and order. Stop guessing about quality or fit. Order today and save with parts that last.
Chevrolet Tie Rod End Parts Questions & Experts Answers
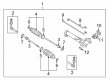
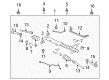
- Q: How to replace the outer tie rod end and inner tie rod assembly on Chevrolet Camaro?A:Begin outer Tie Rod End replacement by removing the cotter pin followed by the hex slotted nut on the outer tie rod assembly . The assembly of the Steering Knuckle requires the universal steering linkage puller (J24319-01) for removing the outer tie rod assembly while the jam nut is loosened on the inner tie rod assembly . Detach the outer tie rod assembly from the inner tie rod assembly as the next step. Before tightening the jam nut , hook up the outer tie rod assembly to the inner tie rod so you can proceed by fitting the outer tie rod assembly to the Steering Knuckle using the hex slotted nut on the outer tie rod stud. Install the hex slotted nut by applying 47 nm (35 ft.lbs.) torque while positioning the cotter pin hole for a final 70 nm (52 ft.lbs.) torque or up to 1/6 additional turn. Never back off the nut before inserting the cotter pin. After inserting the cotter pin through the tie rod stud hole, check that the Rack and Pinion Boot stays untwisted during toe adjustment before making inner tie rod adjustments according to manufacturer guidelines. Complete the adjustment with a hex jam nut torque of 68 nm (50 ft. Lbs.). Begin inner tie rod replacement by removing the Rack and Pinion Boot while maintaining rack alignment to prevent damage. The shock dampener needs detachment from the inner tie rod assembly before sliding it backward onto the rack. Unscrew the rack assembly from the inner tie rod assembly by applying wrenches to the flats of the rack assembly and the inner tie rod housing . Turn the housing counter clockwise to break the connection. First wipe away loctite (R) residue from the rack's threads and inner tie rod threads and then guide the shock dampener back to the rack's front face. Use loctite (R) 262 (or equivalent) to lubricate inner tie rod threads before attaching the inner tie rod to the rack. Use a wrench on the rack's flats along with a torque wrench to tighten the inner tie rod housing to 100 nm (74 ft. Lbs.). Fit the shock dampener over the inner tie rod assembly until it reaches the lowest point then continue with Rack and Pinion Boot reinstallation.
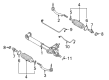
- Q: How to replace the Rack and Pinion Outer Tie Rod End on Chevrolet Impala?A:Before performing replacement of the Rack And Pinion outer Tie Rod End it is essential to lift and secure the vehicle. Start by removing the tire assembly and subsequent detachment of the prevailing torque nut from the outer tie rod assembly followed by unfastening the jam nut from the inner tie rod assembly. Steering linkage joint should not experience damage when you avoid using a wedge to disconnect its parts. A universal steering linkage puller (J 24319-B) should be used for outer tie rod assembly removal from the Steering Knuckle. Proceed with removing the outer tie rod assembly from its connection to the inner tie rod assembly . When installing the components keep the outer and inner tie rod assemblies together using the jam nut but do not over-tighten it. The prevailing torque nut needs to be installed on the outer tie rod assembly before it is secured to the Steering Knuckle through tightening to 30 nm (22 ft. Lbs.) while rotating by 120 degrees until 2 1/2 to 4 1/2 threads extend beyond the nylon washer. The installation ends with a tire and wheel assembly reinstallation followed by vehicle lowering and a front end alignment procedure.
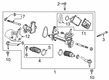
- Q: How to replace the Rack and Pinion Outer Tie Rod End on Chevrolet Malibu?A:The first step towards replacing a Rack And Pinion outer Tie Rod End starts by lifting the vehicle using a stable platform then removing the tire followed by the wheel. First loosen the tie rod jam nut that connects outer to inner parts and remove the prevailing nut between connecting rod and knuckle. Discard that retaining nut. The puppet-like tool known as a pickle fork nor the wedge-type tool should be used to free the ball stud because they risk harming the seal or bushing. Use the tie rod separator (J 24319-B) to break the tie rod connection from the Steering Knuckle before taking the outer tie rod off the inner tie rod. The inner tie rod threads must be cleansed thoroughly before implementing the new outer tie rod attachment. When assembling the new torque prevailing nut on the Steering Knuckle you must maintain control of the ball stud to prevent its rotation. Grab the wheel securely before securing the tire along with installing the wheel. Then reset the front toe.


Related Chevrolet Parts
 Chevrolet Power Steering Pump
 Chevrolet Steering Column
 Chevrolet Drag Link
 Chevrolet Idler Arm
 Chevrolet Steering Angle Sensor
 Chevrolet Ignition Lock Assembly
 Chevrolet Power Steering Assist Motor
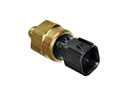 Chevrolet Power Steering Pressure Switch
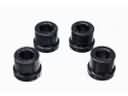 Chevrolet Rack & Pinion Bushing
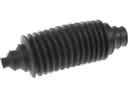 Chevrolet Rack and Pinion Boot
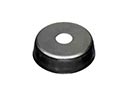 Chevrolet Radius Heat Shield
 Chevrolet Steering Column Seal
Browse Chevrolet Tie Rod End by Models
Nova S10 Colorado C10 Tahoe Cruze Malibu Camaro Equinox Impala SSR Avalanche Silverado 1500 Silverado 2500 HD Caprice Classic Cobalt Suburban Traverse Blazer HHR Sonic Tracker Volt El Camino K10 Spark Trax Trailblazer Astro Cavalier Corvette C20 Aveo Beretta Bolt EUV Bolt EV C1500 C2500 C30 C3500 Celebrity City Express Corsica Express 1500 Express 2500 Express 3500 G10 G20 G30 K1500 K20 K2500 K30 K3500 K5 Blazer Lumina Metro Monte Carlo P30 Prizm S10 Blazer Silverado 2500 Sprint Uplander Venture Lumina APV Silverado 3500 Suburban 1500 Trailblazer EXT Avalanche 1500 Avalanche 2500 Aveo5 C10 Suburban C1500 Suburban C20 Suburban C2500 Suburban Captiva Sport Cruze Limited Impala Limited K10 Suburban K1500 Suburban K20 Suburban K2500 Suburban Malibu Limited P20 R10 R10 Suburban R1500 Suburban R20 R20 Suburban R2500 R2500 Suburban R30 R3500 Silverado 1500 Classic Silverado 1500 HD Silverado 1500 HD Classic Silverado 1500 LD Silverado 1500 LTD Silverado 2500 HD Classic Silverado 3500 Classic Silverado 3500 HD Spark EV Spectrum Suburban 2500 Suburban 3500 HD V10 V10 Suburban V1500 Suburban V20 V20 Suburban V2500 Suburban V30 V3500