ChevyParts
My Garage
My Account
Cart
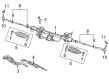
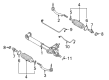
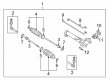
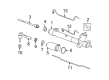
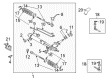
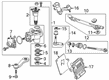
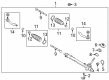
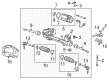
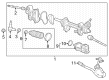
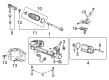
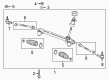
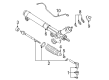
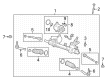
OEM Chevrolet Tie Rod
Steering Tie Rod- Select Vehicle by Model
- Select Vehicle by VIN
Select Vehicle by Model
orMake
Model
Year
Select Vehicle by VIN
For the most accurate results, select vehicle by your VIN (Vehicle Identification Number).
211 Tie Rods found


Chevrolet Outer Tie Rod Part Number: 92286152
$55.74 MSRP: $91.84You Save: $36.10 (40%)Ships in 1-2 Business DaysProduct Specifications- Other Name: Rod Kit, Steering Tie Rod Outer
- Position: Outer
- Replaces: 92280381, 92289862


Chevrolet Outer Tie Rod, Passenger Side Part Number: 26100287
$103.81 MSRP: $253.32You Save: $149.51 (60%)Ships in 1-2 Business DaysProduct Specifications- Other Name: Rod Kit, Steering Linkage Outer Tie; Steering Tie Rod End; Outer Tie Rod End; Tie Rod End; Rod Kit, Steering Tie Rod Outer
- Position: Outer Passenger Side


Chevrolet Outer Tie Rod Part Number: 89047756
$129.03 MSRP: $204.88You Save: $75.85 (38%)Ships in 1-2 Business DaysProduct Specifications- Other Name: Rod Kit, Steering Linkage Outer Tie; Steering Tie Rod End; Outer Tie Rod End; Tie Rod End; Rod Kit, Steering Tie Rod Outer
- Position: Outer
- Replaced by: 19418692


Chevrolet Inner Tie Rod, Green Line Part Number: 15944072
$73.31 MSRP: $120.79You Save: $47.48 (40%)Ships in 1-2 Business DaysProduct Specifications- Other Name: Rod Kit, Steering Linkage Inner Tie; Steering Tie Rod End; Tie Rod End; Rod Kit, Steering Tie Rod Inner
- Position: Inner
- Replaces: 22687091


Chevrolet Inner Tie Rod Part Number: 15221006
$71.84 MSRP: $175.34You Save: $103.50 (60%)Product Specifications- Other Name: Rod Kit, Steering Linkage Inner Tie; Steering Tie Rod End; Tie Rod End; Rod Kit, Steering Tie Rod Inner; Rod Kit, Steering Tie Rod Outer
- Position: Inner
- Replaces: 21011026, 26075038, 26034348


Chevrolet Outer Tie Rod Part Number: 22913602
$105.02 MSRP: $180.37You Save: $75.35 (42%)Ships in 1-2 Business DaysProduct Specifications- Other Name: Rod Kit, Steering Tie Rod Outer; Steering Tie Rod End; Outer Tie Rod End; Tie Rod End
- Position: Outer
- Replaced by: 84467789


Chevrolet Outer Tie Rod, Driver Side Part Number: 42769693
$54.72 MSRP: $97.72You Save: $43.00 (44%)Ships in 1-2 Business DaysProduct Specifications- Other Name: Rod Assembly-Steering Linkage Outer Tie; Rod, Steering Tie Rod Outer
- Position: Driver Side
- Replaces: 42745901

Chevrolet Outer Tie Rod, Driver Side Part Number: 19317050
$65.30 MSRP: $150.76You Save: $85.46 (57%)Ships in 1-3 Business DaysProduct Specifications- Other Name: Rod Kit, Steering Linkage Outer Tie; Steering Tie Rod End; Outer Tie Rod End; Tie Rod End
- Position: Outer Driver Side
- Replaced by: 19318181

Chevrolet Outer Tie Rod, Passenger Side Part Number: 42769694
$54.72 MSRP: $97.72You Save: $43.00 (44%)Ships in 1-2 Business DaysProduct Specifications- Other Name: Rod Assembly-Steering Linkage Outer Tie; Rod, Steering Tie Rod Outer
- Position: Passenger Side
- Replaces: 42745902

Chevrolet Inner Tie Rod Part Number: 19316657
$84.43 MSRP: $150.76You Save: $66.33 (44%)Ships in 1-3 Business DaysProduct Specifications- Other Name: Rod Kit, Steering Linkage Inner Tie; Steering Tie Rod End; Tie Rod End; Rod Kit, Steering Tie Rod Inner
- Position: Inner

Chevrolet Outer Tie Rod, Passenger Side Part Number: 13354598
$99.55 MSRP: $163.99You Save: $64.44 (40%)Ships in 1-2 Business DaysProduct Specifications- Other Name: Rod Kit, Steering Tie Rod Outer; Steering Tie Rod End; Outer Tie Rod End; Tie Rod End
- Position: Outer Passenger Side

Chevrolet Inner Tie Rod Part Number: 87860044
$48.12 MSRP: $75.37You Save: $27.25 (37%)Ships in 1-2 Business DaysProduct Specifications- Other Name: Rod Assembly-Steering Linkage Outer Tie; Outer Tie Rod; Rod, Steering Tie Rod Outer


Chevrolet Outer Tie Rod, Driver Side Part Number: 39008084
$43.65 MSRP: $74.98You Save: $31.33 (42%)Ships in 1-2 Business DaysProduct Specifications- Other Name: Rod Assembly-Steering Linkage Outer Tie; Steering Tie Rod End; Outer Tie Rod End; Tie Rod End; Rod, Steering Tie Rod Outer
- Position: Driver Side

Chevrolet Inner Tie Rod Part Number: 13332651
$53.31 MSRP: $130.08You Save: $76.77 (60%)Ships in 1-2 Business DaysProduct Specifications- Other Name: Rod Kit, Steering Tie Rod Inner; Steering Tie Rod End; Tie Rod End; Outer Tie Rod
- Position: Inner

Chevrolet Outer Tie Rod Part Number: 95371539
$32.32 MSRP: $53.23You Save: $20.91 (40%)Ships in 1-2 Business DaysProduct Specifications- Other Name: Rod Assembly-Steering Linkage Outer Tie; Steering Tie Rod End; Outer Tie Rod End; Tie Rod End; Rod, Steering Tie Rod Outer
- Position: Outer

Chevrolet Inner Tie Rod Part Number: 19207100
$102.26 MSRP: $162.35You Save: $60.09 (38%)Ships in 1-2 Business DaysProduct Specifications- Other Name: Rod Kit, Steering Linkage Inner Tie; Steering Tie Rod End; Tie Rod End; Rod Kit, Steering Tie Rod Inner
- Position: Inner

Chevrolet Outer Tie Rod Part Number: 95371538
$32.32 MSRP: $53.23You Save: $20.91 (40%)Ships in 1-2 Business DaysProduct Specifications- Other Name: Rod Assembly-Steering Linkage Outer Tie; Steering Tie Rod End; Outer Tie Rod End; Tie Rod End; Rod, Steering Tie Rod Outer
- Position: Outer
Chevrolet Outer Tie Rod Part Number: 92286153
$55.59 MSRP: $91.58You Save: $35.99 (40%)Ships in 1-2 Business DaysProduct Specifications- Other Name: Rod Kit, Steering Tie Rod Outer
- Position: Outer
- Replaces: 92289863, 92280383

Chevrolet Inner Tie Rod Part Number: 84326263
$51.80 MSRP: $82.26You Save: $30.46 (38%)Ships in 1-3 Business DaysProduct Specifications- Other Name: Rod Kit, Steering Tie Rod Inner
- Position: Inner

Chevrolet Outer Tie Rod, Driver Side Part Number: 87860040
$48.47 MSRP: $75.94You Save: $27.47 (37%)Ships in 1-2 Business DaysProduct Specifications- Other Name: Rod Assembly-Steering Linkage Outer Tie; Rod, Steering Tie Rod Outer
- Position: Driver Side
| Page 1 of 11 |Next >
1-20 of 211 Results
Chevrolet Tie Rod
Want to cut long-term maintenance and repair costs? Choose OEM Tie Rod. Those parts deliver top durability you can trust. On our site, you'll find a huge catalog of genuine Chevrolet parts. Prices are unbeatable, so you can keep more in your pocket. Every OEM Chevrolet Tie Rod includes a manufacturer's warranty. You can also get an easy return policy that keeps buying risk free. Fast delivery, get your car on the road quickly. It's simple to search, compare, and order. Stop guessing about quality or fit. Order today and save with parts that last.
Chevrolet Tie Rod Parts Questions & Experts Answers
- Q: How to replace the outer tie rod in the steering linkage on Chevrolet Colorado?A:The first step to replace the outer Tie Rod in steering linkage requires you to lift and sustain the vehicle. Begin by removing the tire together with the wheel until you reach and take off the outer Tie Rod retaining nut before discarding it. A wedge should be positioned between the steering linkage joint and its attached part to stop seal damage while maintaining the connection. You will detach the outer Tie Rod from the Steering Knuckle by using tool j 24319-b. The outer Tie Rod needs to be detached from the inner Tie Rod through loosening the jam nut while discarding both the jam nut and the outer Tie Rod. After cleaning the tapered portion of the Steering Knuckle apply suitable chassis lubricant to the threads of the inner Tie Rod before installing the new jam nut on the outer Tie Rod. The procedure starts with linking the inner and outer Tie Rod together before they both connect to the Steering Knuckle. Place a new outer Tie Rod retaining nut then secure it to 45 nm torque (33 lb ft) at 95 degrees while the end jam nut requires a final torque setting of 70 nm (52 lb ft). After placing back the wheel and tire you should lower the vehicle and perform front toe adjustment.
- Q: How to replace the tie rod on ZR2 on Chevrolet S10?A:Start replacing the tie rod of ZR2 models by properly raising and supporting the vehicle until the rear axle reaches curb height. The procedure entails removing the rear tie rod mounting bolt and washers alongside the nut from the frame bracket and axle bracket before extracting the rear tie rod. You should put the new rear tie rod into the frame bracket before installing its bolt and washers and nut to the axle bracket. Install the rear tie rod into the axle bracket first by loosely adding the bolt together with washers and nut to the frame bracket while following fastener precautions. The fitment requires tightening the rear tie rod to axle bracket nut to 61 Nm (45 ft. lbs.) and also the tie rod to frame bracket nut to 61 Nm (45 ft. lbs.). When completing the procedure the vehicle should be lowered after removing the rear axle support.
- Q: How to replace the steering linkage inner tie rod on Chevrolet Tahoe?A:The first step to replace the inner tie rod of the steering linkage requires engineers to dismantle the engine shield when present. The next step involves disconnection of the steering linkage outer tie rod. You should utilize the Inner Tie Rod Wrench (J 34028) to detach the steering linkage inner tie rod from the relay rod. All remnants of oil and grease and other contaminants should be removed from the steering linkage inner tie rod before cleaning its threaded surface with denatured alcohol or equivalent. Allow the surface to dry completely. Load the threads of the steering linkage inner tie rod by coating them with red LOCTITE(TM) threadlocker (GM P/N 12345493, Canadian P/N 10953488). Use the Inner Tie Rod Wrench (J 34028) to screw on the steering linkage inner tie rod to the relay rod before securing it at 100 Nm (74 lb ft). Reinstall both parts which include the steering linkage outer tie rod and any present engine shield. Finally, adjust the front toe.


Related Chevrolet Parts
 Chevrolet Power Steering Pump
 Chevrolet Steering Column
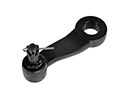 Chevrolet Pitman Arm
 Chevrolet Power Steering Hose
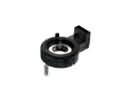 Chevrolet Steering Angle Sensor
 Chevrolet Power Steering Control Valve
 Chevrolet Power Steering Pressure Switch
 Chevrolet Rack & Pinion Bushing
 Chevrolet Shift Interlock Solenoid
 Chevrolet Steering Column Cover
 Chevrolet Tie Rod Adjusting Sleeve
 Chevrolet Upper Steering Column Bearing
Browse Chevrolet Tie Rod by Models
Nova S10 Colorado C10 Tahoe Cruze Malibu Camaro Equinox Impala SS SSR Avalanche Silverado 1500 Silverado 2500 HD Caprice Classic Cobalt Suburban Traverse Blazer HHR Sonic Tracker Volt El Camino K10 Spark Trax Trailblazer Astro Cavalier Corvette C20 Aveo Beretta Bolt EUV Bolt EV C1500 C2500 C30 C3500 Celebrity City Express Corsica Express 1500 Express 2500 Express 3500 G10 G20 G30 K1500 K20 K2500 K30 K3500 K5 Blazer Lumina Metro Monte Carlo P30 Prizm S10 Blazer Silverado 2500 Sprint Uplander Venture Lumina APV Silverado 3500 Suburban 1500 Trailblazer EXT Avalanche 1500 Avalanche 2500 Aveo5 C10 Suburban C1500 Suburban C20 Suburban C2500 Suburban Captiva Sport Citation II Cruze Limited Impala Limited K10 Suburban K1500 Suburban K20 Suburban K2500 Suburban Malibu Limited P20 R10 R10 Suburban R1500 Suburban R20 R20 Suburban R2500 R2500 Suburban R30 R3500 Silverado 1500 Classic Silverado 1500 HD Silverado 1500 HD Classic Silverado 1500 LD Silverado 1500 LTD Silverado 2500 HD Classic Silverado 3500 Classic Silverado 3500 HD Spark EV Spectrum Suburban 2500 Suburban 3500 HD V10 V10 Suburban V1500 Suburban V20 V20 Suburban V2500 Suburban V30 V3500