ChevyParts
My Garage
My Account
Cart
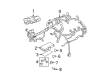
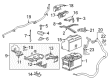
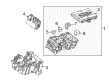
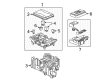
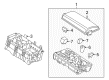
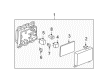
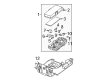
OEM Chevrolet Fuse Box
Fuse Holder Box- Select Vehicle by Model
- Select Vehicle by VIN
Select Vehicle by Model
orMake
Model
Year
Select Vehicle by VIN
For the most accurate results, select vehicle by your VIN (Vehicle Identification Number).
347 Fuse Boxes found


Chevrolet Junction Block Part Number: 20822701
$552.17 MSRP: $994.90You Save: $442.73 (45%)Product Specifications- Other Name: Block; Junction Boxes; Relay Boxes; Fuse Box; Block, Main Wiring Junction And Fuse Block
- Replaces: 25883035, 25821656

Chevrolet Junction Block Part Number: 20927595
$500.39 MSRP: $901.60You Save: $401.21 (45%)Product Specifications- Other Name: Block; Junction Boxes; Relay Boxes; Fuse Box; Block, Main Wiring Junction And Fuse Block


Chevrolet Junction Block Part Number: 20822704
$285.62 MSRP: $512.32You Save: $226.70 (45%)Product Specifications- Other Name: Block, Wiring Junction; Junction Boxes; Relay Boxes; Fuse Box; Block, Main Wiring Junction And Fuse Block
- Replaces: 25798537, 25842705, 25883121, 25883018


Chevrolet Junction Block Part Number: 20822695
$386.00 MSRP: $692.38You Save: $306.38 (45%)Product Specifications- Other Name: Block; Junction Boxes; Relay Boxes; Fuse Box; Block, Main Wiring Junction And Fuse Block

Chevrolet Junction Block Part Number: 20822702
$529.31 MSRP: $836.60You Save: $307.29 (37%)Product Specifications- Other Name: Block; Junction Boxes; Relay Boxes; Fuse Box; Block, Main Wiring Junction And Fuse Block
- Replaces: 25883036


Chevrolet Fuse & Relay Box Part Number: 95442176
$397.43 MSRP: $712.88You Save: $315.45 (45%)Product Specifications- Other Name: Block Assembly-Front Compartment Fuse; Junction Boxes; Fuse Box; Block, Main Wiring Junction And Fuse Block
- Position: Front
- Replaces: 95216200


Chevrolet Distribution Box Part Number: 84335365
$84.94 MSRP: $133.05You Save: $48.11 (37%)Ships in 1-3 Business DaysProduct Specifications- Other Name: Block Assembly-Battery Distribution Fuse; Block, Main Wiring Junction And Fuse Block

Chevrolet Fuse Box Part Number: 84080470
$197.53 MSRP: $310.81You Save: $113.28 (37%)Product Specifications- Other Name: Block; Junction Boxes; Block, Main Wiring Junction And Fuse Block
- Replaces: 23404556

Chevrolet Fuse & Relay Box, Front Part Number: 42677663
$217.00 MSRP: $341.42You Save: $124.42 (37%)Ships in 1-3 Business DaysProduct Specifications- Other Name: Block Assembly-Front Compartment Fuse; Junction Boxes; Fuse Box; Block, Main Wiring Junction And Fuse Block
- Position: Front
- Replaces: 39049713
Chevrolet Fuse & Relay Box, Front Part Number: 42677659
$145.58 MSRP: $292.29You Save: $146.71 (51%)Ships in 1-2 Business DaysProduct Specifications- Other Name: Block Assembly-Front Compartment Fuse; Junction Boxes; Fuse Box; Block, Main Wiring Junction And Fuse Block
- Position: Front
- Replaces: 39049710, 39019637, 39005549, 42571924

Chevrolet Fuse & Relay Box Part Number: 87832674
$106.21 MSRP: $166.33You Save: $60.12 (37%)Ships in 1-2 Business DaysProduct Specifications- Other Name: Block; Block, Wiring Junction

Chevrolet Battery Distribution Engine Compartment Fuse Block Part Number: 84692223
$65.55 MSRP: $102.68You Save: $37.13 (37%)Ships in 1-3 Business DaysProduct Specifications- Other Name: Block Assembly Bat Distribution Eng Compt Fuse; Block, Main Wiring Junction And Fuse Block
- Replaces: 23316249, 84043589, 84131629, 84335366, 23316250

Chevrolet Fuse & Relay Box Part Number: 84144636
$195.02 MSRP: $306.85You Save: $111.83 (37%)Ships in 1-3 Business DaysProduct Specifications- Other Name: Block; Junction Boxes; Fuse Box; Block, Main Wiring Junction And Fuse Block
- Replaces: 84070081, 23411475, 23316254

Chevrolet Engine Compartment Fuse Block Part Number: 84460794
$92.08 MSRP: $144.21You Save: $52.13 (37%)Product Specifications- Other Name: Block Assembly Bat Distribution Eng Compt Fuse; Block, Wiring Junction
- Replaces: 84095550

Chevrolet Fuse & Relay Box, Front Part Number: 20960721
$195.08 MSRP: $258.30You Save: $63.22 (25%)Ships in 1-2 Business DaysProduct Specifications- Other Name: Block Assembly-Front Compartment Fuse; Junction Boxes; Fuse Box; Block, Main Wiring Junction And Fuse Block
- Position: Front


Chevrolet Junction Block Part Number: 20813088
Product Specifications- Other Name: Block Assembly-Body Wiring Harness Junction; Junction Boxes; Relay Boxes; Fuse Box; Block, Wiring Junction
- Replaces: 15174622
Chevrolet Junction Block Part Number: 20822706
$275.44 MSRP: $494.06You Save: $218.62 (45%)Product Specifications- Other Name: Block; Junction Boxes; Relay Boxes; Fuse Box; Block, Main Wiring Junction And Fuse Block
- Replaces: 25842707, 25883123

Chevrolet Junction Block Part Number: 15291746
$159.16 MSRP: $250.42You Save: $91.26 (37%)Product Specifications- Other Name: Block Assembly-Body & Tail Lamp Wiring Harness Junction; Junction Boxes; Fuse Box; Block, Main Wiring Junction And Fuse Block; Block, Body Wiring
Chevrolet Fuse & Relay Box, Front Part Number: 39049709
$137.62 MSRP: $216.54You Save: $78.92 (37%)Product Specifications- Other Name: Block Assembly-Front Compartment Fuse; Junction Boxes; Fuse Box; Block, Main Wiring Junction And Fuse Block
- Position: Front
- Replaces: 39005548

Chevrolet Junction Block Part Number: 25882989
Product Specifications- Other Name: Block; Junction Boxes; Fuse Box; Block, Main Wiring Junction And Fuse Block
- Replaces: 15838750
| Page 1 of 18 |Next >
1-20 of 347 Results
Chevrolet Fuse Box
Want to cut long-term maintenance and repair costs? Choose OEM Fuse Box. Those parts deliver top durability you can trust. On our site, you'll find a huge catalog of genuine Chevrolet parts. Prices are unbeatable, so you can keep more in your pocket. Every OEM Chevrolet Fuse Box includes a manufacturer's warranty. You can also get an easy return policy that keeps buying risk free. Fast delivery, get your car on the road quickly. It's simple to search, compare, and order. Stop guessing about quality or fit. Order today and save with parts that last.
Chevrolet Fuse Box Parts Questions & Experts Answers
- Q: How to replace the underhood fuse box on Chevrolet Equinox?A:The first task before replacing the underhood electrical center or junction block involves disconnecting the negative Battery Cable. To start the procedure disconnect the negative Battery Cable first so remove accessory wiring junction block underhood cover after undoing the fuse block nut to separate positive Battery Cable connections together with eps cable. The technician should loosen the bolts found at the top of the fuse block to raise it from the connectors before removing the i/p connectors. Separate each of the three 68-way connectors through proper up-pull action from the fuse block case and the forward lamp 68-way connector and engine 68-way connector and i/p 68-way connector . Each 68-way connector must be placed back into its assigned location until it reaches the desired position inside the fuse block and then it should be firmly seated. After correctly attaching the i/p connectors the service technician must tighten bolts found on the fuse block top while securing underhood accessory wiring junction block harness retaining bolts using 4 n.m torque (35 lb in). Use the nut to connect the positive Battery Cable with eps at the end of the fuse block before tightening it to 17 n.m (13 lb ft). Then install the Fuse Box cover and reconnect the negative Battery Cable.
- Q: How to replace the rear Fuse Box on Chevrolet Malibu?A:The first step to replace the rear electrical center or junction block requires disconnecting the battery negative cable. The procedure for gmc envoy xl requires left second row seat removal but chevrolet trailblazer and gmc envoy users need to set their left second row seat to cargo position. The process begins with opening the rear electrical cover after which technicians remove the battery terminal nut from the junction block allowing them to extract the Body Control Module (BCM) from the same area. Before proceeding remove the junction block from the block base by first unlatching its tabs then loosening its retaining bolts from the electrical connectors. Remove the Instrument Panel Harness Connector, mobile telephone harness connector, Body Wiring Harness Connector and console harness connector and headliner harness connector from the junction block. Remove all retaining nuts that fasten the floor studs to the block base then remove the base from the floor panel. To install the procedure requires setting the block base onto floor studs before tightening retaining nuts to 10 n.m (88 lb in). Safely connect the mobile telephone harness connector to the junction block base together with Instrument Panel Harness Connector and console harness connector and Body Wiring Harness Connector and headliner harness connector . Secure the junction block onto the block base then bead it down with three bolts which require tightening to 3.5 n.m (31 lb in). Thebcm installation at the rear electrical center includes connecting the junction block battery feed terminal nut while tightening it to 10 n.m and restoring the center cover. When working on chevrolet trailblazer or gmc envoy vehicles position the left second row seat into a passenger state while gmc envoy xl owners should replant their left second row seat. Reconnect the battery negative cable as the final step.
- Q: How to Replace a Fuse Box in the IP Wiring Harness Junction Block on Chevrolet Tahoe?A:The procedure starts with disconnecting the negative Battery Cable(s). Next remove the right side end panel before proceeding. Disconnect all wiring connectors attached to the front part of ip junction block before unclipping the harness from its fastener. To remove the ip wiring harness junction block squeeze its two retaining clips and pull it out toward the rear. The lower ip light bulb requires counterclockwise twisting and then rearward removal. The ip wiring harness junction block needs to be slipped through a hole in the ip while all wiring connectors must be detached from its rear section before extracting it from the vehicle. Insert every wire connector to the back of the ip wiring harness junction block then guide it through the ip hole. Connect the lower ip light bulb through clock-wise bulb socket rotation combined with bulb pushing in before doing the same for the ip wiring harness junction block connection to the ip through clip pressure application leading to a sealed connection. To complete the installation, install the right side end panel then reattach the negative Battery Cable(s) while connecting wiring connector(s) to the front of the ip wiring harness junction block.


Related Chevrolet Parts
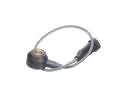 Chevrolet Knock Sensor
 Chevrolet Antenna
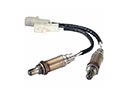 Chevrolet Oxygen Sensor
 Chevrolet Instrument Cluster
 Chevrolet Coolant Temperature Sensor
 Chevrolet Ignition Control Module
 Chevrolet Shift Solenoid
 Chevrolet Speedometer
 Chevrolet Door Lock Switch
 Chevrolet Parking Assist Distance Sensor
 Chevrolet Seat Heater Pad
 Chevrolet Washer Pump
Browse Chevrolet Fuse Box by Models
Colorado Tahoe Cruze Malibu Camaro Equinox Impala SS SSR Avalanche Silverado 1500 Silverado 2500 HD Caprice Cobalt Suburban Traverse Blazer HHR Sonic Tracker Volt Spark Trax Trailblazer Cavalier Corvette Aveo Bolt EUV Bolt EV C1500 C2500 C3500 City Express Corsica Express 1500 Express 2500 Express 3500 K1500 K2500 K3500 Metro Monte Carlo Prizm Silverado 2500 Uplander Silverado 3500 Suburban 1500 Avalanche 1500 Avalanche 2500 Aveo5 C1500 Suburban C2500 Suburban Captiva Sport Cruze Limited Impala Limited K1500 Suburban K2500 Suburban Malibu Limited Silverado 1500 Classic Silverado 1500 HD Silverado 1500 HD Classic Silverado 1500 LD Silverado 1500 LTD Silverado 2500 HD Classic Silverado 3500 Classic Silverado 3500 HD Spark EV Suburban 2500