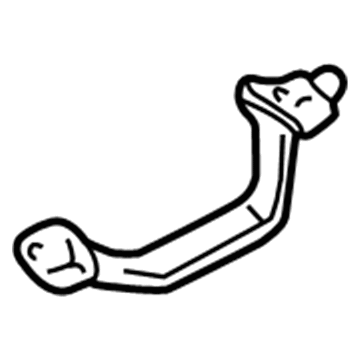
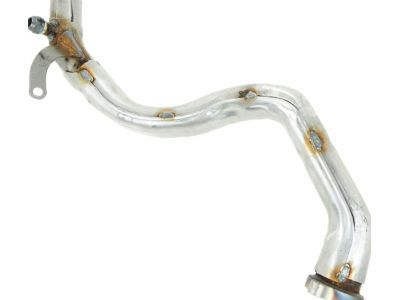
Make sure this part fits

GM 12564240
Exhaust Pipe

1996-2011 GM

Customer Questions & Expert Answers (32)
GM 12564240 Exhaust Pipe
  • Part Description
    Pipe, Exhaust Pipe
  • Position
    Front
  • Replaces
    12556489
  • Manufacturer
    General Motors
Make sure this part fits
$61.91 MSRP: $92.15
You Save: $30.24 (33%)
Currently Unavailable

Due to manufacturer supply shortage, this item isn't currently available for ordering.

  • Related Parts
  • Product Specifications
  • Vehicle Fitment
  • Customer Questions & Expert Answers
  • Product Specifications

    BrandGenuine GM
    Manufacturer Part Number12564240
    Part DescriptionPipe, Exhaust Pipe
    Other NamesCrossover Pipe; Front Pipe; Cross Over Pipe
    Item Dimensions26.3 x 14.2 x 5.4 inches
    Item Weight7.50 Pounds
    PositionFront
    ConditionNew
    Fitment TypeDirect Replacement
    Replaces12556489
    ManufacturerGeneral Motors
    SKU12564240
    WarrantyThis genuine GM part is guaranteed by GM's factory warranty.
    Shipping & ReturnShipping Policy Return Policy
    Warning: California's Proposition 65
  • Vehicle Fitment

    Year Make Model Trim Engine
    2006-2011 Buick LucerneCXL, CXS, Super8 Cyl 4.6 L GAS
    2006-2011 Cadillac DTSBase, Livery, Luxury, Platinum, Premium8 Cyl 4.6 L GAS
    1996-2005 Cadillac DeVilleBase, Concours, d'Elegance, DHS, DTS, Protection Series8 Cyl 4.6 L GAS
    1996-2002 Cadillac EldoradoBase, ESC, ETC8 Cyl 4.6 L GAS
    1996-2004 Cadillac SevilleSLS, STS8 Cyl 4.6 L GAS
    2001-2003, 1996-1999 Oldsmobile AuroraBase8 Cyl 4.0 L GAS
    2004-2005 Pontiac BonnevilleGXP8 Cyl 4.6 L GAS
  • Customer Questions & Expert Answers

    Q:
    Is this 12564240 designed for my car? Posted by ChevyPartsGiant Specialist
    A:
    Please Select Your Vehicle model to see if part number 12564240 is suitable before ordering.
    Posted by ChevyPartsGiant Specialist
    Q:
    How to replace the catalytic converter (L26/3.8L) on Buick Lucerne? Posted by Customer
    A:
    The first step in Catalytic Converter (L26/3.8L) replacement requires vehicle elevation. First disconnect the heated Oxygen Sensor electrical connector then unscrew the stud nuts which secure the Catalytic Converter pipe before removing its gasket. Before you detach the Catalytic Converter nuts and Catalytic Converter itself and Catalytic Converter gasket you must support the exhaust system. Before installation of new ho2s perform an inspection of the Exhaust Manifold surfaces along with the gasket mating areas on the exhaust pipe. For installation, first, install the ho2s. The flexible coupling in the Catalytic Converter assembly demands converter support and strictly limits rear vertical motion between 6-degree upward or downward positions. Attach a fresh gasket to each exhaust pipe stud afterward you can put in the Catalytic Converter and support it properly. Fix the Catalytic Converter nuts at 60 n.m (44 lb ft) of torque. The next step involves mounting new sparse gaskets to the Catalytic Converter pipe alongside its stud nuts before tightening everything to 35 n.m (26 lb ft). Use a wrench to detach the exhaust system support then connect the ho2s electrical connector before checking for exhaust leaks and underbody contact and finishing by lowering the vehicle.
    Posted by ChevyPartsGiant Specialist
    Q:
    How to replace the exhaust crossover pipe (RPO L26/3.8L) with an Exhaust Pipe on Buick Lucerne? Posted by Customer
    A:
    The replacement process of exhaust crossover pipe (RPO L26/3.8L) starts by taking off the intake manifold cover followed by the air cleaner outlet duct. Remove the secondary air injection (AIR) feed tube when it exists on your vehicle. To start the process the power brake booster heat shield nuts should be taken out with the heat shield following. Detach the exhaust crossover pipe bolts and studs while removing the exhaust crossover from the engine space where you will discard the old exhaust crossover pipe seal. Position the new exhaust crossover pipe seal inside the pipe before installing the crossover into its position. Tighten the exhaust crossover pipe bolts and studs at 18 N.m (13 lb ft). Reinstall the power brake booster heat shield while securing its nuts to a torque of 20 N.m (15 lb ft). Followed by the AIR feed tube reinstallation, install the air cleaner outlet duct before placing the intake manifold cover.
    Posted by ChevyPartsGiant Specialist
    Q:
    How to replace the oxidation catalytic converter on Buick Lucerne? Posted by Customer
    A:
    Begin by raising and supporting the vehicle before starting Catalytic Converter replacement work. The cut point should be marked on the converter outlet pipe at 36 mm (1.4 in) distance behind the oxidation Catalytic Converter weld. Use wrenches to cut through the converter outlet pipe at your specified mark and disconnect the oxidation Catalytic Converter to Muffler assembly nuts. You must pull the Muffler assembly backward to free up space before removing the oxidation Catalytic Converter from the vehicle while discarding the gasket. When installing the system users should slide the 2 service clamps onto the oxidation Catalytic Converter outlet pipe but should avoid tightening the clamp. A fresh gasket must be placed between the two catalytic converters and the exhaust system may need minor adjustment for proper fitting between the Catalytic Converter and Muffler assembly. After installing the oxidation converter between the Muffler and three-way converter, torque its nuts to 47 nm (35 lb ft). Position the clamps along the Catalytic Converter output pipe's middle section with opposite facing directions and keep them as close together as possible. Check the alignment of the oxidation Catalytic Converter with the Muffler assembly while tightening the clamps to 54 nm (40 lb ft). Drop the vehicle to the ground then conduct an exhaust leak inspection.
    Posted by ChevyPartsGiant Specialist
    Q:
    How to replace a catalytic converter on Buick Lucerne? Posted by Customer
    A:
    To replace the Catalytic Converter, firstly, lift and support the vehicle while holding the exhaust system near the resonator with an appropriate jack. Does this mean, disconnect the Oxygen Sensor leaving the electrical connector behind, undo the nuts that support the Catalytic Converter to the exhaust manifold pipe and the bolts that support centerexhaust hangers to rear suspension support brackets. Remove the Catalytic Converter from manifold pipe and lower down the exhaust system. Get rid of the catalytic gasket and make sure it cannot be used again and cut the midsize pipe 34 mm (1.3 in) from the resonator weld. For installation, slide service clamps no. 2 over the Catalytic Converter assembly outlet pipe without any tightening. Position the o2 sensor boss on the right side of the vehicle and slide the Catalytic Converter assembly outlet pipe over the intermediate pipe and place a new Catalytic Converter Gasket over Catalytic Converter studs. Lift the exhaust system into place which aligns the Catalytic Converter with the exhaust manifold pipe and install the nuts; hold them but do not tighten them to the Catalytic Converter to the exhaust manifold pipe. Tighten the bolts holding the center exhaust hangers to the rear suspension support brackets to 30 n.m (22 lb ft). Next, remember to tighten the Catalytic Converter nuts in a crisscross manner to 25 n.m (18 lb ft); remove the jack from under the vehicle and identify the service clamps midway the Catalytic Converter assembly outlet pipe, closely together, rotating them till the fastening area points toward each other. Finally, do the tightening on the service clamps to 54 n.m (40 lb ft), lower the vehicle, and look for leaks on the exhaust system.
    Posted by ChevyPartsGiant Specialist
    Q:
    How to replace the Front Exhaust Pipe on Cadillac DTS? Posted by Customer
    A:
    Replacing the front Exhaust Manifold pipe starts by removing both the rear Exhaust Manifold pipe and the transaxle along with the front Exhaust Pipe to Exhaust Manifold bolts . You must first disconnect the front Exhaust Pipe from its bolts to the Exhaust Manifold. The exhaust gas recirculation (EGR) valve inlet pipe features a crush seal connection at the water pump housing that should be replaced when removing it. First disconnect the egr inlet pipe nut from the front Exhaust Manifold pipe before you can remove the front Exhaust Manifold pipe to lower crankcase bolt and front Exhaust Manifold pipe to cylinder head stud to extract the front Exhaust Manifold pipe itself. Users must eliminate the front Exhaust Manifold pipe seal from the left Exhaust Manifold before removing its Exhaust Manifold flange retainer. Install the retainer together with a new front Exhaust Manifold pipe seal on top of the left Exhaust Manifold. Afterwards thread in the front Exhaust Manifold pipe. Affix the front Exhaust Manifold pipe to cylinder head stud before tightening it to 25 n.m (18 lb ft) while also securing the front Exhaust Manifold pipe to lower crankcase bolt at the same torque value. Reinstall the egr inlet pipe nut on the front Exhaust Manifold pipe by tightening it to 60 n.m (44 lb ft). Next install the front Exhaust Pipe to Exhaust Manifold bolts with a torque of 25 n.m (18 lb ft). Gather all components before placing the transaxle together with the rear Exhaust Manifold pipe.
    Posted by ChevyPartsGiant Specialist
    Q:
    How to replace the catalytic converter heat shield on Cadillac DeVille? Posted by Customer
    A:
    To remove the Catalytic Converter heat shield, first remove the exhaust system also considering wearing eye protection in order to avoid injury during the process of drilling rivets. Drill the center of the heat shield rivets, then pull down on the heat shield, to disengage it from the retaining stud, slide it to the left, out from under the oxygen sensor wiring harness heat shield. Position the heat shield when installing by sliding it to the right for fitting under the oxygen sensor wiring harness heat shield, pressing it up for the retaining stud and matching the holes of the heat shield with those of the floor panel. Make use of a rivet gun to attach the oxygen sensor wiring harness heat shield and the Catalytic Converter heat shield on the floor panel using a single rivet and install the remainder of the rivets and lastly fixing the exhaust system back.
    Posted by ChevyPartsGiant Specialist
    Q:
    How to service the exhaust pipe on Cadillac Eldorado? Posted by Customer
    A:
    Service operations on the Exhaust Pipe require lifting the vehicle to proper support position. The first step entails removing the exhaust downpipe by unfastening the nuts which connect it to the Catalytic Converter and subsequently unfastening the four bolts holding it to the Exhaust Manifold before pulling out the exhaust downpipe. Placing the exhaust downpipe correctly in position starts the procedure before securing it using four bolts on the Exhaust Manifold without tightening them. After positioning the Catalytic Converter bolts to its correct location install the nuts. Secure the Catalytic Converter bolts with torque of 24 nm (18 ft.lbs.) while following the fastener notice in service precautions. Proceed to tighten both right exhaust downpipe bolts connected to Exhaust Manifold at 40 nm torque (30 ft. Lbs.) while tightening left exhaust downpipe bolts at 40 nm torque (30 ft. Lbs.). The parallel orientation between converter flanges and Exhaust Manifold rear pipe needs inspection; straighten the Exhaust Manifold rear pipe by adjusting its bolt position if necessary. Finally, lower the vehicle.
    Posted by ChevyPartsGiant Specialist
    Q:
    How to replace the rear exhaust pipe on Cadillac DeVille? Posted by Customer
    A:
    The first step to replace the rear exhaust manifold pipe involves both vehicle elevation and support mechanisms. The 4 nuts holding the Catalytic Converter to the exhaust manifold rear pipe need to be unfastened. The exhaust system needs to be pushed toward the back of the vehicle until all studs in front of the Catalytic Converter can pass the exhaust manifold rear pipe. Sever the Catalytic Converter Gasket by removing it but refrain from incorporating it as an original component. The first step is to separate the exhaust manifold rear pipe from its right exhaust manifold connections using 2 bolts and then disconnect the 2 bolts which hold the exhaust manifold rear pipe to the exhaust manifold front pipe. The exhaust manifold rear pipe with the gasket and exhaust manifold pipe seal together with exhaust manifold flange seal retainer need to be taken out from their respective locations on the front Exhaust Pipe and rear Exhaust Pipe. A new exhaust manifold pipe seal should be positioned along with the exhaust manifold flange seal retainer onto the exhaust manifold rear pipe flange before inserting the 2 retaining bolts through the flange and into the retainer and finger tightening them for seal retention. Apply a new gasket onto the exhaust manifold rear pipe flange before inserting the 2 retaining bolts which will pass through both the gasket and the flange. The exhaust manifold rear pipe must be placed around the exhaust manifold front pipe before it reaches the right exhaust manifold. Screw in the 2 exhaust manifold rear pipe attaching bolts to the right exhaust manifold while tightening them to 40 nm (30 ft. Lbs.). After that tighten the 2 left exhaust manifold rear pipe to exhaust manifold flange seal retainer bolts to 25 nm (18 ft. Lbs.). Position the new Catalytic Converter Gasket at the converter studs and install the converter onto the exhaust manifold rear pipe by tightening its 4 nuts to 25 nm (18 ft. Lbs.). Finally, lower the vehicle.
    Posted by ChevyPartsGiant Specialist
    Q:
    How to service and repair the exhaust crossover exhaust pipe on Cadillac Eldorado? Posted by Customer
    A:
    Service and repair of the exhaust crossover pipe starts by eliminating the transaxle assembly from the vehicle. The first step requires removal of the two bolts located on the left side Exhaust Manifold combined with the exhaust front pipe. Service the crossover pipe by removing first the bolt that connects it to both the crankcase and the Cylinder Head followed by taking out the egr supply tube and pipe. Before crosspipe installation start by placing the two flange seals onto the crossover pipe while maintaining loose connection of the lh Exhaust Manifold joint. Secure the front Exhaust Pipe using hand torque on support bolts (1,3). Refer to manual for torque values to tighten Cylinder Head support bolt and crankcase support bolt . After installing the egr supply pipe you must fasten its nut to 60 nm (44 ft. Lbs.). The installation requires final tightening of left hand Exhaust Manifold bolts to 30 nm (22 ft. Lbs.) before finally reinstalling the transaxle assembly.
    Posted by ChevyPartsGiant Specialist
    Q:
    How to replace the catalytic converter heat shield on Cadillac Eldorado? Posted by Customer
    A:
    Ensuring safety, keeping in mind considerations on the hot exhaust system and removing the parts of the exhaust, step to replace the Catalytic Converter heat shield. Start by removing the exhaust system and then undo the four bolts that hold the Catalytic Converter heat shield to the floor panel and exit the heat shield. For installation put on the new Catalytic Converter heat shield on the floor panel align the holes of it with the threaded holes on the panel. Mount the four bolts to fix the heat shield, locking them at 6 nm (53 inch lbs.) and finally installing the exhaust system.
    Posted by ChevyPartsGiant Specialist
    Q:
    How to service and repair the Exhaust Pipe on Cadillac Seville? Posted by Customer
    A:
    The first step for Exhaust Pipe servicing involves raising a vehicle before providing necessary support. First remove up to two nuts from the Catalytic Converter to exhaust downpipe connection then unfasten the four bolts holding down the exhaust downpipe to Exhaust Manifold before extracting the exhaust downpipe. Begin installation by fixing the exhaust downpipe onto the Exhaust Manifold through all of its four bolts but refrain from tightening them right away. Start by putting on the nuts which secure the Catalytic Converter to the exhaust downpipe followed by tightening the Catalytic Converter bolts to 24 nm (18 ft. Lbs.). When doing this task follow the fastener notice in service precautions. The installation requires torqueing the exhaust downpipe to Exhaust Manifold bolts to 40 nm (30 ft. Lbs.) for both right bolts along with equal torque for left bolts. Check that converter and Exhaust Manifold rear pipe flanges are in perfect alignment; adjust the Exhaust Manifold rear pipe positioning through a process of exercising its bolts then shifting it into proper position. Finally, lower the vehicle.
    Posted by ChevyPartsGiant Specialist
    Q:
    What should be connected next for the 2009 Cadillac DTS? Posted by Customer
    A:
    Connect the EGR inlet pipe nut to the front exhaust manifold pipe and tighten it to 60 Nm (44 lb ft).
    Posted by ChevyPartsGiant Specialist
    See expert answers on similar Exhaust Pipe
    Q:
    What is the final step in the process for the 2006 Buick Lucerne? Posted by Customer
    A:
    Reinstall the air cleaner outlet duct and the intake manifold cover.
    Posted by ChevyPartsGiant Specialist
    See expert answers on similar Exhaust Pipe
    Q:
    What should be done after installing the exhaust crossover pipe for the 2010 Buick Lucerne? Posted by Customer
    A:
    Install the exhaust crossover pipe nuts and tighten them to 20 Nm (15 lb ft).
    Posted by ChevyPartsGiant Specialist
    See expert answers on similar Exhaust Pipe
    Q:
    What is the first step to replace the exhaust crossover pipe (RPO L26) for the 2007 Buick Lucerne? Posted by Customer
    A:
    Begin by removing the intake manifold cover and the air cleaner outlet duct.
    Posted by ChevyPartsGiant Specialist
    See expert answers on similar Exhaust Pipe
    Q:
    What is crucial to apply to the HO2S threads before installation for the 2006 Buick Lucerne? Posted by Customer
    A:
    Apply a special anti-seize compound, consisting of liquid graphite and glass beads, to the HO2S threads before installation; if reinstalling an old sensor, coat the threads with anti-seize compound GM P/N 12377953 or equivalent.
    Posted by ChevyPartsGiant Specialist
    See expert answers on similar Catalytic Converter
    Q:
    How do you remove the oxidation catalytic converter for the 2009 Buick Lucerne? Posted by Customer
    A:
    Gently move the muffler assembly rearward to obtain clearance and remove the oxidation catalytic converter from the vehicle, discarding the gasket.
    Posted by ChevyPartsGiant Specialist
    See expert answers on similar Catalytic Converter
    Q:
    What is the next step after securing the front exhaust manifold pipe for the 2002 Cadillac DeVille? Posted by Customer
    A:
    Install the nut securing the coil cassette ground wire to the cylinder head, tightening it to 17 Nm (13 ft. lbs.).
    Posted by ChevyPartsGiant Specialist
    See expert answers on similar Exhaust Pipe
    Q:
    What is the torque specification for the rear exhaust manifold pipe to exhaust manifold bolts for the 2007 Cadillac DTS? Posted by Customer
    A:
    Tighten to 40 N.m (30 lb ft).
    Posted by ChevyPartsGiant Specialist
    See expert answers on similar Exhaust Pipe
    Q:
    What should be ensured during the installation of the replacement catalytic converter for the 2003 Cadillac DeVille? Posted by Customer
    A:
    Take care not to overextend the heated oxygen sensor pigtail.
    Posted by ChevyPartsGiant Specialist
    See expert answers on similar Catalytic Converter
    Q:
    What is the final step in the process for the 2008 Cadillac DTS? Posted by Customer
    A:
    Install the front exhaust pipe to exhaust manifold bolts and tighten them to 25 N.m (18 lb ft), then reinstall the transaxle and the rear exhaust manifold pipe.
    Posted by ChevyPartsGiant Specialist
    See expert answers on similar Exhaust Pipe
    Q:
    How should the exhaust system be positioned during the process for the 2002 Cadillac Eldorado? Posted by Customer
    A:
    Position the exhaust system rearward to allow the studs in front of the catalytic converter to clear the exhaust manifold rear pipe.
    Posted by ChevyPartsGiant Specialist
    See expert answers on similar Exhaust Pipe
    Q:
    What bolts need to be removed to take out the crossover pipe for the 2000 Cadillac DeVille? Posted by Customer
    A:
    Remove the bolt securing the crossover pipe to the crankcase, the nut securing the ignition module ground wire to the cylinder head, and the bolt securing the crossover pipe to the cylinder head.
    Posted by ChevyPartsGiant Specialist
    See expert answers on similar Exhaust Pipe
    Q:
    What is the final step in the process for the 2006 Cadillac DTS? Posted by Customer
    A:
    Reinstall the transaxle and the rear exhaust manifold pipe.
    Posted by ChevyPartsGiant Specialist
    See expert answers on similar Exhaust Pipe
    Q:
    What is the next step after removing the transaxle for the 2010 Cadillac DTS? Posted by Customer
    A:
    Take out the front exhaust pipe to exhaust manifold bolts.
    Posted by ChevyPartsGiant Specialist
    See expert answers on similar Exhaust Pipe
    Q:
    What is the next step after removing the exhaust system for the 2000 Cadillac Eldorado? Posted by Customer
    A:
    Position the new exhaust system to the vehicle, ensuring to adhere to the Fastener Notice in Service Precautions.
    Posted by ChevyPartsGiant Specialist
    See expert answers on similar Catalytic Converter
    Q:
    How should the bolts securing the front exhaust manifold pipe to the left exhaust manifold be tightened for the 2001 Cadillac DeVille? Posted by Customer
    A:
    Tighten them to 25 Nm (18 ft. lbs.).
    Posted by ChevyPartsGiant Specialist
    See expert answers on similar Exhaust Pipe
    Q:
    How should the retaining bolts be inserted during installation for the 2004 Cadillac Seville? Posted by Customer
    A:
    Insert the 2 retaining bolts through the flange into the retainer, finger tightening them to hold the seal and retainer in place.
    Posted by ChevyPartsGiant Specialist
    See expert answers on similar Exhaust Pipe
    Q:
    What should be removed after the front exhaust manifold pipe for the 2002 Cadillac Seville? Posted by Customer
    A:
    Remove the exhaust manifold flange retainer.
    Posted by ChevyPartsGiant Specialist
    See expert answers on similar Exhaust Pipe
    Q:
    What bolts need to be removed to take out the crossover pipe for the 2000 Cadillac Seville? Posted by Customer
    A:
    Remove the bolt securing the crossover pipe to the crankcase, the nut securing the ignition module ground wire to the cylinder head, and the bolt securing the crossover pipe to the cylinder head.
    Posted by ChevyPartsGiant Specialist
    See expert answers on similar Exhaust Pipe
    Q:
    What must be replaced if the EGR valve inlet pipe is disconnected for the 2001 Cadillac Seville? Posted by Customer
    A:
    The EGR valve inlet pipe must be replaced due to its crush seal connection.
    Posted by ChevyPartsGiant Specialist
    See expert answers on similar Exhaust Pipe
    If you have any questions about this product, please don't hesitate to ask us. We will be happy to help you!

OEM GM 12564240, Excellent Performance and Perfect Fitment

To ensure reliability, purchase GM part # 12564240 Exhaust Pipe. It is sometimes referred to as GM Catalytic Converter, GM Exhaust Pipe. Choosing OEM parts is the optimal decision for guaranteeing superior quality and perfect performance. These components undergo stringent quality checks and are carefully constructed to comply with GM's factory specifications, ensuring a smooth installation process.

ChevyPartsGiant.com is a leading supplier of genuine GM parts such as GM 12564240 Exhaust Pipe. Our website boasts an extensive inventory of OEM GM parts, available at highly competitive prices in the market. Should you require any new genuine GM parts, rest assured we will deliver them swiftly and efficiently to your doorstep. Furthermore, all our parts come with the assurance of a manufacturer's warranty. For detailed Cadillac parts information, click here.
Choose ChevyPartsGiant for discounted prices, exceptional service and fast delivery